With Blackboard Learn, you can use any theory or model for teaching your online course because it's open, flexible, and centered on student achievement.
Even if you're new to online instruction, you can create a basic course in a short amount of time. You can start with a week or two of materials and add more later.
We've compiled some tips and basic steps for the novice Blackboard Learn instructors who want to learn how to create content in an online course. We want to help you with the high-level principles and processes involved when you build a course from the ground up.
As you work through this topic, choose what fits your teaching style and the needs of your students.
After you complete the basic steps, you'll have a course ready for students! But first, you need to determine which course view you'll build your course in. Then, you can zero in on the specific steps and info you need. Already know your course view? Then let's go!
You can also check out our Quick Start topic that details the basics of course building.
Determine your course view
Based on which experience your institution has chosen, you may have the flexibility to choose how your course appears in Blackboard Learn.
Experience: Describes how the interface outside a course looks and which features and navigation appear. Your institution may choose the Original experience or the Ultra experience.
You have the Original experience if your name appears in the upper-right corner of your window after you log in. You navigate to other system areas from the tabs in the page header.
Your interface might have different colors, logos, tabs, tools, and names that are specific to your institution. For example, your institution can rename the My Institution tab to match your institution's name or remove a tab or tool entirely.


You have the Ultra experience if your name appears in the left panel of your window after you log in. You can navigate to core features outside of your courses from the list. Access the activity stream that captures all the action in your courses and the grades page that shows all your grading tasks organized by course.
Unlike the Original experience, the Ultra experience looks similar at every institution. You may see some institutional branding, such as colors and logos.

Course view: Describes how your course looks and which features, tools, and navigation are available. Your courses may appear in the Original Course View, the Ultra Course View, or a mix of both.

If your institution has the Original experience, your courses can appear only in the Original Course View.
If your institution has the Ultra experience, you may be able to offer a mix of both course views. However, your institution can limit your course view to only one. If you're allowed to have two course views, choose the course view that works best for each of your courses. Both course views appear seamlessly in your course list.
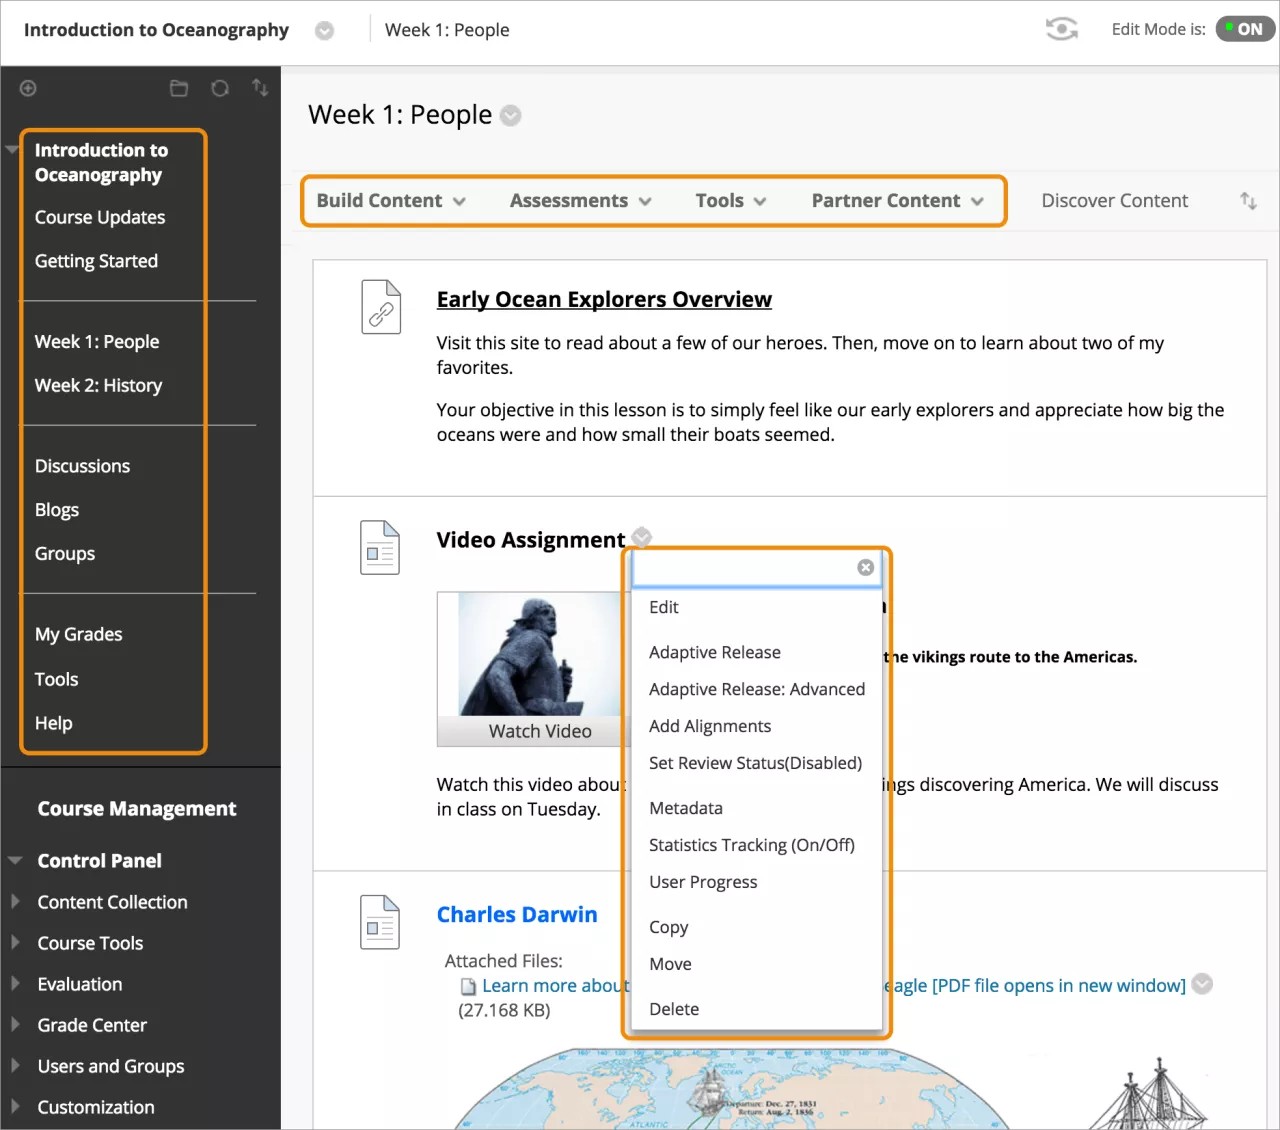
Original Course View
The Original Course View includes all of the traditional workflows and depth of functions Blackboard Learn is known for.
The course menu appears on the left side of your window and is the cornerstone for the organization and navigation of your course. You create links on the course menu to present tools and materials to students.
The area after the course menu is the Control Panel. You can access the Grade Center and your file repository, and choose which course tools are available to your students. Students don't see the Control Panel.
Your content appears in the main window to the right of the course menu. You use the functions above the main window to add content, such as Build Content and Assessments. Throughout your course, most items and tools have menus.
More on the Original Course View
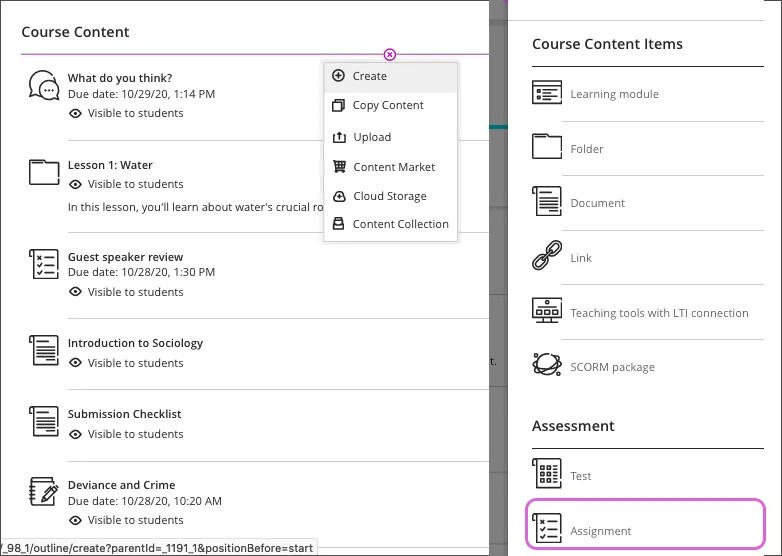
Ultra Course View
In the Ultra Course View, you have simplified workflows, a modern look and feel, and a fully responsive interface on all devices.
On the Course Content page, select the plus sign wherever you want to create content. In a new, blank course, use the functions to add content, such as Create and Upload. Select the icons on the navigation bar to open frequently used tools, such as discussions.
All of your course content appears in the main part of the page. You can always see the left navigation area that peeks from behind layers.
Most content items, such as folders and assignments, have a menu with options. When you open a piece of content, it slides out in a layer on top of the Course Content page. Close layers to go back to a previous spot in your course.
If you've enabled conversations on content, activity icons appear for new conversation activity. The activity icon also appears on discussions, and on tests and assignments where you've enabled group conversations.
Basic steps
After you complete the first four basic steps, you'll have a course ready for students! Evaluation is a step that should happen continually.
- Make a plan
- Create content
- Preview and feedback
- Make content available to students
- Evaluate your course
1. Make a plan
Planning is one of the most important aspects in course creation. Take the time to develop an outline or sketch of the items and activities you want to include in your course. Make an inventory of any materials that are "web-ready" or that you can modify easily. Most likely, you'll need to create some new materials to use in your online course.
Sometimes, you can't have all of your content ready by the first day of class. You can prepare content for the first few weeks of class and make only that content available to students. Hide all the content that you still want to work on. You can develop the next portion of content as students work on the material you've made available.
2. Create content
We've compiled a list of some essential materials you may want to add to your first course. Use the links to other topics to explore the types of content and find the step-by-step instructions.
- Welcome your students: Let students know you are glad they're here. An inviting tone-somewhat informal, but still professional-is equivalent to a smile and a greeting to a student who walks through the door in a traditional class. You want to include specific instructions on how to begin the course. For example, if they need to review the syllabus first, tell them how to access it. You can create a basic piece of content or send a message with instructions.
- Course information: In one area or folder, provide materials that students can access throughout the term.
- Syllabus, including goals, objectives, textbook information, and your contact info
- Grading guidelines, late work policies, and where to access grades in your course
- Topic or lesson schedule and a reminder that due dates appear on the course calendar
- Technical support and institutional policies
- Lectures, readings, files, and multimedia: Include all the materials that students need to develop a basic knowledge of the topic or lesson. To provide your students with an easy-to-navigate and familiar environment, create a consistent structure for each topic or lesson. You might create a folder for each segment. You can include similar content, such as objectives, readings, instructions, web resources, multimedia, and your lectures. You want to create manageable chunks of content and add visual and auditory elements.
- Assignments and tests: Start with simple warm-up assignments that build confidence and prepare students for more challenging work in the weeks ahead. You can also provide students with an ungraded quiz so that they can become familiar with the interface. You can create your assignments and tests alongside the content students need to prepare or organize them in folders.
- Participation and interaction: To build a successful online community, students need the tools to interact and have conversations, such as in discussions and blogs. Through conversation, we learn about each other, ourselves, the topic, how to get along, and make group decisions.
3. Preview and feedback
You want to be confident that your course is well designed and functions as intended-before your students see it. If possible, view your course on different computers with different browsers and operating systems. You also want to be sure multimedia appears as you want. You might also check your course on smaller devices to see if it appears as you expect.
You can invite a student or colleague to preview your course. When you discover issues early, you'll receive fewer messages from students who can't find materials.
- Was navigation intuitive? Is content logically organized and chunked?
- Can they locate assignments and tests?
- Do they know how to communicate with you and their classmates?
- Were they able to download documents, open media, find the syllabus and where grades will appear?
4. Make content available
As you create content, you'll probably continue to edit, delete, and move materials around. Experiment! Try different ways to present content. You can hide items if you don't want students to see them. You can also move content to a folder and hide the folder from students.
When you're ready, only show students the content you want them to see right now.
Another good practice is to move the newest content to the top of the content list. Then, students don't have to hunt for the content they need or miss your latest content additions.
More on making content available
5. Evaluate your course
As you build your course, you'll undoubtedly jump back and forth between development and evaluation. Evaluation should be an ongoing component of the process and not the final step in the development of your course. Backtracking to review and revisit isn't only acceptable but preferable.
Evaluation can come in several forms.
- Continue to refine and add to your course as you teach it and discover what works well and what didn't.
- Ask students to submit evaluations of your course at the end of the term.
- Ask other online instructors what works well for them.
- Explore other online courses. Always be willing to "steal from the best!"
- Visit the Blackboard Exemplary Course Program which showcases pedagogically sound and technologically rich courses.