Oppilaitoksesi määrittää, mitkä työkalut ovat käytettävissä alkuperäisessä kurssinäkymässä. Otsikot ovat aina kouluttajien käytettävissä Ultra-kurssinäkymässä.
Rubrics can help ensure consistent and impartial grading and help students focus on your expectations.
A rubric is a scoring tool you can use to evaluate graded work. When you create a rubric, you divide the assigned work into parts. You can provide clear descriptions of the characteristics of the work associated with each part, at varying levels of skill.
Students can use a rubric to organize their efforts to meet the requirements of the graded work. When you allow students access to rubrics before they complete their work, you provide transparency into your grading methods.
Watch a video about creating rubrics
The following narrated video provides a visual and auditory representation of some of the information included on this page. For a detailed description of what is portrayed in the video, open the video on YouTube, navigate to More actions, and select Open transcript.
Video: Create rubrics shows how to create a rubric for assessing and grading student work.
Create a rubric
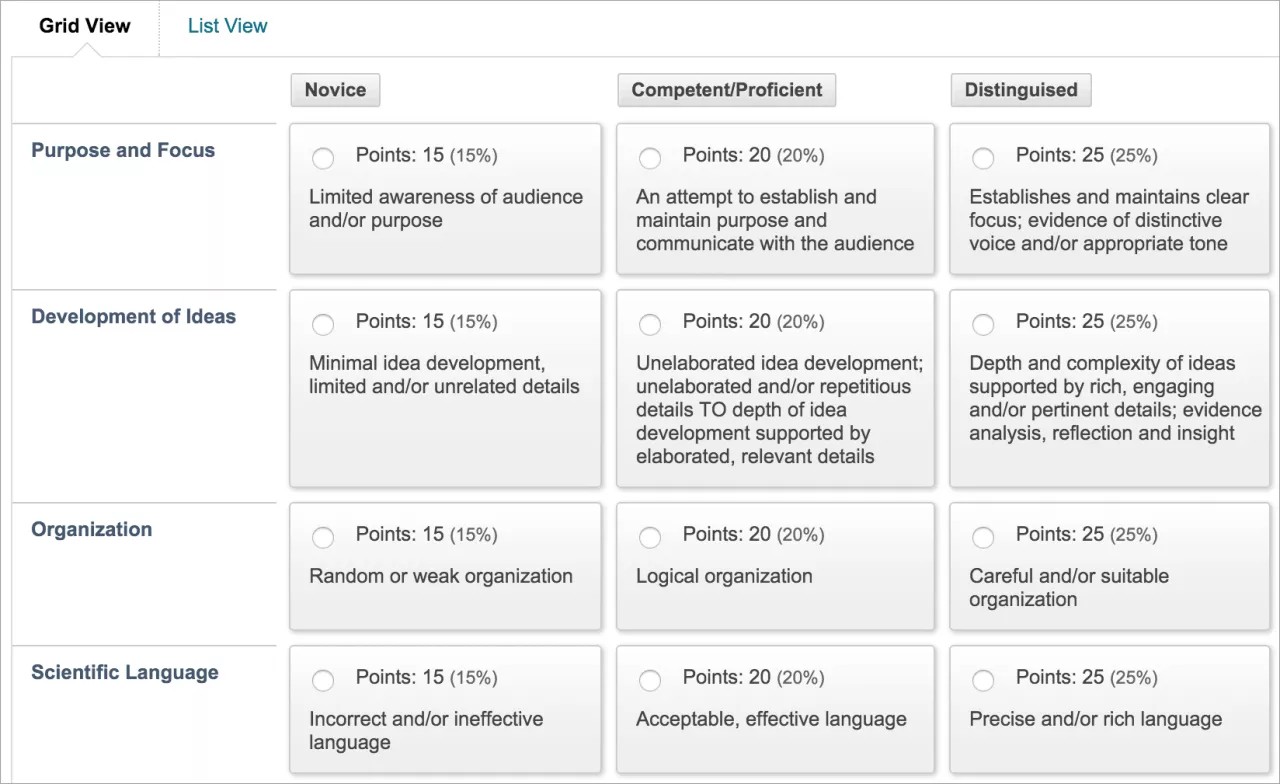
You can create multiple rubrics in your course. Rubrics consist of rows and columns. The rows correspond to the criteria. The columns correspond to the level of achievement that describes each criterion. New rubrics have three rows and three columns.
After you create rubrics, you can associate them with content.
Control Panel > Course Tools > Rubrics
- On the Rubrics page, select Create Rubric. Type a title and optional description.
- Select Add Row to add a new criterion to the bottom of the grid.
- Select Add Column to add a new level of achievement to the grid.
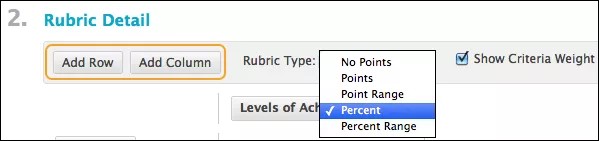
- Choose a Rubric Type from the menu:
- No Points: Provide feedback only.
- Points: Each level of achievement has a single point value.
- Point Range: Each level of achievement has a range of values.
- Percent: Each item's possible points determines the percentage.
- Percent Range: Each level of achievement has a range of values. When you grade, you select the appropriate percentage level for a particular level of achievement. The system calculates the points earned by multiplying the weight x achievement percentage x item points.
- To change a row or column's title, access a heading's menu and select Edit. Type the new title and select Save.
- Type a point or percentage value for each row and column.
- Type a description for the criterion and the associated level of achievement. Each cell has a 1,000-character limit.
- Select Submit.
You can reorder rows and columns. Select the Criteria or Levels of Achievement heading, which opens a reorder panel.
After you use a rubric for grading, you can't edit it. You can copy the rubric to create a duplicate rubric you can edit.
Percentage-based rubrics
When you choose a percent-based rubric, select from these options:
- Show Criteria Weight check box: Show or hide criteria weights. If you add more rows when weights are hidden, weights for new criteria are distributed equally.
- Balance Weights: Use after you add a new row to keep all criteria weighted equally. If you want individual criteria weighting, type percentages for each criterion. You must select the Show Criteria Weight check box for Balance Weights to appear.
The total weight for all criteria must equal 100%. No row may have a 0% weight. At least one level of achievement must have a value of 100%.
Watch a video about associating rubrics
The following narrated video provides a visual and auditory representation of some of the information included on this page. For a detailed description of what is portrayed in the video, open the video on YouTube, navigate to More actions, and select Open transcript.
Video: Associating Rubrics shows how to associate a rubric with a gradable content item.
Associate a rubric
You can associate rubrics with these types of gradable content:
- Assignments
- Essay, Short Answer, and File Response test questions
- Blogs and journals
- Wikis
- Discussion forums and threads
You can also associate a rubric with any non-calculated Grade Center column. For example, you can associate a rubric with a manually created column for class participation and use the rubric to grade participation. Access a column's menu and select Edit Column Information.
To associate a rubric, access the Add Rubric menu and choose one of these options:
- Select Rubric from those you've created.
- Create New Rubric opens a window so you can create a rubric.
- Create From Existing uses an existing rubric as a template to create a new rubric.
In the Type column, you can designate a rubric as Used for Grading or Used for Secondary Evaluation. If you associate multiple rubrics, you can use only one as the primary grading rubric.
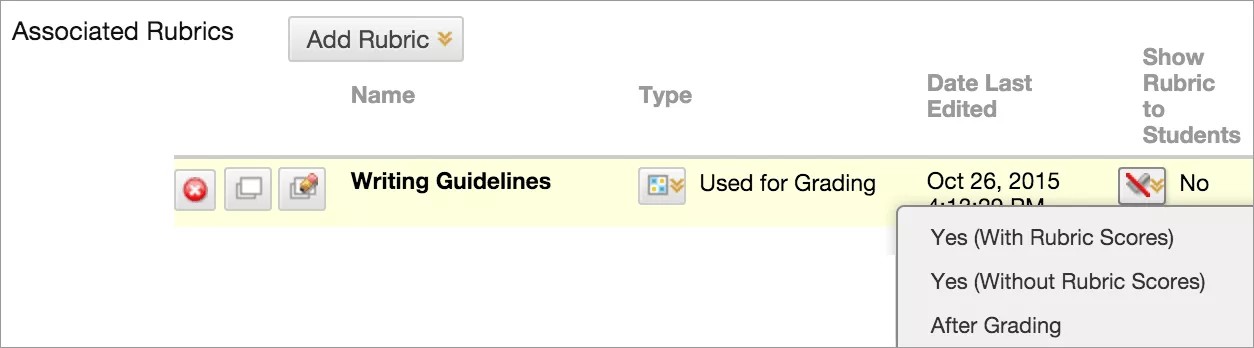
Show Rubric to Students has four options for rubric visibility:
- No: Students can't view the rubric.
- Yes (With Rubric Scores): Students can view the rubric when you make the item available, including possible point or percentage values.
- Yes (Without Rubric Scores): Students can view the rubric when you make the item available, but they can't see the possible point or percentage values.
- After Grading: Students can view the rubric only after you've finished grading their submissions.
For a percent-based rubric, type the points possible. For a points-based rubric, you're prompted to use the rubric's point value as the item's possible points.
Point values for test questions are handled in the main test or pool canvas. Both point and percent-based rubrics adjust their calculations to match the assigned point value for the test question. Questions you've associated with a rubric appear with the rubric icon next to the points box.

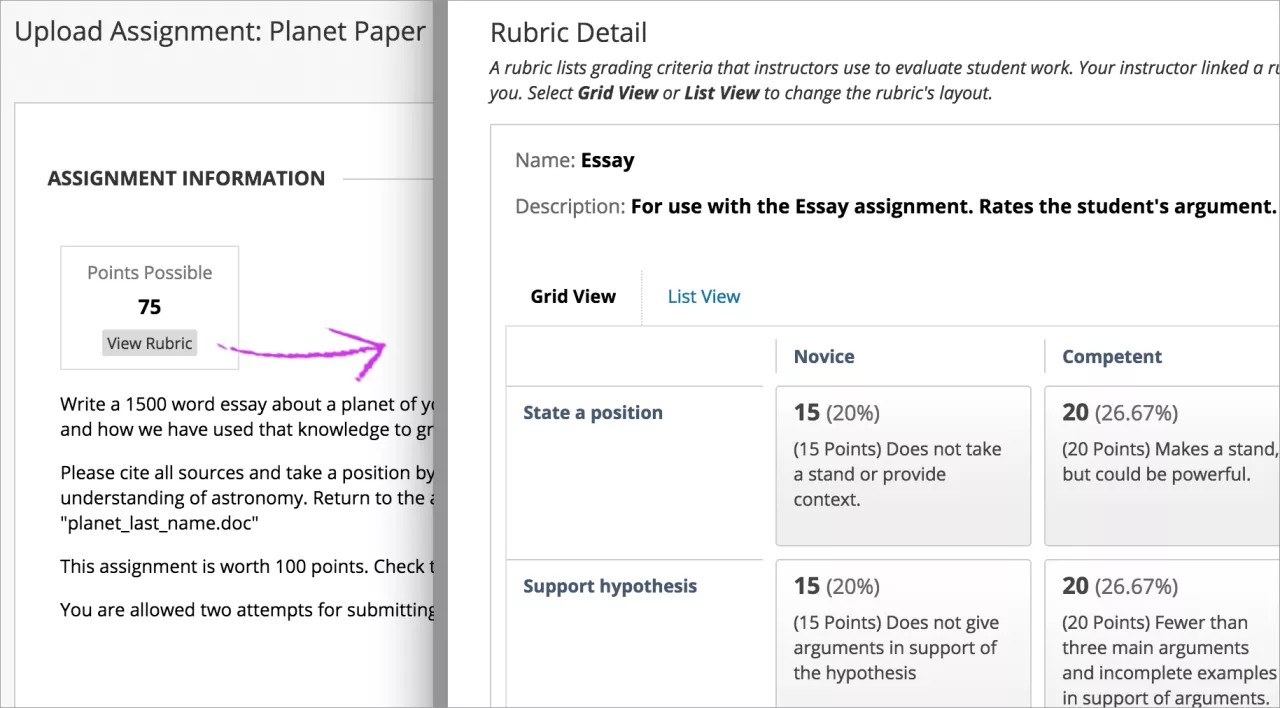
Student view of content with a rubric
Students can select View Rubric and view the grading criteria before they submit their work. They can move the rubric window next to the content so they can view the instructions alongside the criteria.
In the rubric's List View, if you didn't select an option for a criterion and then typed feedback, the feedback wasn't saved when you saved the rubric.
For an assignment
For a test question

Manage rubrics
Access a rubric's menu to edit, copy, or delete the rubric. You can also View Associated Content to view the items a rubric is associated with.
You can copy a rubric if you have a similar gradable item for your students that will use the same criteria. You can keep the settings and rename the rubric. You can also copy a rubric when you want to edit a rubric that's in use. A copy is created with the same title and the number 1 added: "Introductory Speech(1)."
Manage associated rubrics
When you edit an item with an associated rubric, you can change the rubric's options.
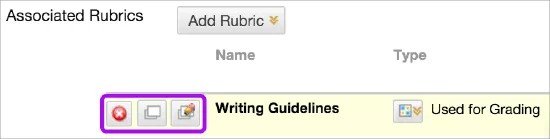
In the Associated Rubrics section, you have these management functions:
- Remove Rubric Association removes the connection to a rubric but doesn't delete the rubric itself. You can remove a rubric from an assessment you've graded and the grades will remain. The grades are no longer associated with the rubric, but now appear as grades you added manually.
- View Rubric opens a preview you can't edit, with a link to view associated items and print the rubric.
- Edit Rubric opens the associated rubric so you can edit it. If you've already used the rubric for grading, you can't edit it.