Nämä tiedot koskevat vain alkuperäistä kurssinäkymää. Oppilaitoksesi määrittää, mitkä työkalut ovat käytettävissä.
You can select which tools are available in your course and determine if guests and observers can access them. For example, if you won't use the course messages tool, make it unavailable. No one can see it or access it, including you, until you make it available again. On the Tool Availability page, available tools are listed alphabetically.
Your institution can turn off select tools, making those tools unavailable for use in your courses. Your institution can also remove your ability to choose who has access to select tools.
For the tools you make available in your course, you can add links to them on the course menu and in course areas. If you add the Tools area to your course menu, students see all the tools that you have made available on one page.
Watch a video about setting tool availability
The following narrated video provides a visual and auditory representation of some of the information included on this page. For a detailed description of what is portrayed in the video, open the video on YouTube, navigate to More actions, and select Open transcript.
Video: How to turn tools on and off in a course shows you how to set tool availability in your course.
Tool availability settings
On the Control Panel, expand the Customization section and select Tool Availability. Select or clear the check boxes of the tools you want to use in your course and which users will have access to these tools.
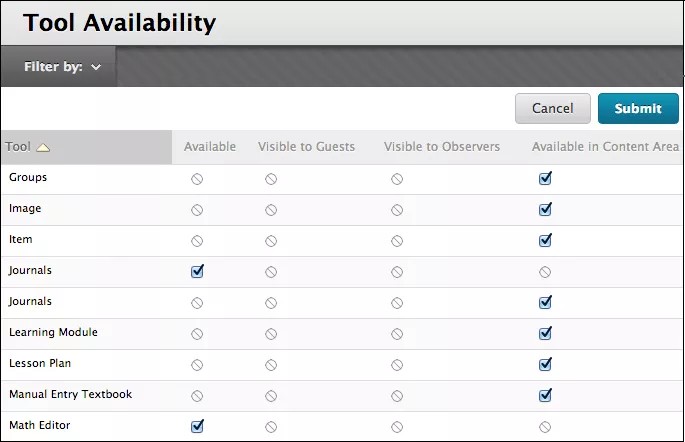
- Available: The tool is available throughout your course and open to all users that have a role permitting the use of the tool, such as instructors, students, teaching assistants, and graders.
- Visible to Guests: The tool is visible (read-only), but not usable to guests when guests are permitted in your course.
- Visible to Observers: The tool is visible (read-only), but not usable to observers when observers are permitted in your course.
- Available in Content Areas: You can place a link to a tool in one or more content areas in your course.
Circle with diagonal line: Your institution made the tool unavailable, or it's unavailable in the system.
If tools are made unavailable after a period of being available, either at the course level by you or at the system level by your institution, no content is deleted from the system. If the tools are made available again, the existing content remains and becomes accessible.
Filter the display
Select Filter by to sort the table based on availability status for the tool and for the role users have in a course. Filtering makes it easier to see which tools are available and visible, and change settings based on those criteria.
About building blocks
If your institution has licensed any building blocks, they appear in the list of tools on the Tool Availability page.
Email settings
Your institution controls which tools are available.
When you enable the Email tool in your course, you can control which sender options are available to students.
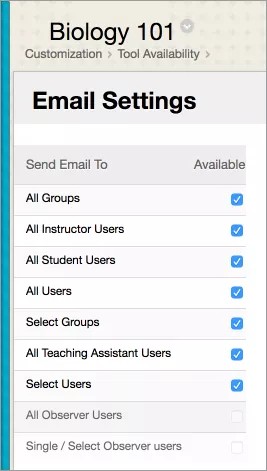
In the menu next to Email on the Tool Availability page, select Email Settings. You can decide whether students have the ability to email certain groups of users in your course, such as instructors, teaching assistants, or course groups. Use these settings to help prevent email misuse in your course.
Students who have opted out of email in their Privacy Settings won't receive email from other students, even if the All Users, Select Users, or Select Groups options are allowed.
The settings you choose here don't affect your ability to send email in a course. Your institution may restrict which options are available. Unavailable options are shown in the list, but appear grey and the check box is disabled.