What Does the Editor Do?
Where does the editor appear?
Doesn't seem familiar? Jump to the "Ultra" help about finding the editor.
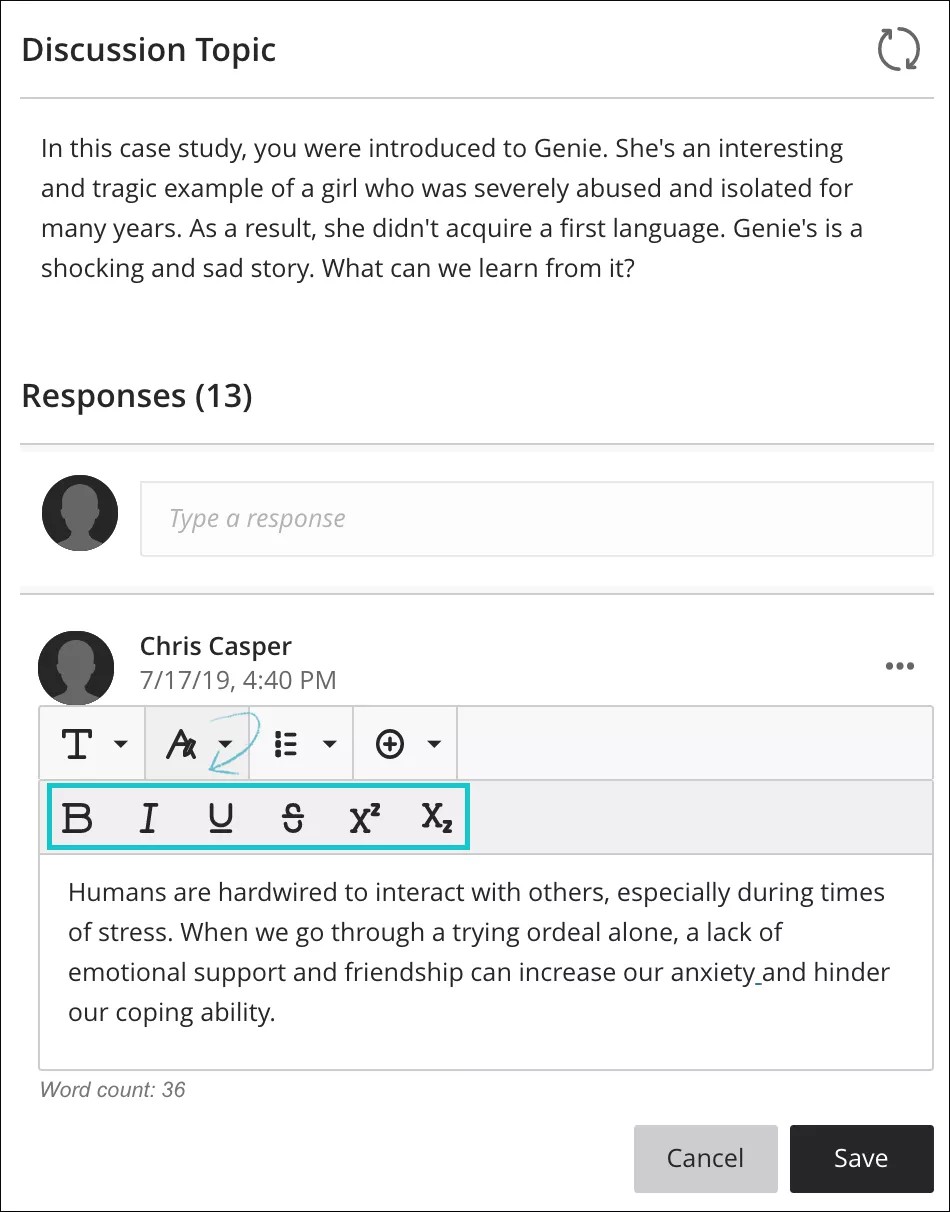
With the editor, you can add and format text, attach files, embed multimedia, and insert equations, links, and tables. Use the options in the editor when you work in assignments, tests, discussions, journals, blogs, wikis, and more.
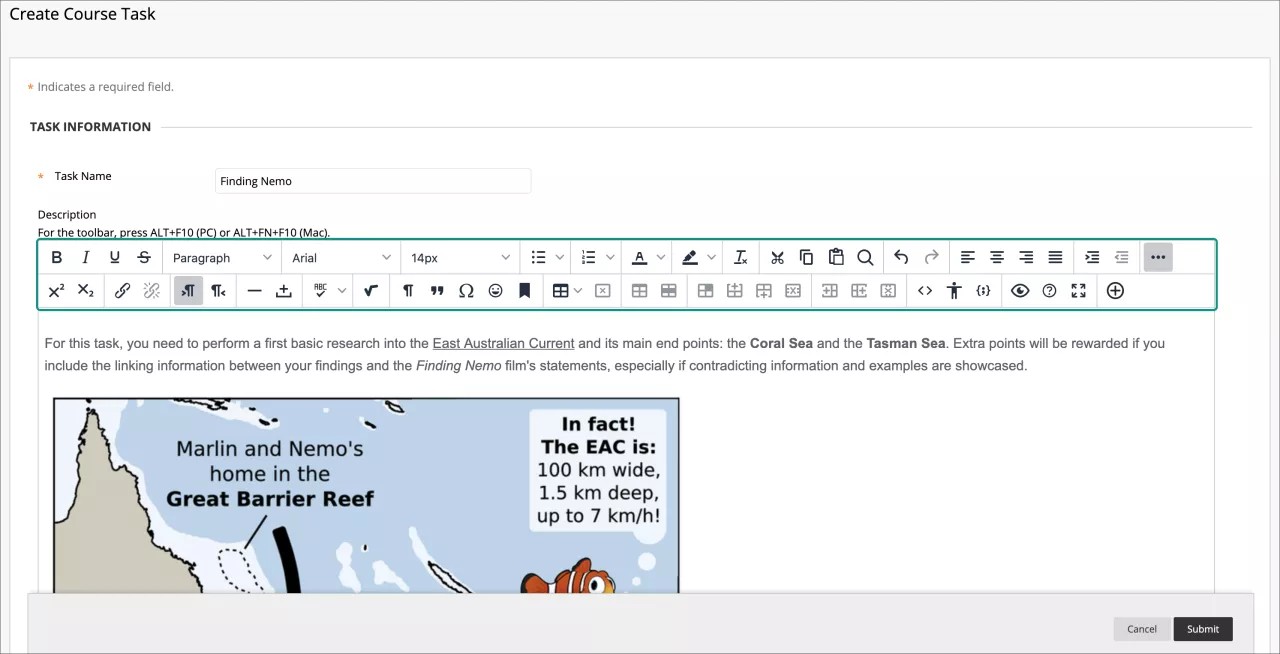
To use your keyboard to jump to the editor toolbar, press Alt + F10. On a Mac, press Fn + OPT + F10. The focus is placed on the first icon on the left in the top row. Use the right and left arrow keys to move forward and backward. The up and down arrows don't work to navigate to different rows. Use the arrow keys to move to the end of one row and then up or down to the next available row.
Editor icons and options
Doesn't seem familiar? Jump to the "Ultra" help about options in the editor.
Each editor option is represented by an icon. Some options include a menu of options.
Select the three-doted More icon, at the right end of the first row, to show only the most used text options. Some options appear in different rows when you expand or collapse the editor rows.

Unavailable options appear grayed out. For example, the Remove Link option is available only after you select text or an object that already contains a link in the text box. The options for modifying t a table will become active only when a table is created and selected.
Institutions and instructors can disable the spell checker and the math editor options.
Row 1
| Options | Description |
|---|---|

|
Bold or remove this style on the selected text. |

|
Italicize or remove this style on the selected text. |

|
Underline or remove this style on the selected text. |

|
Strikethrough: Display text with a horizontal line through the letters. |

|
Select a paragraph style for the text from the list. |

|
Select the font face for the text from the list of all available fonts. |
|
Select the size of the text from a list. |

|
Create a bullet list. |

|
Create a numbered list. |
|
Select the text color from the color swatch box. |

|
Select the text highlight color. The color appears as a background. |
|
|
Remove all formatting so that only plain text appears. |

|
Cut the selected items. |

|
Copy the selected items. |

|
Paste the most recently copied or cut items. |

|
Search for and replace text. |

|
Undo the previous action. |

|
Redo the previous action-only if an action has been undone. |

|
Align text to the left margin. |

|
Align text in the center. |

|
Align text to the right. |

|
Align text to both the left and right margins. |

|
Increase indent: Move the text or object to the right. Select again to indent further. |

|
Decrease indent (Outdent): Move the text or object to the left. Select again to outdent further. You can't outdent text beyond the left margin. |

|
Expand the editor options: Shows more or less options, depending on the current state of the editor panel. |
Row 2
| Options | Description |
|---|---|

|
Superscript: Make the selected text appear slightly above your regular text or remove this style on the selected text. |

|
Subscript: Make the selected text appear slightly below your regular text or remove this style on the selected text. |

|
Select text or an object, and select the Insert/Edit Link icon to add a new link or edit an existing link. You can specify a link to a website, a file from your computer, or the course's file repository, such as the Content Collection. |

|
Remove a hyperlink from the selected text or object. |

|
Add text to the left of the current mouse pointer location. |

|
Add text to the right of the current mouse pointer location (default). |

|
Add a thin horizontal line to the current mouse pointer position, which spans the entire width of the text area. |

|
Insert a non-breaking space character at the current mouse pointer position. |

|
Begin the automatic spell checker. You can select a different language from the list. |

|
Open the visual math equation editor page. |

|
Show all nonprinting characters. Select the icon again to hide them from view. |

|
Format the text as a block quote. |

|
Open the Select Special Character window. Select a symbol to insert at the current mouse pointer position. |

|
Open the Insert Emoticon window. Select the emoticon to insert at the current mouse pointer position. |

|
Use anchors to position other items and objects, such as images. Position the mouse pointer where you want the anchor to appear and open the Insert/Edit Anchor window. |
|
Open the Insert/Edit Table window. If you select the icon while inside a table, a new table is created inside the first one. |
| Delete the table currently selected. | |
| Open the Table Properties window. | |

|
Open the Table Row Properties window. |

|
Open the Table Cell Properties window. |

|
Insert a blank row in the table above the current mouse pointer position. |

|
Insert a blank row in the table after the current mouse pointer position. |

|
Delete the current row from the table. If you select multiple rows, all are deleted. |

|
Insert a blank column in the table to the left of the current mouse pointer position. |

|
Insert a blank column in the table to the right of the current mouse pointer position. |

|
Delete the current column from the table. If you select multiple columns, all are deleted. |

|
Open the Source code window to directly edit the code. This feature is included for experienced web developers. |
| Open the Accessibility checker window: show detected accessibility issues. | |
| Insert / edit code sample: insert code from various programming languages, including HTML/XML, JavaScript, CSS, PHP, Ruby, Python, Java, C, C# and C++. This feature is included for experienced web developers. | |

|
Open a preview window to view how your content will appear when you submit. |

|
Open the editor help window. |

|
Expand the editor window to fill the browser window. |
|
Add content: add and insert different types of content including content from the Content Collection, Blackboard Collaborate, Digication, Flickr, SlideShares and YouTube. |
ULTRA: Where does the editor appear?
The editor appears in most places you can add text. You can use the editor to add and format text, embed images, attach files, and insert equations, links, and tables.
If you view the editor on a smaller screen, select the plus icon or the icons with arrows to view their dropdown menu or their second row options.
Use the options in the editor when you work in assignments, tests, discussions, messages, conversations, journals, and more.

When you open the editor on a smaller screen, the options condense into menus or second line menus that will remain open until you select the menu again or select a different option menu, for easy access:
To use your keyboard to jump to the editor toolbar, press Alt + F10. On a Mac, press Fn + ALT + F10. The focus is placed on the first icon on the left in the top row. Use the right and left arrow keys to move forward and backward. The up and down arrows don't work to navigate to different rows. Use the arrow keys to move to the end of one row and then up or down to the next available row.
ULTRA: Editor icons and options
Each editor option is represented by an icon. Some options include a menu of options.
ultra_editor_alignmentOptions| Icons | Options | Description |
|---|---|---|
|
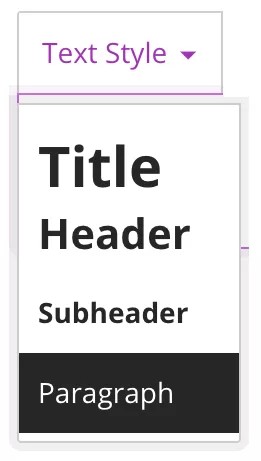
Text style menu: Title Header Subheader Paragraph |
Select a preformatted paragraph style from the list for the selected text. |

|
Font Style | Font type can be chosen between: Arial, Comic Sans MS, Courier New, Noto, Open Sans, Times New Roman and, Verdana. |
|
Font Size | Font size, it defaults to a specific chosen font type. |

|
Color Picker (Font color) | Font color can be chosen between: black (default), grey, purple, blue, green and, red. |

|
Bold | Bold or remove this style on the selected text. |

|
Italic | Italicize or remove this style on the selected text. |

|
Underline | Underline or remove this style on the selected text. |
|
Text options menu | The text options selector will open a second line menu with the options for: superscript, subscript and, strikethrough text to choose from. |

|
Format style: Strikethrough | Display text with a horizontal line through the letters. |

|
Format style: Superscript | Make the selected text appear slightly above your regular text or remove this style on the selected text. |

|
Format style: Subscript | Make the selected text appear slightly below your regular text or remove this style on the selected text. |

|
Alignment Options | The text options selector will open a dropdown menu with the options for: left-align, center, right-align and justify text to choose from. |

|
Left Align | Left-align for text. |

|
Center | Center alignment for text. |

|
Right Align | Right-align for text. |

|
Justify | Justified alignment for text. |

|
List options menu | The list options selector will open a second line menu with the options for: numbered and bulleted lists to choose from. Also includes the line height space selector option. |

|
List style: Bulleted List | Create a bulleted list. |

|
List style: Numbered List | Create a numbered list. |

|
Line height options menu | The line heigh options selector will open a dropdown menu with the options for: Single, 1.15, 1.5 and Double space options to choose from. |

|
Insert/Edit Math Formula | Open the visual math equation editor page or edit the selected equation. |

|
Undo | Undoes the last action performed. |
|
|
Clear Format | Clears the existing format in any selected section of text. |

|
Insert/Edit Link | Add or edit a URL link to a website, page, or file. |

|
Insert Local Files | Upload a file from your computer or device to embed in the editor. You can display it as a file attachment or inline with other text, if the browser allows. |
|
Insert Content menu | The content selector will allow you to choose from insert or edit: images from web, media from web, YouTube™ videos, Cloud Storage content and, LTI items. |

|
Insert/Edit Image from Web | Embed an image in the text box or edit an existing selected image. You can add images from a URL. |

|
Insert/Edit Media from Web | Add or edit a URL for a video from a YouTube™ or Vimeo™ channel, embed enterprise Office365 files. |

|
Insert YouTube Video | Browse and add content hosted on the external content provider YouTube. |

|
Insert from Cloud Storage | Browse and add content from your cloud storage accounts. |

|
Insert/Edit LTI Item | You can add files or tools your institution allows from the Content Market. |

|
Insert/Edit Recording | Record and insert a file with your device camera and microphone.
Available for instructors only in the Feedback area of assessments. Your institution controls which tools are available. |