Web Folders and Shared Locations
What is WebDAV?
You can use WebDAV to share files over the internet. WebDAV is compatible with most operating systems. When you set up WebDAV, also called a web folder, you can manage all the files for your course.
On a Mac, you will set up a shared location rather than a web folder.
Use web folders to perform these actions:
- Create folders and easily move items between folders.
- Rename and remove files and folders.
- Drag content from multiple drives and folders into the web folder or shared location.
- Easily view and edit a file in a web folder. You don't have to download the file, edit it, and upload it again.
Your institution may restrict access to this feature.
About file names
These characters are acceptable to use in file names:
- a-z
- 0-9
- period '.'
- underscore '_'
All standard ISO 8859 characters are also supported. No foreign characters or symbols are allowed.
All spaces are converted to underscores '_' in the name of the uploaded file. Special characters are not supported in file names.
Set up a web folder for Microsoft Windows©
To connect to a web folder, use the web address of the Content Collection folder and a valid username and password.
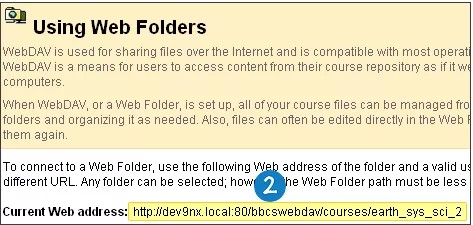
- In the Content Collection, select Set Up Web Folder for the top-level folder. Starting from this location ensures WebDAV access to all folders contained in the Content Collection. You can choose any folder inside the Content Collection, but the web folder path must be less than 240 characters. Each folder chosen has a different address.
- On the Using Web Folders page, right-click and copy the URL that appears for Current Web address. You'll paste the address in later steps.
After you copy the URL, follow the instructions for your operating system to complete the connection.
Set Up Web Folders in Windows 10
Using the web address of the folder, follow these steps to create the web folder in Windows XP.
- Open the File Explorer.
- Select This PC in the left menu.
- Select Add a network location in the ribbon at the top of the page.
- When asked where you want to create the network location, select Choose a custom network location. Select Next.
- When asked for the location of your website, paste the web address you copied from the steps above. Select Next.
- When prompted to enter a username and password, type your Blackboard Learn username and password. Select OK.
- You will be prompted to enter a name for the location. Enter a name and select Next.
- On the Completing the Add Network Location Wizard page, select Finish.
- The web folder will open. It will now be listed in Computer under Network Location.
Set Up Web Folders in Windows 7 and Windows Vista
Using the web address of the folder, follow these steps to create the web folder in Windows 7.
- Open Start > Computer.
- In the bottom of the right pane, right-click and select Add a network location.
- The Add Network Location Wizard will open. Select Next.
- When asked where you want to create the network location, select Choose a custom network location. Select Next.
- When asked for the location of your website, paste the web address you copied from the steps above. Select Next.
- When prompted to enter a username and password, type your Blackboard Learn username and password. Select OK.
- You will be prompted to enter a name for the location. Enter a name and select Next.
- On the Completing the Add Network Location Wizard page, select Finish. If prompted to enter a username and password again, type your Blackboard Learn username and password. Select OK.
- The web folder will open. It will now be listed in Computer under Network Location.
Troubleshooting for Windows 7:
- On some Windows versions, you cannot connect to web folders without using SSL. Microsoft's Knowledge Base article KB841215 describes how to work around this problem.
- If Office 2003 is installed, web folders do not appear to work. Upgrading to Office 2007 should resolve this.
Troubleshooting for Windows Vista:
- On some Windows versions, you cannot connect to web folders without using SSL. Microsoft's Knowledge Base article KB841215describes how to work around this problem.
Set Up Web Folders in Windows XP
Using the web address of the folder, follow these steps to create the web folder in Windows XP.
- Open My Computer.
- Select My Network Places.
- Select Add Network Place.
- The Add Network Place Wizard will open. Select Next.
- When asked where you want to create the network place, select Choose another network location. Select Next.
- When asked for the address of the network place, paste the web address you copied from the steps above. Select Next.
- When prompted to enter a username and password, type your Blackboard Learn username and password. Select OK.
- You will be prompted to enter a name for the Network Place. Enter a name and select Next.
- On the Completing the Add Network Place Wizard page, select Finish.
- If prompted to enter a username and password again, type your Blackboard Learn username and password. Select OK.
- The web folder will open. It will now be listed in My Network Places.
Troubleshooting for Windows XP:
- On some Windows versions, such as Windows Server 2003 x64 these steps will fail. In those cases, open a cmd prompt (Start/Run "cmd.exe") and execute the command: net use * https://cdev-saas-ultra-test.blackboard.com/bbcswebdav/courses/ocean.org.101 to manually connect to the web folder.
- On some Windows versions, you cannot connect to web folders without using SSL. Microsoft's Knowledge Base article KB841215 describes how to work around this problem.
Move files to the web folder
- With the web folder open, navigate to the folder where you'd like to add files or folders.
- In a separate window, locate the folder on your computer containing the files and folders you want to transfer.
- With your folder and the web folder open, you can drag and drop files or folders to move items between them. Select an item and drag it to the destination folder. Drop it into the folder by releasing the mouse button. Files and folders moved to the web folder are copied to the Content Collection.
- If you prefer, you can also use copy and paste to move files between the web folder and a location on your computer.
- In the Content Collection, select Refresh to view the uploaded files.
After you copy all files and folders, disconnect from the web folder. If you don't disconnect, the server connection remains open until you shut down the computer. If you use a computer that others use, they'll have access to everything in the Content Collection.
When you need to use the web folder in the future, access My Network Places and select the web folder shortcut you created.
Set up a shared location for Mac©
To connect to a web folder, called a shared location for the Mac, use the web address of the Content Collection folder and a valid username and password.
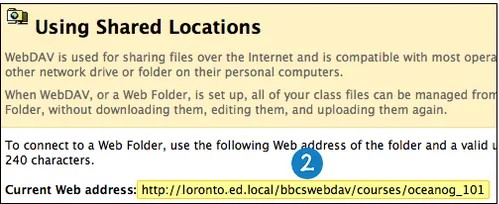
- In the Content Collection, select Set Up Shared Location for the top-level folder. Starting from this location ensures WebDAV access to all folders contained in the Content Collection. You can select any folder inside the Content Collection, but the shared location path must be less than 240 characters. Each selected folder has a different address.
- On the Using Shared Location page, copy the URL that appears for Current Web address. You'll paste the address in later steps.
- On the Finder bar, select Go > Connect to Server.
- In the Connect to Server window, paste the URL you copied in step 2 into the Server Address box. Select Connect.
Select the plus sign next to the pasted address to include it in the Favorite Servers box. When you save the address as a favorite server, you won't have copy and paste it each time. In the future, start with step 3 to connect to this shared location.
- If the WebDAV File System Authentication window appears, type your Blackboard Learn login username and password. Select OK.
- After you're connected to the shared location, the Mac network icon appears on your desktop. Double-click the icon to open the shared location. The shared location displays the files and folders in the Content Collection.
Move files to the shared location
- With the shared location open, navigate to the folder where you want to add files or folders.
- In a separate window, navigate to the folder on your computer that contains the files and folders you want to transfer.
- With your folder and the shared location open, you can drag and drop files or folders to move items between them. Select an item and drag it to the destination folder. Drop it into the folder by releasing the mouse button. Files and folders moved to the shared location are copied to the Content Collection.
- If you prefer, you can also use copy and paste to move files between the shared location and a location on your computer.
- In the Content Collection, select Refresh to view the uploaded files.
After you use the shared location, some files may appear with duplicate file names that begin with "._" or ".DS Store." You can safely delete them from the Content Collection.
When you have copied all files and folders, close the window and drag the Mac network icon to the trash to disconnect from the shared location. If you don't disconnect, the icon and server connection remain open until you shut down the computer. If you use a computer that others use, they'll have access to everything in the Content Collection.


