System roles control what sections in the Administrator Panel are available to different types of users. Most users have a system role of None, which means they don't have access to the Administrator Panel.
You can use system roles to assign subsets of administrative privileges to other users. This helps you delegate routine administrative tasks to other users. For example, you can grant an instructor access to the user management pages, where the instructor can create users, edit user profiles, or change a user's enrollment in courses.
Only a user with full administrator privileges can assign privileges to a system role.
If your institution has access to community engagement, you can assign multiple secondary system roles to a user account. Multiple system roles grant the user the sum of their privileges. This makes it possible to create system roles based on tasks instead of creating a separate system role for every possible set of privileges.
Use caution when assigning system roles with administrative privileges directly to a user account. Privileges granted to a user in this way apply to the entire Blackboard Learn system. Applying a system role to a user within a domain limits that user's privileges within the domain.
Learn more about applying system roles within a domain
About default system roles
Blackboard Learn includes a set of default system roles. Each system role has a predefined set of privileges. You can add or remove privileges for any of these roles except System Administrator and Guest.
To help you plan and create roles for your institution's needs, see the Privileges Description Spreadsheet.
Some system roles are provided only with specific licenses of Blackboard Learn.
You can copy a default system role to use as a basis for creating additional custom roles.
This list summarizes the basic privileges included with each default system role:
- Card Office Administrator: Manage some eCommerce functions. Create tabs, modules, and tab groups.
- Course Administrator: Manage courses and enrollments.
- Community Administrator: Manage organizations, discussion boards, and some brands and themes.
- eCommerce Administrator: Manage all eCommerce and eMarketplace functions. Create tabs, modules, and tab groups.
- eMarketplace Administrator: Manage eMarketplace functions.
- Guest: Default role for unauthenticated users. You can't rename or edit privileges for this role.
- Learning Environment Administrator: Create tabs, tab groups, and modules. Create, import, export, and edit courses and enrollments.
- None: Change personal information, including privacy options and password, for the user's own account.
- Observer: View materials and interactions for the associated students. No Write privilege. You can't rename this role.
- Support: Manage basic course, organization, and user functions. Intended for basic help desk support staff.
- System Administrator: Default Blackboard administrator. All privileges. You can't edit the privileges for this role.
- System Support: Manage most administrative functions. Isn't given the Quick Enroll privilege by default as of Blackboard Learn Service Pack 8. Intended for junior system administrators.
- User Administrator: Manage most user-related functions, such as creating, editing, enrolling, and deleting users.
About planning system roles
Group related privileges into roles
Blackboard Learn includes more than 1,100 individual privileges. One way to make it easier to manage privileges is to create multiple system roles, each with a set of related privileges. For example, create one system role that has all of the building blocks privileges, another system role with all communities privileges, another with all course privileges, and so on. Then assign multiple system roles to users who require more than one set of privileges.
You can use default roles as the basis for new roles. Learn more about copying a system role.
Assign system roles by domain
Domains are available only if your institution has access to community engagement.
Domains gather courses, organizations, users, tabs, and modules into defined sets called collections. Each domain can have one or many collections.
You can create a domain that contains just the users, courses, organizations, tabs, and modules for which you want to delegate administrative tasks to another user. Then assign that user as an administrator for that domain.
Learn more about creating domains and assigning administrators by domain
Use a naming convention
System roles can contain any combination of more than 1,100 privileges. A descriptive and logical Role Name makes it easier to assign the correct roles to a user. You can add more details in the Description field, but only the Role Name appears in the user management screens.
Manage privileges
To manage privileges, go to the Administrator Panel > Users section > System Roles > open a role's menu > select Privileges.
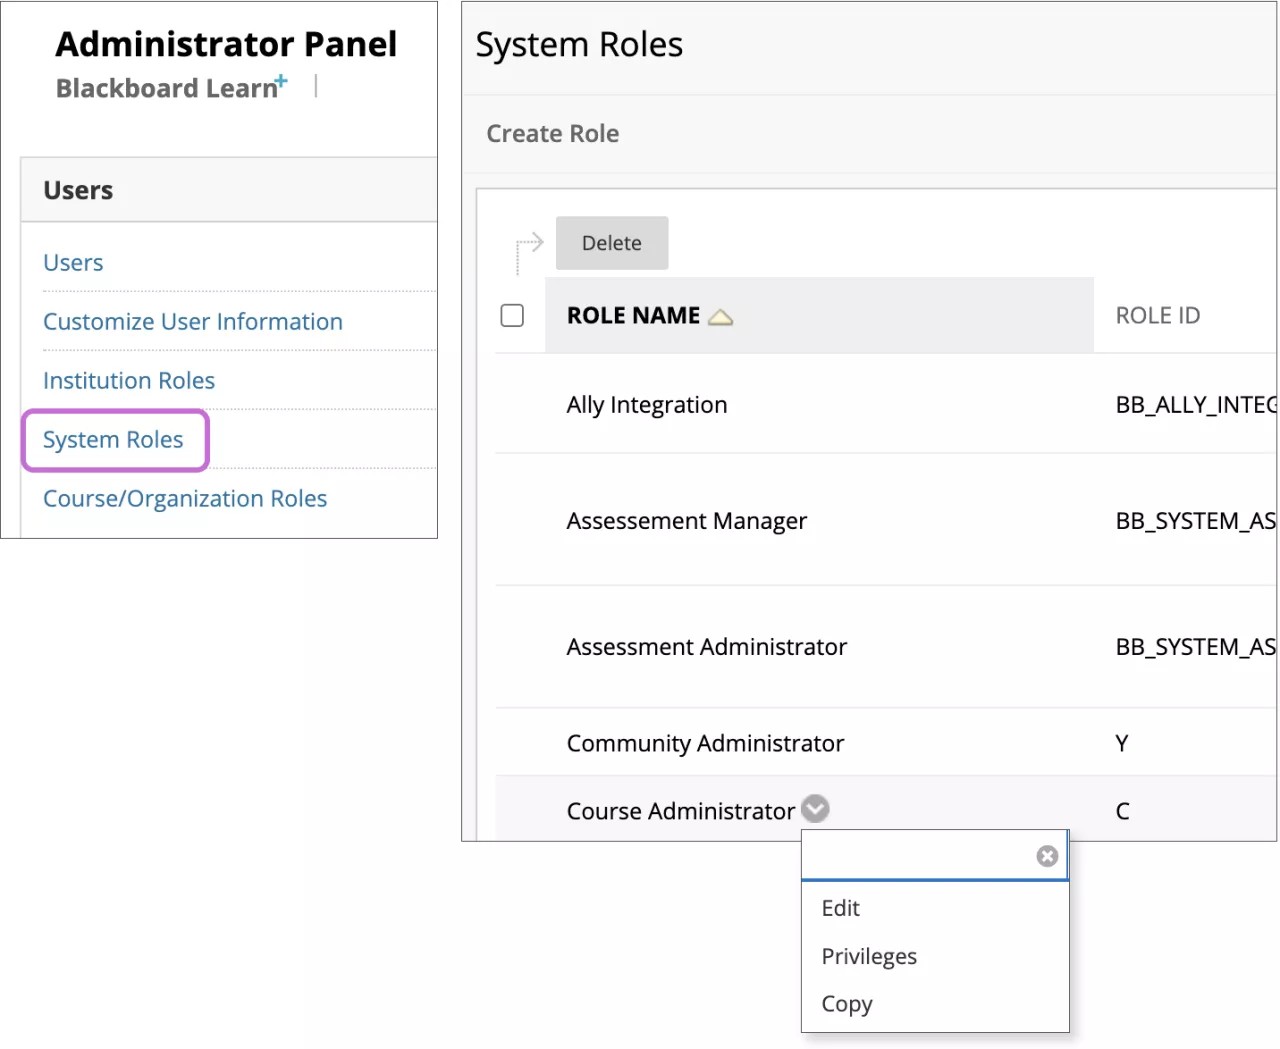
On the Manage Privileges page, green check marks indicate the privileges included with the role.
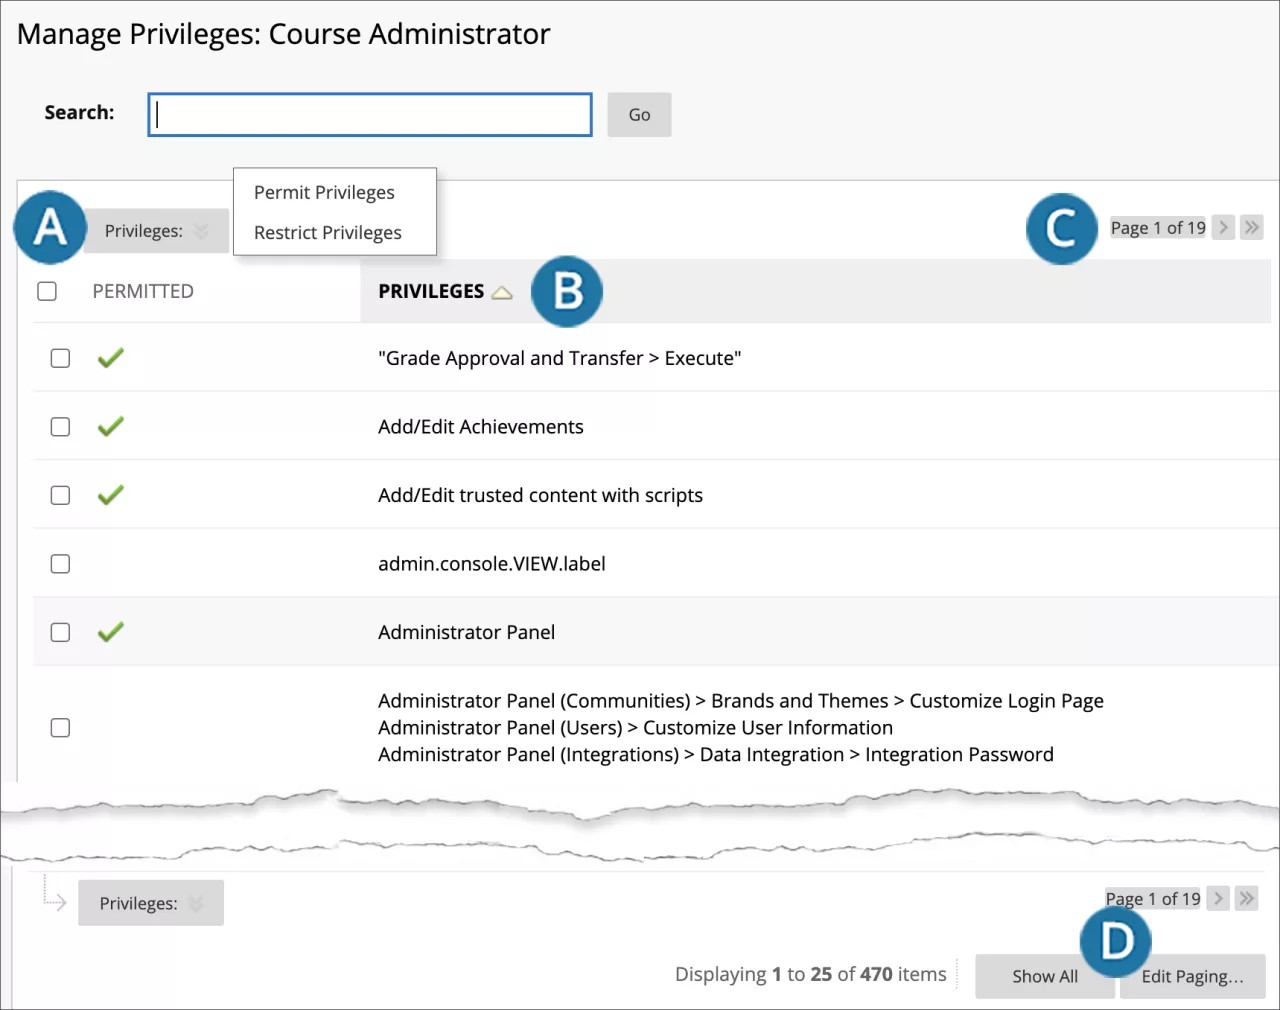
- To permit or restrict one or more privileges, select the check box and choose Permit Privileges or Restrict Privileges from the menu.
- To sort the list, select the Permitted column header to sort the privileges by permitted (green check mark) or restricted (no check mark) for this role. Select the Privileges column header to sort the privileges alphabetically. Select the column header again to reverse the sort order. Use the Search box to find a specific privilege.
- Select the single arrow to navigate one page forward or back in the privileges list. Select the double arrows to jump to the first or last page of the privileges list.
- Determine how many privileges appear on a single page. Select Edit Paging to specify the number of privileges to show on one page. Select Show All to view all privileges on one page.
Create a system role
If you're creating a system role with relatively few privileges, use the steps in this topic.
If the new system role will have dozens or hundreds of privileges, it's often easier to copy an existing system role and then edit the privileges. Learn more about copying a system role.
- On the Administrator Panel in the Users section, select System Roles.
- Select Create Role.
- Provide a Role Name. The Role Name appears in the user interface when you assign system roles to users.
- Provide a Role ID. The Role ID is a unique identifier for the database. You can't change the Role ID after you select Submit to save this role to the database.
- Provide a Description. The description appears on the System Roles page and provides more details about the role for other administrators. However, the description doesn't appear in the user management screens, so make sure the Role Name is as descriptive as possible.
- Select Submit.
- On the Manage Privileges page, select the check box of any privilege you want to assign to this system role.
- Select Permit Privileges.
- Select OK.
Copy a system role
You can create a new system role by copying an existing system role. This creates an exact duplicate of the existing role with all of the same privileges. After you create the copy, you can edit it to change the privileges. Learn more about changing privileges for system roles.
- On the Administrator Panel in the Users section, select System Roles.
- Open the role's menu.
- Select Copy.
- Provide a Role Name. The Role Name appears in the user interface when you assign system roles to users.
- Provide a Role ID. The Role ID is a unique identifier for the database. You can't change the Role ID after you select Submit to save this role to the database.
- Provide a Description. The description appears on the System Roles page and provides more details about the role for other administrators. However, the description doesn't appear in the user management screens, so make sure the Role Name is as descriptive as possible.
- Select Submit. A new system role appears with the same privileges as the old system role.
Change a system role name
You can change the name of any system role except System Administrator, Observer, Guest, and None. You can't change the Role ID of a role after it's been saved to the database.
- On the Administrator Panel in the Users section, select System Roles.
- Open the role's menu.
- Select Edit.
- Type the new Role Name.
- Optionally, edit the Description.
- Select Submit.
Change privileges for system roles
Only a user with full System Administrator privileges can change privileges for a system role.
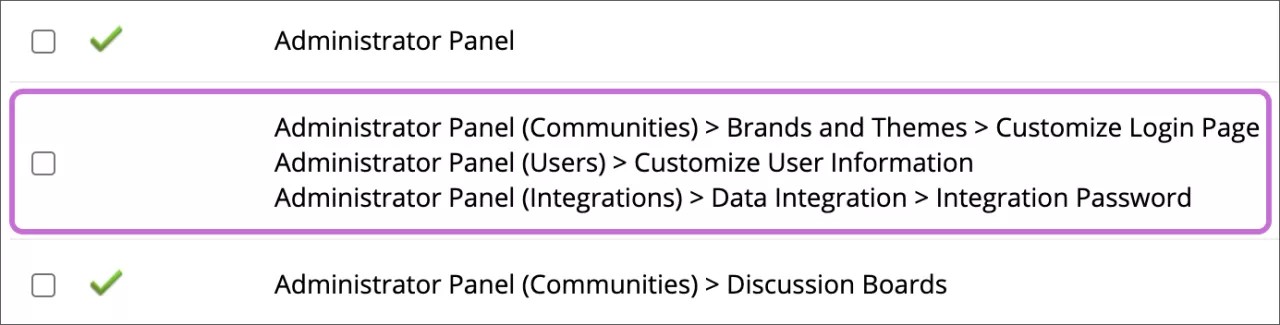
The Manage Privileges page identifies privileges by the sections of the user interface they grant access to. For example, you create users on the Administrator Panel, so the privilege to create user accounts appears as Administrator Panel (Users) > Create Users. The privilege to delete course materials appears as Course/Organization (Content Areas) > Delete Materials.
Blackboard Learn groups some privileges into subsets. These have only one check box for all privileges included in the subset.
- On the Administrator Panel in the Users section, select System Roles.
- Open the role's menu.
- Select Privileges. The Manage Privileges page lists the privileges you can assign. A green check mark indicates the privilege is assigned to this role. To learn more about system role privileges, see the Privileges Descriptions Spreadsheet.
- On the Manage Privileges page, select the check box of any privilege you want to assign to this system role. To select all privileges displayed on the page, select the check mark in the column heading.
- Select Permit Privileges.
- Select the check box of any privileges you want to exclude from this system role.
- Select Restrict Privileges.
- Select OK.
Assign system roles to user accounts
You assign system roles to users when creating user accounts. All user accounts must have a primary system role. The default value is None, which means that the user doesn't have access to the Administrator Panel.
You can also apply system roles within a domain. Applying system roles within a domain limits the user's role privileges to data in that particular domain.
- On the Administrator Panel in the Users section, select Users.
- Search for a user.
- Open the user's menu and select Edit.
- Scroll down to the System Roles heading.
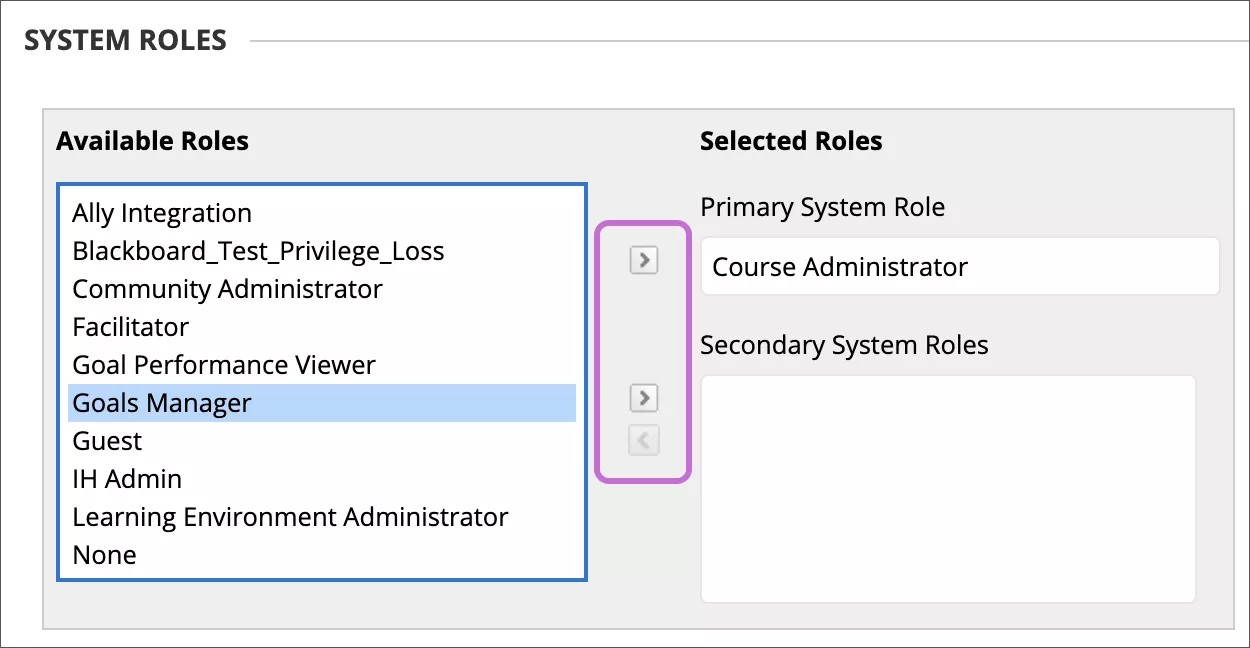
- Select a system role to select it.
- Select the arrows to move the role.
- To add or change the Primary System Role: Select a system role under Available Roles and select the right-pointing arrow next to the Primary System Role box.
- To add or change the Secondary System Roles: Select one or more roles in the Available Roles list. Select the right-pointing arrow next to the Secondary System Roles box.
Available only if your institution has access to community engagement features.
For Windows, to select multiple items in a list, press the SHIFT key and select the first and last items. To select items out of sequence, press the CTRL key and select each item needed. For Macs, press the COMMAND key instead of the CTRL key.
- To remove Secondary System Roles: Available only if your institution has access to community engagement. Select one or more roles in the Secondary System Roles list. Select the left-pointing arrow to remove the role.
- Select Submit.