It is possible to test an LIS integration without a connection to an SIS. This is a bit more complicated than with the other integration types given the requirement to a) bind to the Web Services, which requires an application to manage SOAP requests, and b) a data format difference between the SIS generated SOAP based data and that used for the Upload File option available in the UI. The following will demonstrate how to test an LIS integration using both the LIS supporting web services and the UI.
LIS integration testing
Testing your LIS integration from a functional perspective before connecting your SIS to the integration enables you to confirm proper operation of the configuration on the Learn half of the integration. Once you are assured that Learn is properly handling LIS requests then when connecting to your SIS you have eliminated half of the equation should issues with connectivity or improper operation occur. Once you have tested using the provided samples, you may consider extracting LIS output from your SIS and supplementing your non-connected testing before continuing with connecting your SIS to Learn - again limiting the number of variables in your testing scenario.
LIS integrations are web service based and utilize SOAP as the data transport. SOAP is an XML message format based protocol which enables the exchange of structured information.
There are two means of placing data in Learn using LIS formatted data - you may use the web service endpoints or you may upload XML files.
Test using web service endpoints
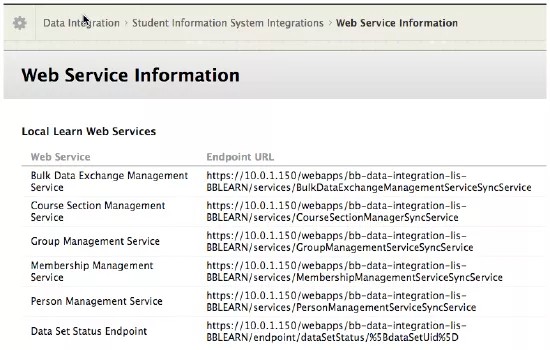
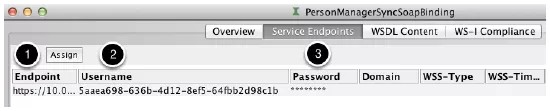
After you have configured the LIS integration you will need to note the Web Service endpoints - these will be used in configuring your test environment. The endpoints for LIS integration are discoverable using the Web Service Information link on a configured LIS integration.
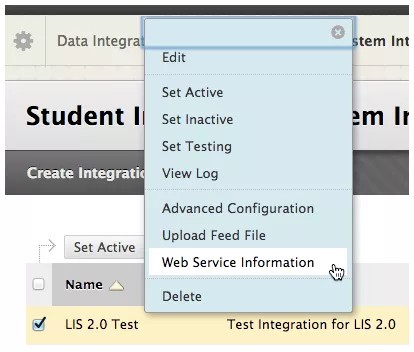
Additionally, you will need to make note of the username and password you entered for the integration - this may be discovered by selecting the Edit option from the integration's menu.
SoapUI
Testing the web services requires the use of a tool which is capable of posting SOAP messages to web service endpoints. The following examples use a tool called SoapUI. SoapUI is available at www.soapui.org. SoapUI is a free and open source cross-platform functional testing solution that allows you to easily and rapidly create and execute web service functional and load tests.
While following demonstration uses SoapUI, you may use a comparable tool of your choice.
After you have completed testing your LIS integration using you may configure your SIS to submit data to the endpoints per required operation. (see service examples).
Configure SoapUI
In addition to the web service information you will need the integration username and password - you may access this via the saved integration's edit menu. This is the username and password that is used for authenticating access to and identifying the related LIS integration instance.
- Open SoapUI.
- On the File menu, select Preferences.
- Under HTTP Settings, select Adds authentication information to outgoing requests.
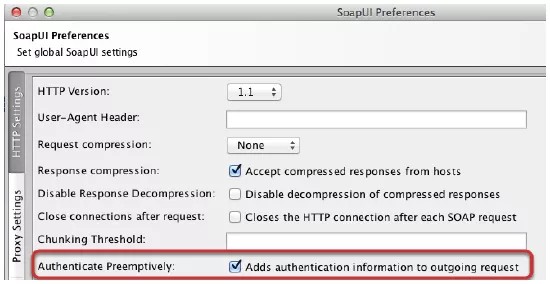
- Select OK.
Get WSDL URLs
Each service tested will require a WSDL for construction of the supported methods. The WSDL URL is the 'Endpoint URL' value for the management under 'Local Learn Web Services', concatenated with ".wsdl". The constructed WSDL URL will look something like the following:
https://<yourserver>/webapps/bb-data-integration-lis-BBLEARN/services/PersonManagementServiceSyncService .wsdl
You will construct four of these one for each service to be tested:
CourseSectionManagerSyncService
GroupManagementSyncService
MembershipManagementSyncService
PersonManagementSyncService
dataSetStatus is not an LIS service rather a Learn provided service for monitoring integration activity.
Resolve the SoapUI "Characters larger than 4 byte are not supported" error
Some SoapUI installs may throw an error "org.apache.xmlbeans.XmlException: java.io.CharConversionException: Characters larger than 4 bytes are not supported: byte 0x96 implies a length of more than 4 byte" when attempting to load the WSDL.
To resolve this error:
- Open the 'bin' folder under the SoapUI installation and the "soapUI-4.6.4.vmoptions" file. Open it in a text editor and add this line:
-Dfile.encoding=UTF8
- Save the file, close/re-open SoapUI and load the WSDL again.
Testing the Bulk Data Exchange Management Service may not be completed end to end using SoapUI in the same manner as the service requires access to a file server for accessing the data file. To learn more, see "Testing the Bulk Service using SoapUI" later in this topic.
Create SoapUI projects for testing
Each service to be tested will need to be added as a project to SoapUI. The following demonstrates setting up SoapUI for testing the PersonManagementServiceSyncService.
- Use the menu or hit 'Ctrl+n' to create a new SoapUI project.
- Name the project. Because this demonstration is for the Person service, it will be named LIS Person.
- In the Initial WSDL field, paste the WSDL URL constructed above for the PersonManagementServiceSyncService.
The initial WSDL is the Learn endpoint URL for the service you are testing with a '.wsdl' extension.
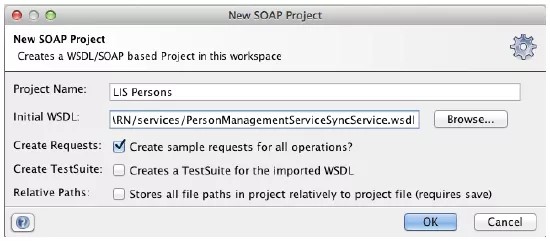
- Select OK.
- After the services templates have been created, select the project interface to open the project's Interface Viewer. Here you will update the Service Endpoint using the URL copied from the integration's Web Service Information page.
- Enter the Username as provided on the integration's configuration page.
- Enter the Password you provided on the integration's configuration page.
This information is used for all the project's services. The Username and password provides the authentication information necessary to identify the target integration and access the services.
If you change the Service Endpoint settings you should select the Assign button and select the '- All Requests -' option to update the project. Failing to do so may result in SOAP errors.
To create projects for Course, Membership, and Group you will need to repeat the above steps 1-5. While SoapUI supports multiple WSDLs per project it is easier to keep the services separated if four projects are created.
Test the integration
SoapUI generates request templates based on the provided WSDLs which, while useful for understanding the format of the LIS managed objects, are not suitable for submitting to Learn. Doing so will not cause a problem, Learn will simply return an error for the process.
To test, a compliant data set must be submitted. The examples provided below may be used to perform initial tests after which real extracts from your SIS may be used.
Blackboard Learn 9.1 SP 14 and earlier LIS implementations only support replace services - you may check supported services by submitting the generated request templates. Unsupported services will respond with an unsupported error.
Test the PersonManagementServiceSyncService
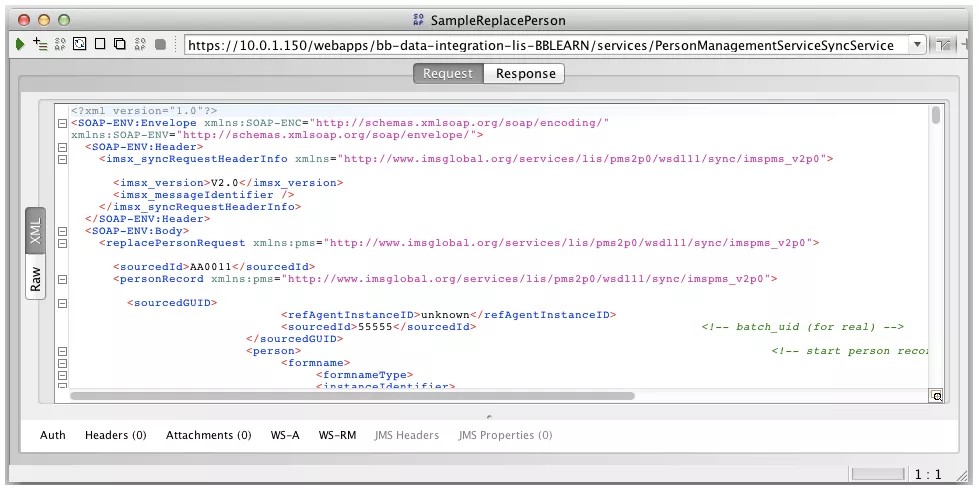
- Expand the Interface tree under the service you are testing (this should be visible after the new project is created). In this example, replacePerson is expanded.
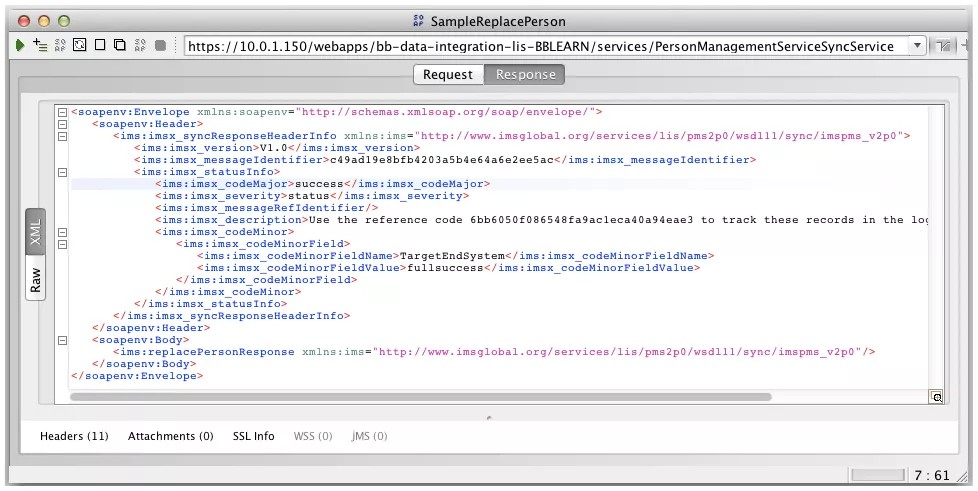
- Create a new request and name it SampleReplacePerson
- The request viewer will open containing a template of a replacePerson request. Copy the text from SampleReplacePersonRequest.xml and paste into the request view replacing the generated template.
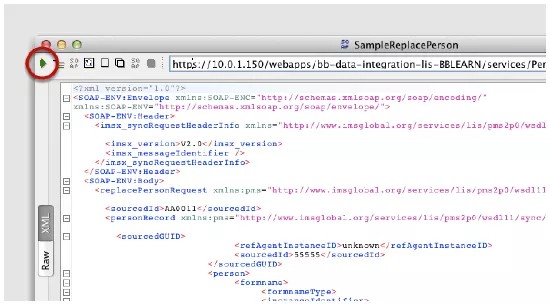
- Select the Submit Request icon (indicated by the circled green arrow in the above image).
- The results of the request are displayed in the request view to the right of the SOAP XML you provided.
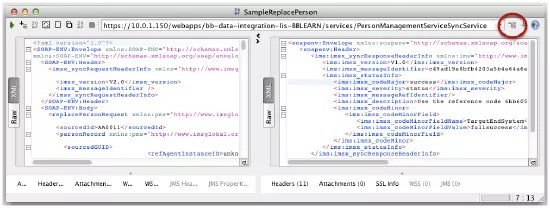
Note the circled icon in the above image - this enables the tabbed version of the viewer.
Repeat steps 1-5 for the remaining projects/interfaces using the provided sample files - this ensures that there are no issues with your integration configuration prior to testing with 'real' data or connecting to your SIS. Additionally, you may use this process for testing extracted or hand-built data sets.
The returned reference code may be captured to monitor the processing of the request.
Test using UI file upload
The Learn SIS Framework allows for the uploading of bulk formatted XML via the UI. This demonstration explains the differences between bulk files and the event format provided by the SIS to the LIS endpoints.
The file format for bulk files - those used for uploading via the integration UI - requires an altered version of XML over what is passed to the endpoints by the SIS. See SampleBulkRequest_PersonCourseMemberTerm.xml in the Upload Examples contained in the below downloadable sample set.
Bulk file format
When an LIS-compatible SIS communicates with Learn, the SIS sends a fully formed SOAP message to the the Web Service endpoints. This SOAP message contains a wrapper around the LIS XML data. This information isn't necessary for a manual data upload and will cause a feed error if included. A truncated sample for a Person (User) object is shown below in Data Set 1.0. For a complete description of the data format for each supported object, see LIS 2.0 Data Format.
<?xml version='1.0' encoding='ISO-8859-1'?>
<bulkDataRecord xmlns="http://www.imsglobal.org/services/li...sDataFile_v1p0" xmlns:xsi="http://www.w3.org/2001/XMLSchema-instance" xsi:schemaLocation="http://www.imsglobal.org/services/li...sDataFile_v1p0 ../schemas/imsbdemsDataFile_v1p0.xsd">
<!-- Consider everything ABOVE this line as the "feed file header" -->
<!-- start persons here -->
<transactionRecord>
<transactionOpIdentifier>identifier</transactionOpIdentifier>
<serviceName>PersonManagementService</serviceName>
<interfaceName>PersonManager</interfaceName>
<operationName>replacePerson</operationName>
<!-- Consider everything ABOVE this line as the "personRecord header";
operationName will be replacePerson or deletePerson -->
<parameterSet>
<parameterRecord>
<parameterInvoc>In</parameterInvoc>
<parameterName>sourcedId</parameterName>
<parameterType>GUID</parameterType>
<parameterValue>55555</parameterValue> <!-- ID for logging -->
</parameterRecord>
<parameterRecord>
<parameterInvoc>In</parameterInvoc>
<parameterName>personRecord</parameterName>
<parameterType>PersonRecord</parameterType>
<parameterValue>
<personRecord>
<sourcedGUID>
<refAgentInstanceID>unknown</refAgentInstanceID>
<sourcedId>55555</sourcedId> <!-- batch_uid (for real) -->
</sourcedGUID>
<person> <!-- start person record -->
<formname>
<formnameType>
<instanceIdentifier>
<language>en</language>
<textString>unknown</textString>
</instanceIdentifier>
<instanceVocabulary>
http://www.imsglobal.org/lis/pmsv2p0/formatnmetypevocabularyv1p0
<instanceVocabulary>
<instanceValue>
<language>en</language>
<textString>Full</textString>
</instanceValue>
</formnameType>
<formattedName>
<language>en</language>
<textString>Dr. First Middle Last, Jr.</textString> <!-- Full Name IGNORED by Learn-->
</formattedName>
</formname>
...
</person>
</personRecord><!-- end person record -->
<!-- could have more <personRecord></personRecord>s here -->
</parameterValue>
</parameterRecord>
</parameterSet>
</transactionRecord>
<!-- could have additional transactionRecords for Courses, Memberships, or Groups here -->
</bulkDataRecord>
<!-- Master closing tag -->
Data Set 1.0: LIS example data for use in a Learn UI LIS Upload file. The full file is available in the sample set downloadable from the below link.
Alter the LIS SOAP XML for uploading
Bulk data files minimally require removal of the SOAP-ENV:Envelope and SOAP-ENV:Body opening and closing tags in an LIS-generated message and replacing them with the bulkDataRecord opening and closing tags. This is shown in the abbreviated data set above. If performing multiple transactions (for example: for persons, courses, and memberships) in a single file these must be wrapped in additional transactionRecord tags (see the full example).
Testing
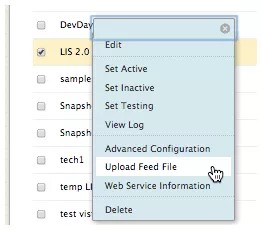
After you have prepared your data files, open the Upload Feed File via the LIS integration menu.
You will be directed to the upload page where you select the file to upload. For this demonstration select the provided sample file: SampleBulkRequest_PersonCourseMemberTerm.xml.
Submitting the file redirects you back to the Integration page. To view the results of the test you may inspect via the admin UI the objects created or updated, or use the SIS Framework Log viewer to view the log for the integration.
To view the integration's log, select View Log from the integration's menu and you will be directed to the Log page for the integration.
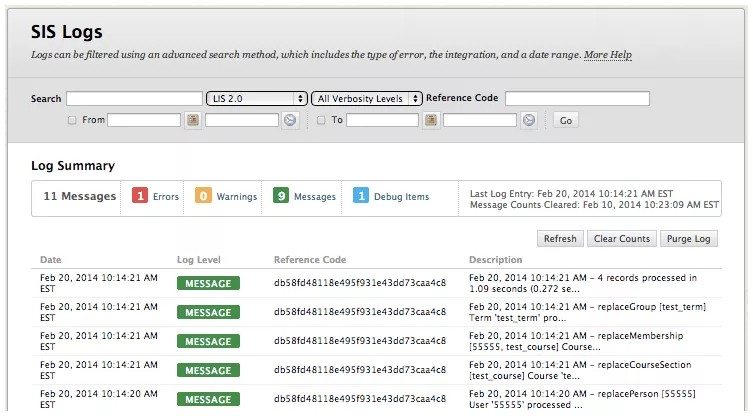
To further inspect a logged message select on the message line item in the list and details will appear in the Message Detail area below the message list.
This detail will contain information useful for debugging issue. For example:
<feb _x0032_0=""> Invalid data for attribute: role. Skipping entire record. Reason: The Course Role is invalid.
InvalidData
Error occurred processing the following XML:
In
sourcedId
GUID
test_course.55555
In
membershipRecord
membershipRecord
<membershipRecord><sourcedGUID><refAgentInstanceID>unknown</refAgentInstanceID><sourcedId>test_course.55555</sourcedId></sourcedGUID><membership><collectionSourcedId>test_course</collectionSourcedId><membershipIdType>courseSection</membershipIdType><member><personSourcedId>55555</personSourcedId><role><roleType>Learner</roleType><subRole>Learner</subRole><timeFrame><begin>2014-02-01T15:00:00</begin><end>2014-09-01T15:50:00</end><restrict>false</restrict><adminPeriod><language>en</language><textString>201330</textString></adminPeriod></timeFrame><status>Active</status><dateTime>2011-08-04T15:00:00</dateTime><creditHours>0</creditHours><dataSource>SIS</dataSource><extension><extensionNameVocabulary>unknown</extensionNameVocabulary><extensionTypeVocabulary>unknown</extensionTypeVocabulary><extensionField><fieldName>LIS2.0Role/Gradable</fieldName><fieldType>String</fieldType><fieldValue>Gradable</fieldValue></extensionField><extensionField><fieldName>LIS20DeliverySystem</fieldName><fieldType>String</fieldType><fieldValue>BB</fieldValue></extensionField></extension></role></member><dataSource>SIS</dataSource></membership></membershipRecord></feb>
blackboard.dataintegration.lis.operation.OperationExecutorException: InvalidData
The previous message detail indicates a failed replaceMembership operation, specifically an incorrect Course Role (indicated by the yellow highlighted text). The posted request is included and we can see that the roles are provided incorrectly as "Learner" - changing them to "Student" and resubmitting will result in a successful replaceMembership request.
Test the bulk service using SoapUI
Setting up for testing Bulk Service requests is the same as for the other services with one exception - you must provide a file server that the Learn application server has access to for 'pick-up' of the bulk data file by the LIS service.
The architecture of the Bulk Data Exchange web service is made up of three parts: the client (in this case SoapUI), the LIS instance in the test Learn instance, and a file server. The client sends a SOAP message to the Bulk Data Exchange web service. The request from the client includes the URL of the batch file to be processed (which is located on the file server) and what operation should be performed.
The possible operations which the Bulk Data Exchange web service could perform on a batch file are limited to the set of web service operations which can be performed by the other web services for the LIS instance. In the case of 9.1 SP 14 and earlier these are limited to replace operations.
If you are experiencing issues with the checksum you may disable checksum checking via the Data Integration - LIS settings.
LIS setup
- Open your configured LIS integration (or create one) and note the value of Shared Username.
- Under Integration Properties, fill in the following and note:
- Shared Password
- Batch Service Username
- Batch Service Password
- Batch Download Username (for example purposes, make same as 'Batch Service Username')
- Batch Download Password (for example purposes, make same as 'Batch Service Password')
- SIS Learning Information Services Batch Web Service URL: http://localhost:8081/
This is the address of the HTTPD service which provides the file to the LIS Bulk service and should represent your specific configuration.
- Set Integration Status to Active.
- Set Log Verbosity to All Diagnostic and Debug messages.
- Set Learn Data Source to Use the same Learn Data Source for all new inbound data.
- Select Submit.
Set up the supporting HTTPD file service
Download the below linked SimpleHttpServer.zip file and unzip to the server where you will place your test files.
Download the SampleBulkRequest_PersonCourseMemberTerm.xml file and place in the directory from which the files will be delivered.
Test the HTTPD file service
java -jar SimpleHttpServer.jar
Usage: java SimpleHttpServer <port number> <path to directory to serve files from> <username> <password>
For example:
java -jar SimpleHttpServer.jar 8081 /Users/moneil/Desktop/LISTEST moneil moneil
Server running on port 8081. Hit Ctrl-C to quit.
Access the server via your browser to test delivery of the file:
For example:
http://10.0.1.16:8081/SampleBulkRequest_PersonCourseMemberTerm.xml
Setup SoapUI for Testing
Setting up SoapUI for testing the Bulk Data Exchange is the same as for the other LIS services.
Get the bulk data exchange URL/WSDL
- Navigate to Student Information System Integrations in the test Learn instance.
- In the LIS Setup section, select the context chevron for the LIS integration created.
- Select the Web Service Information option.
- The WSDL URL is the Endpoint URL value for Bulk Data Exchange Management Service, under Local Learn Web Services, concatenated with ".wsdl".
SoapUI setup
- Open SoapUI.
- On the File menu, select Preferences.
- Under HTTP Settings, select Adds authentication information to outgoing requests.
- Select OK.
- Press Ctrl+n.
- In the Initial WSDL field, paste the WSDL URL.
- Select OK.
- Expand the tree under announceBulkDataExchange (this should be visible after the new project is created).
- After the services templates have been created, select the project interface to open the project's Interface Viewer. Here you will:
- Update the Service Endpoint using the URL copied from the integration's Web Service Information page.
- Enter the Username as provided on the integration's configuration page.
- Enter the Password you provided on the integration's configuration page.
Run the test
Open the announceBulkDataExchange request and copy/paste the below Data Set 2 contents into the request view.
You must change the <ims:url> element in the sample to reflect your test file server! Also make certain that the url is on a single line.
<soapenv:Envelope xmlns:soapenv="http://schemas.xmlsoap.org/soap/envelope/" xmlns:ims="http://www.imsglobal.org/services/li.../imsbdems_v1p0">
<soapenv:Header>
<ims:imsx_syncRequestHeaderInfo>
<ims:imsx_version>V1.0</ims:imsx_version>
<ims:imsx_messageIdentifier>123456</ims:imsx_messageIdentifier>
</ims:imsx_syncRequestHeaderInfo>
</soapenv:Header>
<soapenv:Body>
<ims:announceBulkDataExchangeRequest>
<ims:transactionId>123456</ims:transactionId>
<ims:bulkBlockManifest>
<ims:bulkBlockManifestId>123456</ims:bulkBlockManifestId>
<ims:expiryDate>2020-10-01T12:00:00</ims:expiryDate>
<ims:bulkBlockDataFile>
<ims:url>http://<your_test_file_server>:8081/<file_path>¬ /SampleBulkRequest_PersonCourseMemberTerm.xml</ims:url>
<ims:checkSum>b3ecf4f05935c687932ce1d8c1af7335</ims:checkSum>
<ims:totalSize>29063</ims:totalSize>
<ims:savePoint>2020-10-01T12:00:00</ims:savePoint>
<ims:serviceSet>
<ims:serviceRecord>
<ims:serviceName>CourseManagementService</ims:serviceName>
<ims:interfaceName>CourseSectionManager</ims:interfaceName>
<ims:operationSet>
<ims:operationName>replaceCourseSection</ims:operationName>
</ims:operationSet>
</ims:serviceRecord>
</ims:serviceSet>
</ims:bulkBlockDataFile>
</ims:bulkBlockManifest>
</ims:announceBulkDataExchangeRequest>
</soapenv:Body>
</soapenv:Envelope>
Data Set 2: BulkDataRequest
Notes for creating your own test file
The elements ims:imsx_messageIdentifier, ims:transactionId, and ims:bulkBlockManifestId should all be the same value (in this sample, the value is 123456). The elements ims:expiryDate and ims:savePoint should also be the same value (in the above sample, the value 2020-10-01T12:00:00 is used).
The object ims:bulkBlockDataFile represents one batch file to be operated on. The element ims:url is the URL for the location of the test feed file on the file server. The element ims:totalSize is the total size, in bytes, of the test feed file (use 'ls -l' in Linux or dir in Windows). The element ims:checkSum is the md5 hash of the test file (use md5sum in Linux or get either a comparable program or Cygwin in Windows).
The object ims:serviceRecord represents how the feed file will be processed; more than one ims:serviceRecord can exist in one element ims:bulkBlockDataFile element. The element ims:serviceName represents the LIS web service whose operations will be called for processing the given feed file. The element ims:interfaceName is the interface in the LIS SIS code which will be used as the index of available methods to call. The object ims:operationSet contains the list of methods (listed as a ims:operationName element) which are to be called for processing the feed file.
Execute the test request
The request is executed by selecting the green 'play' button at the top-left-hand corner of the frame for the request.
The response to the request above is:
<soapenv:Envelope xmlns:soapenv="http://schemas.xmlsoap.org/soap/envelope/">
<soapenv:Header>
<ims:imsx_syncResponseHeaderInfo xmlns:ims="http://www.imsglobal.org/services/li.../imsbdems_v1p0">
<ims:imsx_version>V1.0</ims:imsx_version>
<ims:imsx_messageIdentifier>4ebf713ae3664f84ab67d961c3f55060</ims:imsx_messageIdentifier>
<ims:imsx_statusInfo>
<ims:imsx_codeMajor>success</ims:imsx_codeMajor>
<ims:imsx_severity>status</ims:imsx_severity>
<ims:imsx_messageRefIdentifier>123456</ims:imsx_messageRefIdentifier>
<ims:imsx_description>Use the reference code 9d4a22b81d4a45d683c2c13e0a0e7a1c to track these records in the logs.</ims:imsx_description>
<ims:imsx_codeMinor>
<ims:imsx_codeMinorField>
<ims:imsx_codeMinorFieldName>TargetEndSystem</ims:imsx_codeMinorFieldName>
<ims:imsx_codeMinorFieldValue>fullsuccess</ims:imsx_codeMinorFieldValue>
</ims:imsx_codeMinorField>
</ims:imsx_codeMinor>
</ims:imsx_statusInfo>
</ims:imsx_syncResponseHeaderInfo>
</soapenv:Header>
<soapenv:Body>
<ims:announceBulkDataExchangeResponse xmlns:ims="http://www.imsglobal.org/services/li.../imsbdems_v1p0"/>
</soapenv:Body>
</soapenv:Envelope>
In summary
Manually testing the integration prior to connecting to the SIS allows you to confirm proper operation of the Learn configuration. Testing using the UI allows for quick testing of data and behavior of settings. Testing using the SoapUI toolset allows not only for testing of data and behavior, but also of connectivity and authorization settings as they would be passed from the SIS. This allows for a separation of tasks for establishing and triaging your LIS integration.
Sample data
The sample data set (bbdn-lis_samples) used in this topic can be cloned or downloaded as a .zip file from the Blackboard GitHub repository.