Setup Page Overview
Setup will be available as a selection in the page selector to users who have administrative roles and permissions. If you do not have an administrative role, you will not see Setup in your page selector drop-down. The administrative configurations you will have access to are:
- Advisor configurations (update, reset password, deactivate/activate)
- Case View configurations
Setup Page Layout
The Setup page contains the following areas:
- Setup area with selectors:
- Components
- Selections (dependent on selection in Components)
- If Advisor is selected in the Components selector, a Search bar displays
- Results list area (which may be expanded to a full page list view)
- Action button area
- Active load area

Setup Area
The Setup area contains a Component drop-down that is used to select the object that you would like to administer:
- Select Advisor to manage advisors.
- Select Case to activate the Selections selector.
- At this time, Case Views (institution level Views) will be the only Case Selection available to select.
Setup Area
- Manage Advisors
- Edit Advisors Personal Information & Passwords
- Activate / Deactivate Advisors
- Manage standard Case Views (beyond the 2 standard out-of-the-box views)
Mange Advisors
Users with administrative roles and permissions will be able to manage other advisors who will use SmartView.
- Select Advisors from the Components selector.
- See the list of all advisors set up in the institution listed in alphabetical order by first name.
- Search for an Advisor by entering the first name, last name, both first and last names, or email address of the advisor you would like to find.
- Select the Search icon.
The following actions are available on the Advisor Action Menu:
- Create a New Advisor
- Edit an Advisor
- Activate / Deactivate an Advisor
As with other lists, the Advisor Setup List may be expanded to the full-page list view, where you may modify the number of Advisors you wish to see per page in the list.
Selecting an Advisor from the Advisor Setup List will display the selected Advisor's profile information in the Add/Edit Advisor section.
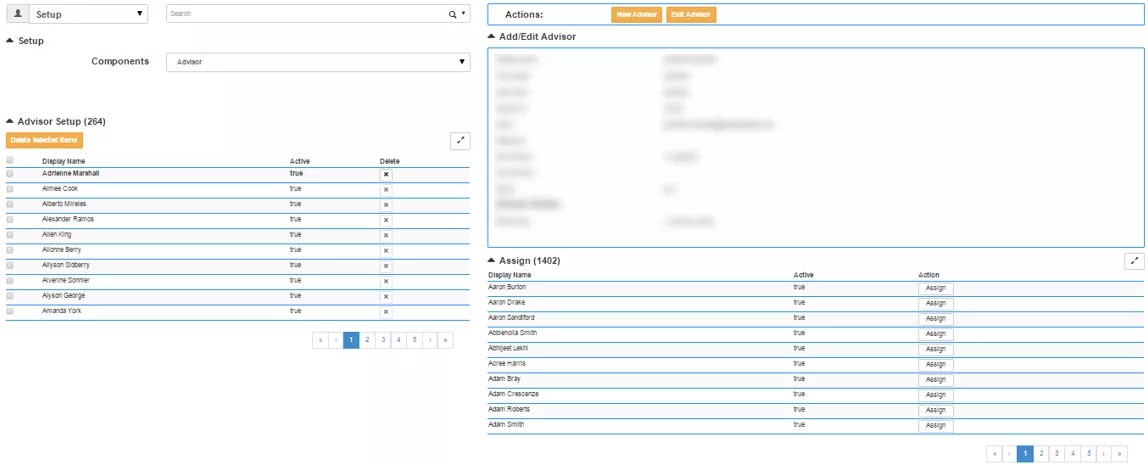
Advisors may be deleted one at a time via the Actions "x", or in groups by selecting the checkbox for the Advisors that you want to delete and then selecting the Delete Selected Items button. You may also select all the Advisors displaying in the list by selecting the global checkbox (column header) and then selecting the button to delete all selected items (Note: this option will delete all the Advisors listed per page).
New Advisor
You must complete the following when creating a New Advisor:
- Complete the user's general profile information
- Choose whether or not the Advisor will be active (able to log into Service Desk)
- Choose the Role Group the advisor will be assigned to
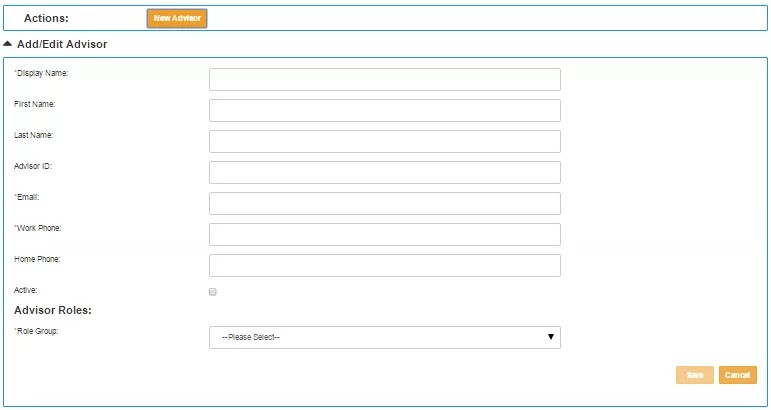
Edit Advisor
You will be able to edit the following items for Advisors:
- The user's general profile information
- Set whether or not the Advisor will be active (able to log into Service Desk)
- Set the Role Group the advisor will be assigned to
Create Standard Views
To access the Case View Manager interface, Case must be selected from the Components drop-down, and Views selected from the Selection drop-down within the Setup page.
The following actions are available in the Case View Action Menu:
- Create a New View
- Edit a View
As with other lists, the Case Setup List may be expanded to the full-page list view, where you may modify the number of Case Views you wish to see per page in the list.
Selecting a Case View from the Case Setup List will display the selected Advisor's profile information in the Add/Edit View section.

Case Views may be deleted one at a time via the Actions "x", or in groups by checking the checkbox of the Case View that you wish to delete and then selecting the Delete Selected Items button. You may also select all the Case Views displaying in the list by checking the global checkbox (column header) and then selecting the button to delete all selected items (note: this option will delete all the Case Views listed per page).
New View
There are three steps to creating a new Case View:
- Name the Case View
- Specify the search conditions
- Select the fields to be displayed as the column headers
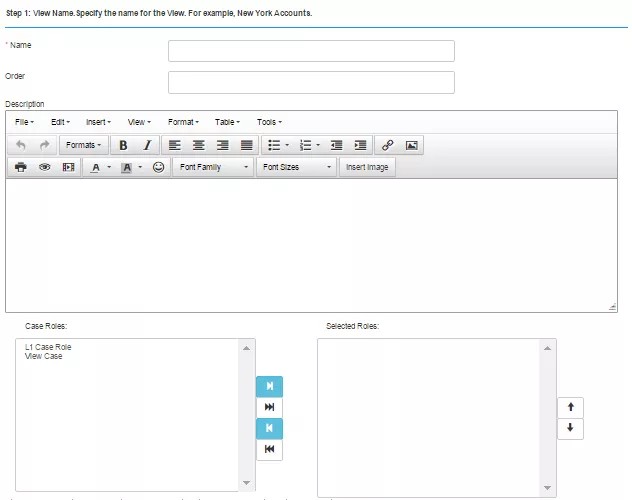
Step 1: Naming the Case View
This section allows you set the name of the Case View, the order for the Case View to be displayed in the Case View dropdown list in the Case page, as well as the Case Role that determines which actions can be performed for cases in this view.
Step 2: Specifying the search conditions
The search conditions in a Case View is used to determine which cases are to be displayed in this Case View. The following components are used to specify your search criteria:
The Field, Condition, and Value drop-downs are all dependent on one another to create search criteria.
- Field
- The field dropdown relates to various Case Fields and Case information.
- Condition
- The condition is to narrow results to the desired value from a selected field using the following conditional operations:
- Equal
- Not Equal
- Null
- Not Null
- The condition is to narrow results to the desired value from a selected field using the following conditional operations:
- Value
- The Value sector will display available options for the selected Field option.
- And Or
- If the Case View requires more than one Search Criteria, then you must select a Boolean operation:
- And - Case must meet these criteria AND the following.
- Or - Case must meet these criteria OR the following.
- If the Case View requires more than one Search Criteria, then you must select a Boolean operation:
- Actions
- Two actions are available in the Actions field:
- Delete Search Criteria
- Add a Search Criteria
- Two actions are available in the Actions field:

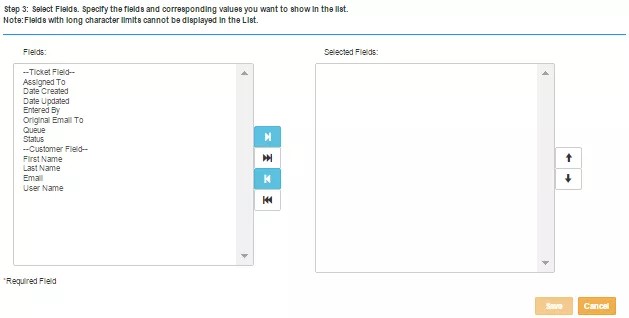
Step 3: Selecting the column headers
The final step is to select what you would like to be displayed as the column headers for this Case View.
Fields are customizable.
Edit View
If the Edit View action is selected, you are able to change the following for the selected Case View:
- Name the Case View
- The search conditions
- The fields to be displayed as the column headers