Most account information is managed from the district student information system, so most changes should be added there and not directly in the account. But as an administrator, you can review the account details and update directly into the Blackboard Communications HQ interface if needed.
Search for a user
There may be times when you need to search for a specific user. Using the Account Search feature from the menu bar, you can search for students, their parents, and other school members.
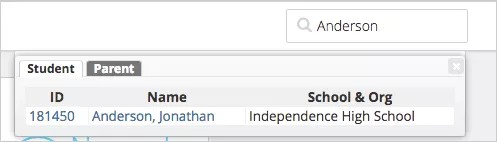
- Type the user name, phone number, ID number, or email address in the Account Search box.
- Press Enter or Return.
You will receive a list of users that you can view. Click the name of the user to review their account information including phone numbers and email addresses.
Edit account information
- From the Blackboard Communications HQ interface menu, select Accounts > Manage Accounts.
- Search for the user to update.
- You can search by Role, School, Name, or Phone/Email.
- Select List Accounts.
- Select the account Name to open the personal account information.
- Select the type of information to update on any of the tabs. The account tabs available may include:
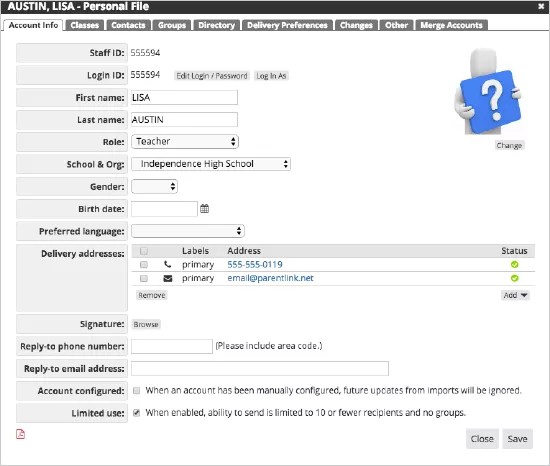
- Account Information - This tab displays the same information that can be found in the My Accounts tab, including name, IDs, role, school, gender, preferred language, delivery addresses, and whether the account is configured. From here, you can update a user's login and password, upload profile pictures, update their contact details.
- Classes - Depending on the user, the Classes tab lists the class information. For teachers, this tab lists the class websites, where you can manually adds sites to the teacher. For students, this tab lists the class, teacher information, and grades.
- Attendance - Depending on the users, the Attendance tab lists recent absences. You can select a timeframe for a list absences, and produce a report.
- Contacts - You can view recent messages that were sent to the user. You can also add contacts for the user.
- Groups - This tab displays the list of groups that the user is a member of.
- Parents - This tab displays the list of parents connected to a user account (for students). From here, you can add parent and guardians to a student account.
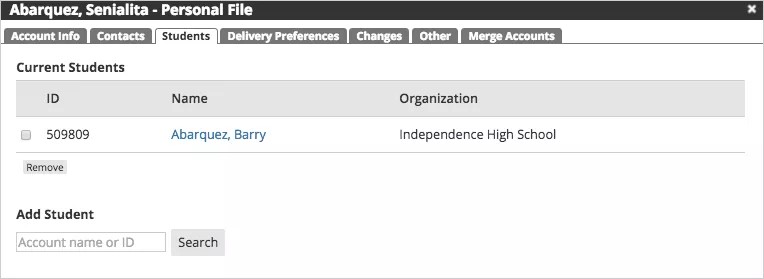
- Students - This tab displays the list of students connected to a user account (for parents usually). From here, you can add a student to a parent account.
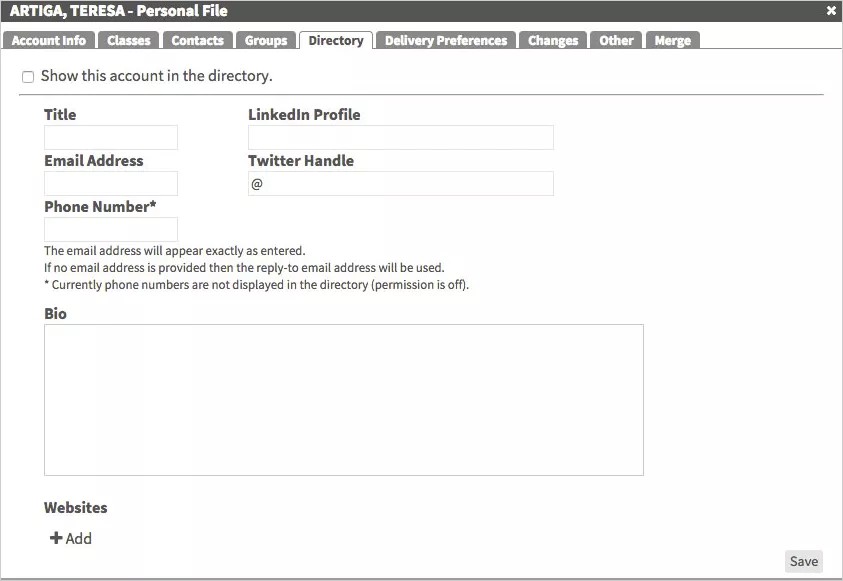
- Directory - This tab allows you to add the user to your district/school directory list. You can add the user's title, bio, and contact information.
Delivery Preferences - This tab allows you to view the users preferences for delivering a specific type of message.
Check out the details of the delivery status levels.
- Changes - This tab lists all the changes that have been made to the account.
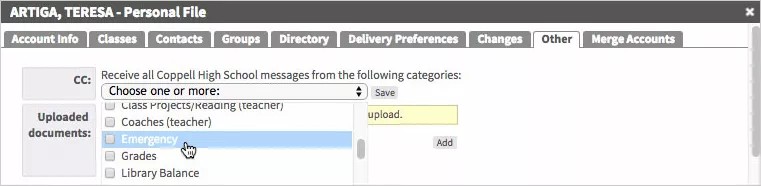
- Other - This tab displays different type of information depending on the user type. For students, this tab displays any cafeteria balance information, uploaded documents, and additional data for the student in question. For teachers, this tab displays different categories of messages that the user should receive, and details of the teacher's class menus. You can add additional documents to any type of user.
- Merge - This tab allows you to select one account to be merged with another account.
If you add any changes to the tabs, select Save.
If the account will never need to be changed in your district/school student information system, select Account configured from the Account info tab. This feature ensures that there will not be any future updates saved to the account.
Delivery Status Levels
You can view the status levels on an individual account and in the Bad Phone/Email report.
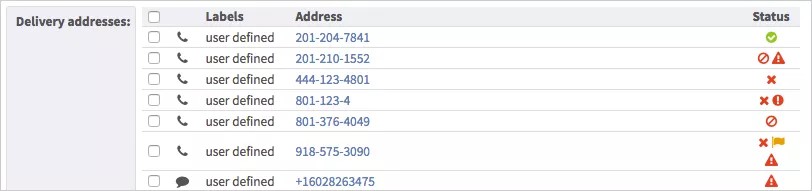
The following table describes the available status levels with the icons and descriptions.
| Icon | Description |
|---|---|

Enabled | Available for use. Messages will be sent to address. |

Flagged | Marked as a bad address based on delivery results. Delivery attempts will be limited. |

Disabled | Not available for use. No messages will be sent to address. |

Invalid | Invalid address format including phone numbers missing all ten digits or email addresses without @ symbols. |

Blocked | Listed on the do-not-contact list. Addresses are added by:
|

Deactivated | Phone number has been deactivated by the phone carrier. |
Edit login ID and password
Administrators can update a user login or password as required when a user cannot access the system.
- From the Blackboard Communications HQ interface menu, select Accounts > Manage Accounts.
- Search for the user to update.
- You can search by Role, School, Name, or Phone/Email.
- Select List Accounts.
- Select the account Name to reset the password or change the Login ID.
- From the Login box, select Edit Login/Password.
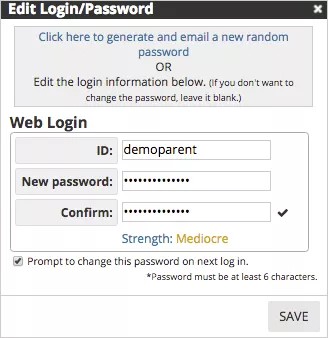
- You can generate a new password and email it to the user. Select the link to complete the password change.
- Type a new login ID.
- Type a New password and Confirm the information.
- Select Prompt to change this password on next log in, so the user can update their password.
- Select Save.
Change user delivery methods
Administrators can adjust the delivery methods upon request for other users. You can only use this process to change delivery methods for currently existing phone numbers and email addresses on file for a user.

- From the Blackboard Communications HQ interface menu, select Accounts > Manage Accounts.
- Search for the user to update.
- You can search by Role, School, Name, or Phone/Email.
- Select List Accounts.
- Select the account Name to reset the delivery methods.
From the account, select the Delivery Preferences tab.
The Delivery Preferences tab shows all of the delivery methods as well as the possible contact methods.
- Select each image to show the available contact numbers or addresses.
Select or clear each option listed under the delivery method.
If the school or district has set a delivery type to required, it will not permit anyone to remove the last contact number form a list.
- Select Save when finished.
View previous contacts for users
You can view the previous contacts for a user to see a past message.
- From the Blackboard Communications HQ interface menu, select Accounts > Manage Accounts.
- Search for the user to update.
- You can search by Role, School, Name, or Phone/Email.
- Select List Accounts.
- Select the account Name to view.
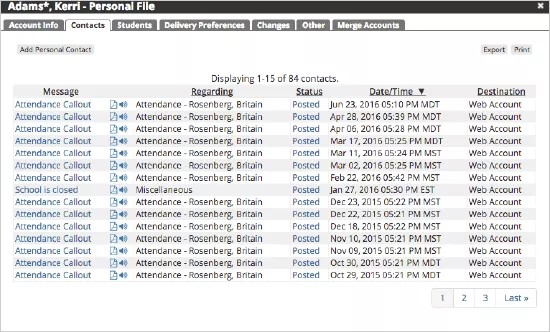
After the Account window is open, select the Contacts tab.
The tab lists all previous contact/messages sent to that person.
- Select the message itself to see what it said, print the message, or listen to the message.
- You can Export or Print a list of the contacts/messages for person.
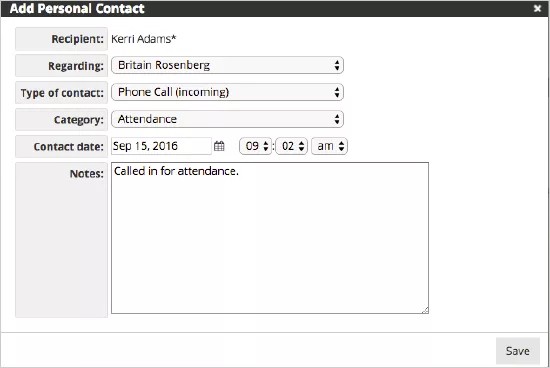
- Select Add Personal Contact to add a contact or message to the list that was done outside the messaging system, but you want to track.
Connect parents to students and students to parents
You can connect parent accounts and student accounts. Either search for a parent account to attach a student, or search the student account to attach the parent account.
- Search for the student to add a parent, or a parent to add a student connection.
- Select the account Name to open the personal account information.
- Select the Students or Parents tab.
- In the Add Student or Add Parent area, type the Account name or ID and select Search.
- Add the appropriate account.
- Select Save when finished.
Hide a staff profile from the directory
You can hide individual staff including teachers from appearing in your app directory.
- Search for the staff member.
- Select the account Name to open the personal account information.
- Select the Directory tab.
- Clear the Show this account in the directory option to remove the staff member from the directory.
- Select Save when finished.
Add carbon copy on messages
As an administrator, you can select specific users to be automatically carbon copied for all or specific message categories. As an example, for all emergency messages sent, you can receive a carbon copy of the message.
- From the Blackboard Communications HQ interface menu, select Accounts > Manage Accounts.
- Search for the user to update.
- You can search by Role, School, Name, or Phone/Email.
- Select List Accounts.
- Select the account Name to open the personal account information.
- Select the Other tab.
- Select the categories for topics where you want to receive messages.
- Select Save when finished.