Create a one-stop shop for important information with the Institution Page!
In the Ultra experience, you can create an Institution Page to broadcast important messages and links to everyone in your institution. Each user can access the Institution Page from the base navigation, making it simple and quick to find out about what's going on around campus or online. Add distinct modules to highlight events, processes, announcements, or anything else you want to spread the word about!
Looking to highlight the Institution Page? You can change the page users visit first after they log in.
If you used Tabs & Modules in the Original experience to broadcast important information to your academic community, use Institution Page to do the same in the Ultra experience.
You can't currently disable the Institution Page from the Administrator Panel. The page appears in the Ultra base navigation by default. When you hide all modules, the Institution Page doesn't appear in the base navigation for users other than administrators.
You can set visibility so that users can see the finished modules, but modules under construction are hidden.
Frequently asked questions about the Institution Page
Video: Create your Institution Page in Blackboard Learn with the Ultra Experience
Watch a video about creating the Institution Page
The following narrated video provides a visual and auditory representation of some of the information included on this page. For a detailed description of what is portrayed in the video, open the video on YouTube, navigate to More actions, and select Open transcript.
Video: Create your Institution Page shows you how to customize and add modules to your institution page.
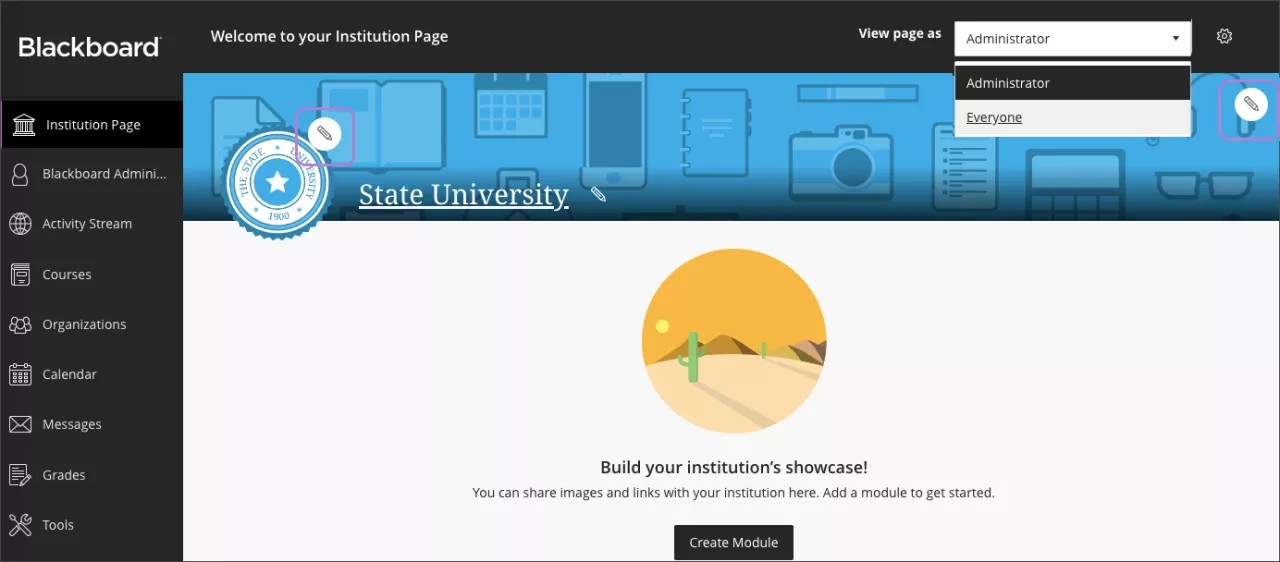
Add your institution's name and banner
Show off your school's personality with the banner on the Institution Page. Point to the text at the top of the screen and select to edit your school's name.
- To add your institution logo, place your cursor on the logo and select the Edit icon, represented by a pencil. A panel appears where you can choose a new logo. Select Insert from Content Collection to browse and choose an image from your institution's repository. Select Save when you're finished.
- To add a banner image, select the Edit icon—represented by a pencil—at the top-right of the banner image. A panel appears where you can choose a new banner image. Select Insert from Content Collection to browse and choose an image from your institution's repository. Select Save when you're finished.
For the best appearance, the logo image should be at least 200 x 200 pixels. We recommend the banner image should be at least 2000 pixels wide and 160 pixels high. Because screen size width varies on wider screens, the banner image crops at the top and bottom to center the image as the content area gets wider.
When you select a logo or banner image, you can choose to open the Content Collection in the current window or a new window. You can change this preference later—simply select the settings icon in the panel to change how the Content Collection loads in your browser.
Users need permission to view the files you choose to add to the Institution Page. Blackboard Learn automatically updates the file permissions in the Content Collection when you choose files from the repository. Anyone who has access to the Institution Page can view the images as well.
Add a module
There are currently two types of modules you can add to the Institution Page: Helpful Links and Custom Content.
You can use modules to highlight specific pieces of information you want users to know. Whether it's information about moving into dorms, graduation procedures, or construction projects, you can use modules to share key dates and links.
- To add a module to the empty Institution Page, point to Create Module. As you continue to build the Institution Page, select the plus sign wherever you want to add a new module.
- In the Module Creator panel, you can build the module and preview the content as you go.
- First, you can select your audience. Choose which roles at your institution see the modules you create. All users can view a module unless you select a specific audience. Select a role from the menu. You can add as many roles as you want.
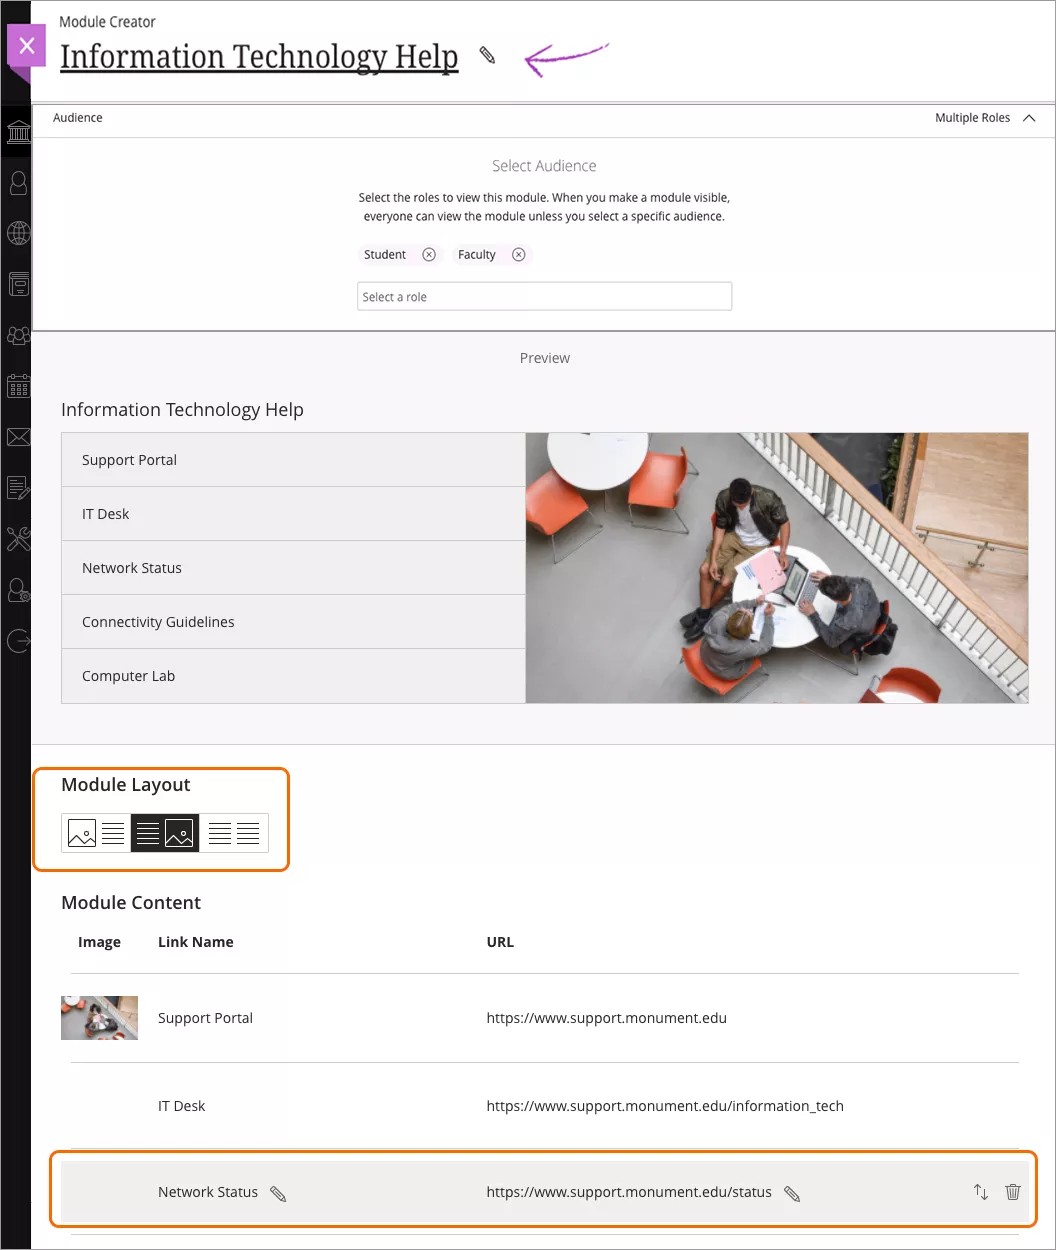
- The Preview section shows you how the module will appear to users. Edit the content below the Preview. At the top of the panel, type a module title to get started.
Helpful Links
Catch some attention with an engaging module title and image.
- In the Module Layout area, select the orientation of the image and links. You may choose to position the image to the left or right of the links, or omit the image to show only links.
- In the Module Content area, you can add and edit the image, link name, and URL. Hover over the Image, Link Name or URL area, and select the Edit icon. You can change these options at any time.
- Select the plus to add an image to the module.
- On the panel that opens, select Insert from Content Collection to browse and choose an image from your institution's repository. Choose to open the Content Collection in the current window or a new window. You can change this preference later—simply select the settings icon in the panel to change how the Content Collection loads in your browser.
- Select Save when you're done.
Users need permission to view the files you choose to add to the module. Blackboard Learn automatically updates the file permissions in the Content Collection when you choose a file from the repository. Anyone who has access to the module can view the image as well.
For the best appearance, the Helpful Links module image should be at least 580 x 274 pixels.
In Module Content, you can add links. The Helpful Links module includes five example links by default.
- To edit a link, hover over the Link Name or URL and select the Edit icon.
- If you want to reorder the links, point to the link and select the Move icon to the side. Use the keyboard or drag-and-drop function to move the link.
- To delete a link, select the Delete icon.
When you include more than four links, the additional links are not shown to users at first. Additional links in the Show All menu and appear when the user opens the list.
The first four links are the ones that your users see first, so be sure to order the important links at the top.
Custom Content
The Custom Content module is your blank canvas. In the Module Content area, use the editor to build out the module. Use the editor's options to format text, include links and images, and embed videos.
If you use Targeted Notifications and want the notification to persist or be available for future reference, you may find it useful to post the same information in a Custom Module. This way, your users can find it easily and refer back to it as often as they need to.
Add LTI content
You can add external tools to the Institution Page using Learning Tools Interoperability (LTI). In the editor of the Custom Content module, select Insert/Edit LTI Item. Select a tool from the list to add it to the module.
Don't see the tool you're looking for? An LTI tool needs to be placed as a System Tool to appear as an option in this list.
Learn more about how to manage LTI placements
Edit, move, or delete a module
Point to a module to edit, move, or delete it. Choose from the options:
- Select the More options link and choose Edit. Make your changes and select Save.
- Select the More options link and choose Delete. Confirm if you'd like to permanently remove the module from the Institution Page.
- Select the Move icon to reorder where the module appears. Use the keyboard or drag-and-drop function to move the module.
Build an Institution Page for custom brands
You can create an Institution Page for your custom brand. Individuals who have access to the brand will have access to the custom Institution Page—making it the ideal place to post communications for that audience.
You can access a brand's Institution Page in two ways—in the Brands area of the Administrator Panel or directly from the Institution Page on the base navigation.

More on creating custom brands in Ultra
Visibility settings
You can choose who sees the modules on your Institution Page. All modules are Hidden from users by default. When you're finished building a module and ready to share, select Visible to users in the visibility settings.

Want a preview of what the page looks like for instructors and students? You can view the Institution Page as all users to confirm it looks the way you expect. At the top of the page, in the View page as menu, select All Users.
Allow other users to add or edit modules
Making sure the Institution Page's content is accurate and up to date can be a challenge. To help you handle the workload, you can grant other users permission to add, edit, and delete modules on the Institution Page.
As with any permissions, it's important to consider which users you want to have these abilities. It is recommended to create a new system role to manage the Institution Page, and then add this role to existing user accounts. This way, you won't grant an entire group—such as Course Builders or Staff—the ability to edit modules. You have more granular control when you create a new system role.
When you create a new role, grant these permissions to allow edit capabilities on the Institution Page:
- Administrator Panel (Users) > Institution Roles
- Administrator Panel (Users) > Users > View Institution Roles
- Administrator Panel (Communities) > Tabs and Modules > Modules
- Administrator Panel (Communities) > Tabs and Modules > Modules > Create Module
- Administrator Panel (Communities) > Tabs and Modules > Modules > Delete Modules