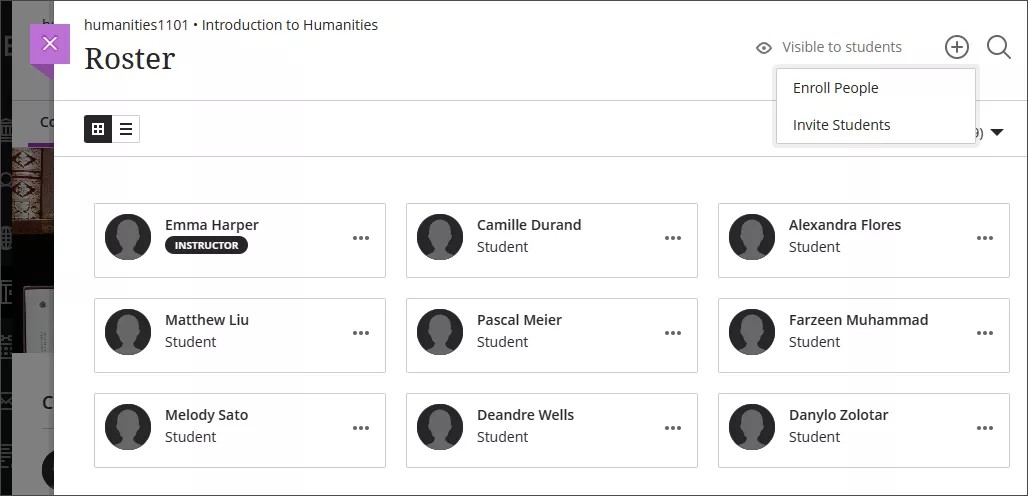
Roster
Use the Roster link on the Course Content page to view your class list, connect with your students, and match faces to names. You can also send messages to anyone involved with your course.
Users can upload a picture of themselves on their Profile pages. If they don't add pictures, a generic silhouette appears in the roster. Users' profile pictures also appear in the gradebook, groups, discussions, conversations, and messages next to their activity. Your profile picture also appears on the Course Content page.
Select a name to view more information. Everyone controls who can access this information in their profile privacy settings.
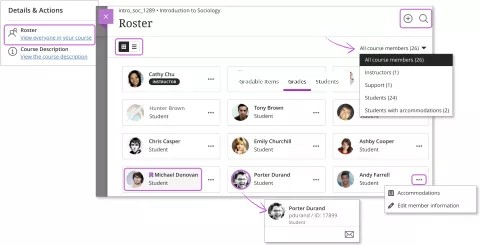
Change your view. You can choose grid view or list view. The roster remains in the selected view until you change it, even if you log out.
- Grid view is sorted automatically by role and then by last name. Roles appear in this order: instructors, teaching assistants, graders, course builders, and students. To manually sort the list, switch to list view.
- List view is sorted by last name by default. Select the Name or Role headings to sort the contents.
Filter your view. You can view the roster by roles, such as instructors or support faculty. The filter options are based on the roles found in your course. You can also filter by Students with accommodations. Students with accommodations appear with an icon next to their names.
Connect from profile cards. Select profile pictures to see basic profile cards and send messages. If more than one student has the same name, names are ordered by student IDs. The profile cards display usernames if allowed by your institution.
Manage users. With the appropriate permissions, you can perform some user management functions from the roster. Point to a person to reveal the More options button to access the menu and change user roles, deny access, add accommodations, or remove a person from your course. People you deny access to appear with a gray profile picture with a diagonal line. To enroll people from the roster, select Enroll People at the top of the page.
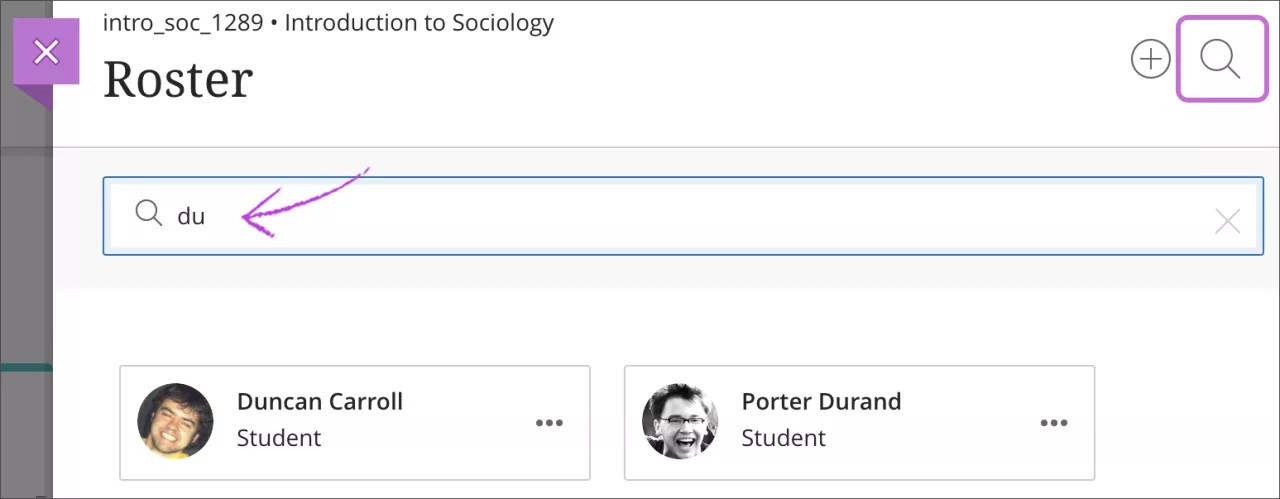
Search the list. In grid or list view, select Search Roster. In the search box, type a name, username, or at least two letters to reveal matches. Any filters previously selected are cleared when you perform a new search.
Manage and enroll people
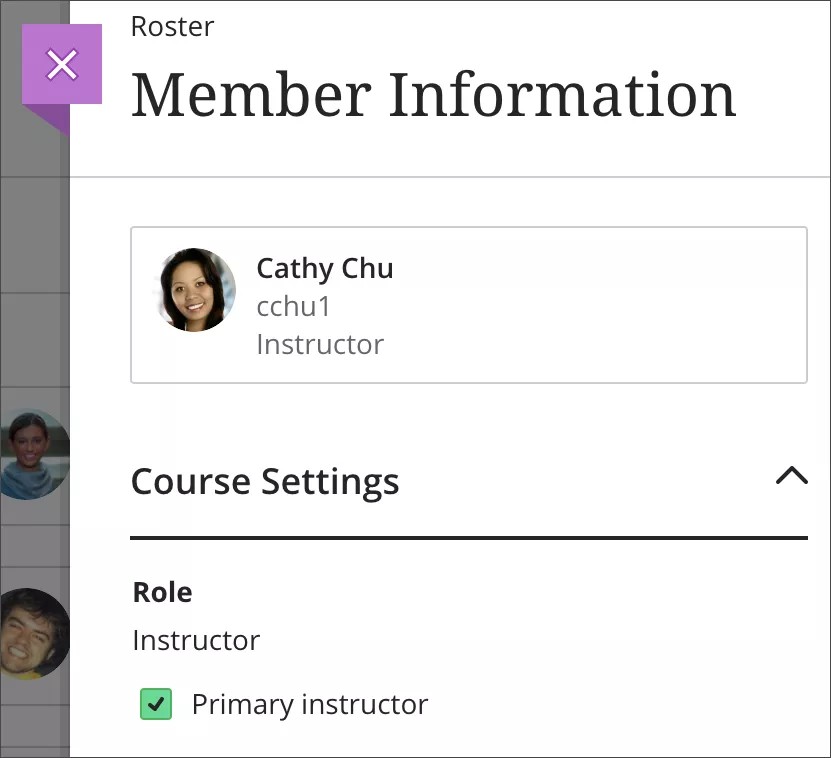
On the Roster page, access a person's menu. Select Edit member information to open the Member Information panel. You can change anyone's role, deny access to your course, or remove a person from your course. Your institution controls what you can do.
In the panel, you can also update your personal information. Your changes are reflected in your profile and throughout the system. Students can edit their information in the same way.
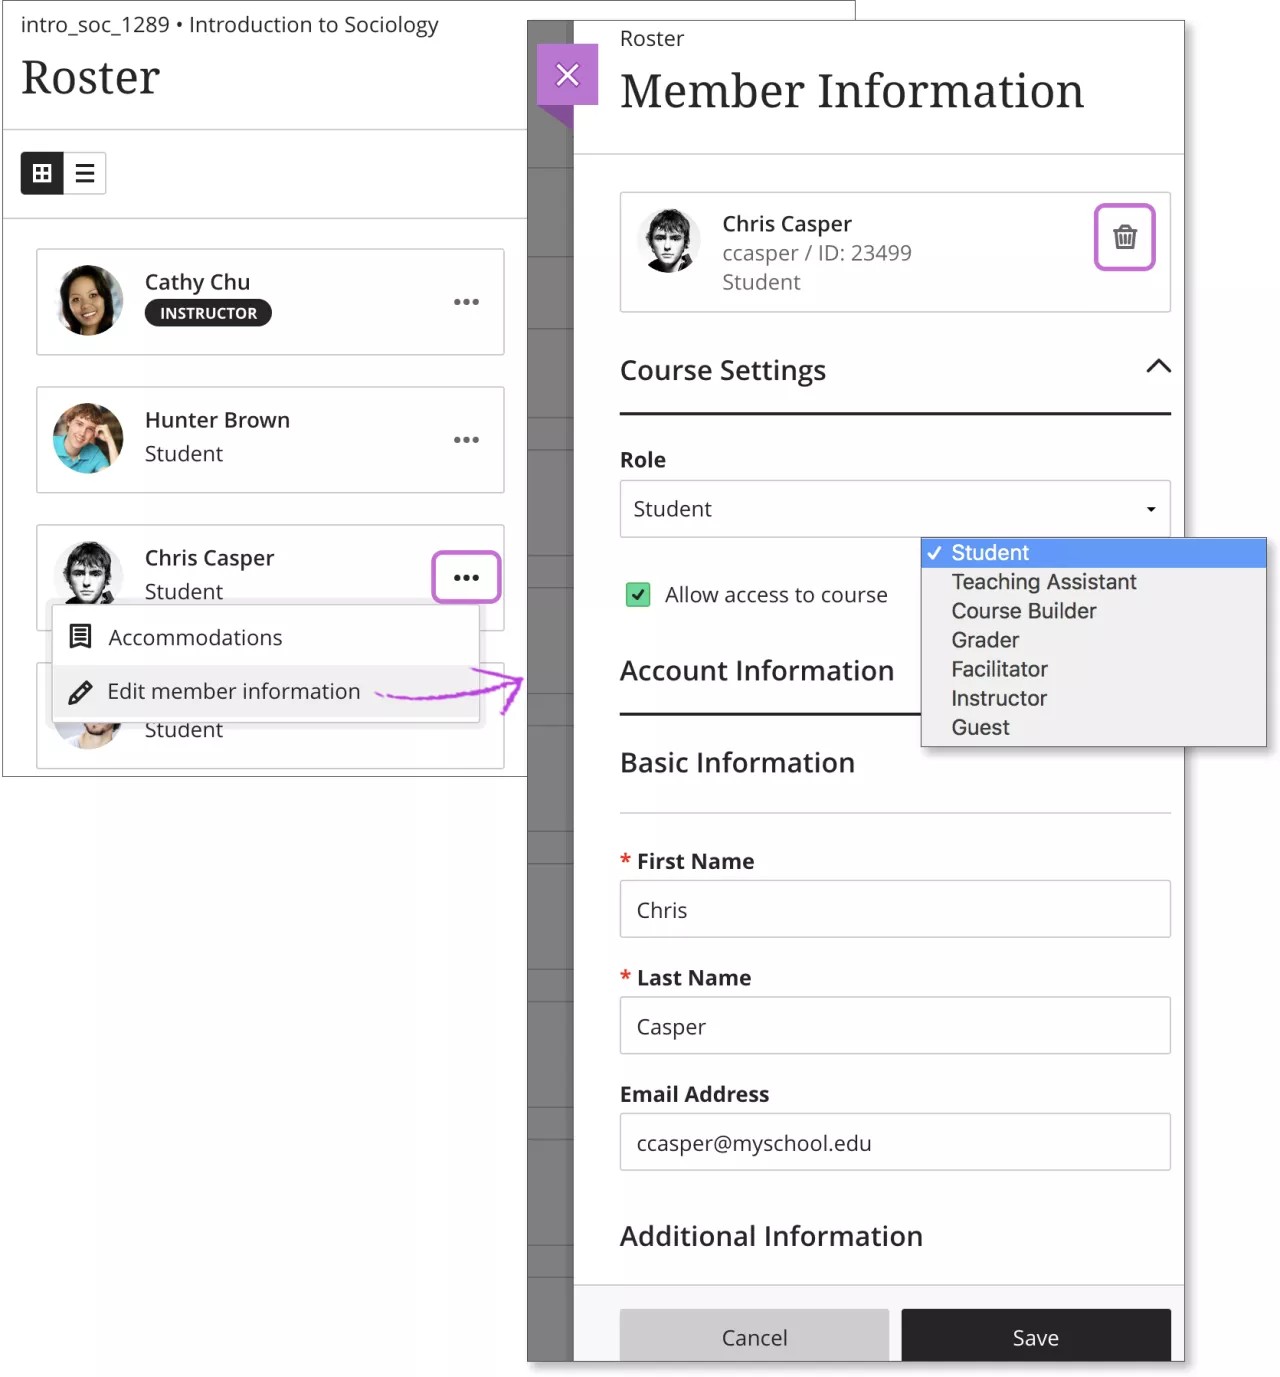
Change roles. When you change a person's role, the person is repositioned in the roster list if you're in grid view. Roles appear in this order: instructors, teaching assistants, graders, course builders, and students. In list view, all members appear in alphabetical order.
Deny access. Clear the Allow access to course option to deny course access yet retain the person's course record and activity. The roster indicates the person's status with a gray profile picture with a diagonal line. The person no longer sees your course on the Courses page.
Administrators make users unavailable at the system level, which is different than when you deny a person access to your course from the roster. Unavailable users at the system level can't log into the system.
Remove people. Select the Remove Member icon to remove a person from your course. This action also deletes all data and grades associated with the person. You'll receive a pop-up confirmation window. To keep the data, you can cancel and deny the person access to your course instead.
Enroll people
If allowed by your institution, you can enroll people in your course. Select the Enroll People icon at the top of the roster to open the Enroll People panel.
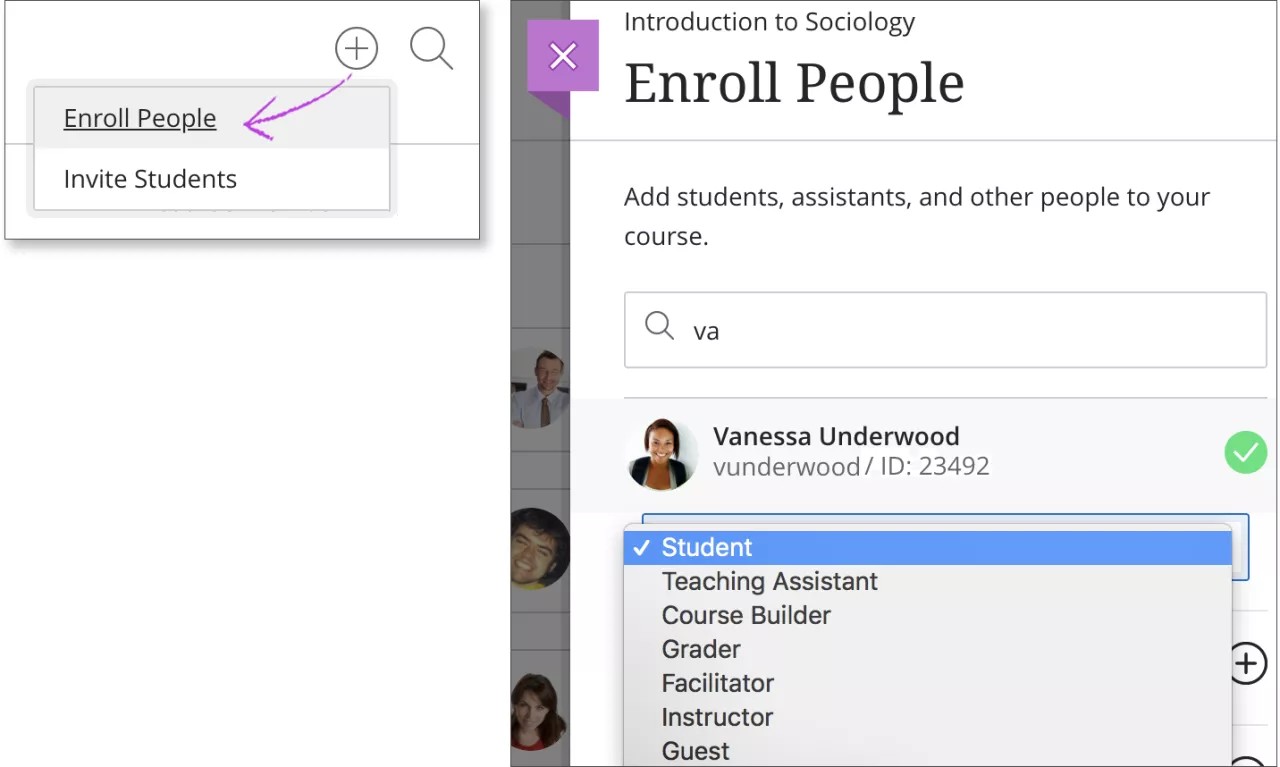
- In the search box, type a name, username, or at least two letters to reveal a list of matches. People already enrolled in your course don't appear in the search results.
- Select one or more people. They immediately appear in the roster list. To reverse a selection, select a person's name again.
- Choose a role for each selected person.
- Select Save. The panel closes. At the bottom of the roster, a message appears with the names of the people you added.
Unavailable users at the system level can't be enrolled in courses and don't show in the search results.
Invite students
You can invite students to a course by email. Select Invite Students at the top of the roster panel.
The Invite Students panel opens.
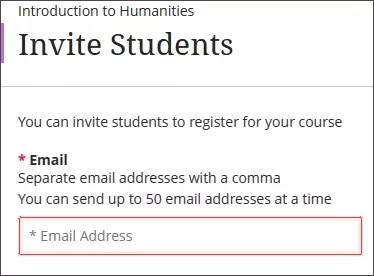
Enter a student email into the Email field. If you want to invite multiple students, separate the emails with a comma. You can send up to 50 email addresses at a time. Students will receive an invitation link in their email.
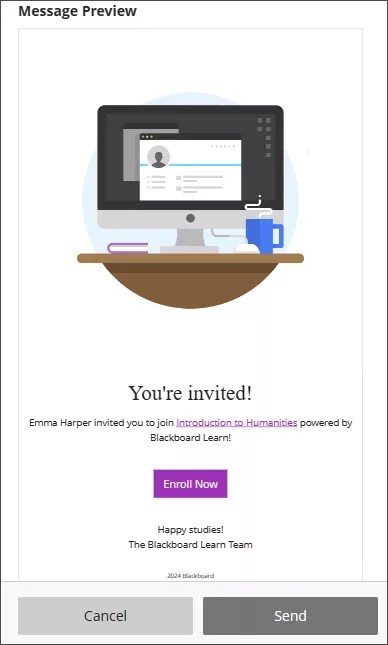
Students can select Enroll Now in the email to enroll themselves into the course. To send the invite to students, select Send at the bottom of the panel.
Roles
Instructor: Creates course content and facilitates course interactions. Instructors can access private courses and open a course when it's ready for students.
Primary Instructor: If a course has multiple instructors, any of them can designate the primary instructor from the roster. Open an instructor's Member Information panel and select the Primary instructor option. The primary instructor is listed first in the roster. If multiple primary instructors exist, they're listed alphabetically before other instructors in the roster.
Teaching Assistant: Creates course content, facilitates course interactions, and has access to private courses, same as instructors. Role limitations are set by your institution. Teaching assistants can't delete an instructor from a course.
Grader: Assists instructors in the creation, management, and grading of coursework. Graders can't access a private course.
Facilitator: Assists instructors to keep the curriculum moving forward. The facilitator has default privileges related to course materials, gradebook, calendar, announcements, discussions, and groups to assist instructors in the progress of a course.
Course Builder: Creates content, manages a course, and can access private courses. Course builders can't access student grades or remove an instructor from a course.
Student: Submits coursework and participates in discussions. Students can't create or grade course items. Students see private courses in their course lists, but they can't access them.
Guest: Though you can assign the guest role, guests can't access courses at this time.
About accommodations
You can set accommodations for individual students. You can exempt students from assessment due dates or time limits. Use accommodations to help students progress in the course even though they may have difficulty with some requirements. For more information, see Make Accommodations.
You can also give an individual student an exception on a specific test or assignment. An exception includes additional attempts or extended access, even if the assessment is hidden from other students. An exception overrides the two settings applied to everyone else for only that specific assessment.