This information applies only to the Original Course View. Your institution controls which tools are available.
About grading periods
You can create grading periods to group Grade Center columns together by a period of time, such as terms, semesters, or quarters. You can also create grading periods to group columns together by a shared characteristic, such as all the gradable columns for a group project. To create a date range grading period, you can select a setting to automatically associate all existing columns with due dates that occur in the date range.
By default, the Grade Center has no grading periods. You can associate any column with one grading period except user columns. You can create as many grading periods as you want.
You can use grading periods to perform these tasks:
- Filter your view of the Grade Center. For example, you can view only the first quarter grading period and the columns that pertain in the Grade Center grid.
- Calculate grades. For example, you can create a total column that calculates a grade for the columns in the first quarter.
- Create a smart view. A smart view is a focused look at the Grade Center that shows only the columns that match a set of criteria. For example, you can create a smart view that only displays columns associated with "Quarter 1."
- Create a report. You can create a report that displays statistics of performance for all of the columns in a grading period.
Create grading periods
You can't associate columns with more than one grading period. A newly created grading period with the same or overlapping date range will override the settings of an existing grading period. All columns associated with the existing grading period will become associated with the new one.
- In the Grade Center, access the Manage menu and select Grading Periods.
- On the Grading Periods page, select Create Grading Period and type a name and an optional description.
- Select the Grading Period Dates.
- Select None to manually associate columns with the grading period. For example, you can create a grading period named "Group Project." Later, you can manually associate the columns for the project.
- Select Range and type a date range to associate columns that have a due date within that range. Each grading period must have unique dates.
- Optionally, select the check box for Associate Columns to associate all existing columns with a due date within the date range. When you create new columns that fall in the date range, you must manually associate the columns with the grading period.
- Select Submit.
Sort, edit, and delete grading periods
On the Grading Periods page, you can sort, edit, and delete grading periods. To sort a column, select the heading. If many grading periods exist, select Show All to display all on one page. Select Edit Paging to change the number of items to view per page.
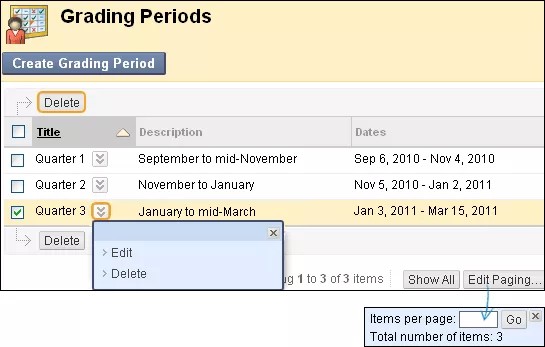
To edit or delete a grading period, access its menu and select Edit or Delete. All Grade Center columns associated with a deleted grading period are reset and aren't associated with a grading period.
You can change the date range for a grading period and select the Associate Columns check box. All of the existing columns with due dates that match the new date range will be associated with the grading period.
View a grading period and associate columns
In the Grade Center, you can view the columns associated with a grading period in two ways. You can filter the view of the Grade Center and select a grading period. You can also view all grading periods and associated columns on the Column Organization page. You can move one or more columns to a grading period, a different grading period, or no grading period. Access the page from the Manage menu.
If columns weren't associated automatically with a grading period based on due dates, you can manually associate columns on the Column Organization page. You can also edit a column's settings. For example, you can create a grading period for a group project and associate the columns that pertain.