This information applies only to the Original Course View. Your institution controls which tools are available.
About the glossary and glossary files
You can add a glossary of terms to each of your courses. Each entry consists of a term and a definition. You and your institution control if the glossary tool is available.
If you plan to build a large glossary, you can upload a file that contains all, or most of the terms, and then update the glossary with more terms as needed. You can also add glossary terms one by one for a short glossary or when you want to add terms to an existing glossary.
To create a glossary file for to upload, type the terms and definitions in spreadsheet software, such as Microsoft® Excel®. You must add one term and one definition per line, with the term in one column and the definition in the next column. Save the file as CSV (comma-separated values). Alternatively, use a simple text editor to create your glossary file. With one entry per line, separate the term from the definition by a comma or tab. Then, save the file in CSV or TXT format.
After you create your glossary file, upload it with the glossary tool. You have the option to either update an existing glossary or replace it.
If duplicate terms are in the uploaded file, they will replace those in the existing glossary.
Glossary file format
Within the CSV file, each entry is separated by a hard return and the term and the definition are separated by a comma.
Example 1:
"Apple","A red fruit."
"Onion","A vegetable."
Although it's not always necessary to enclose the term and the definition in quotation marks, Blackboard strongly recommends this practice to avoid processing errors.
Example 2:
"Apple","A delicious fruit, usually <b>red</b> in color. Apples are grown all over the world and are an important religious and mythical symbol to several cultures. The Pacific Northwest region of the United States, particularly Washington state, is famous for its apples.<br><br> However, most refined apple lovers agree that the best apples come from the Hudson River valley area of New York. Perhaps this is why New York City is nicknamed, ""The Big Apple."""
"Onion","Onions are a tasty vegetable with green stalks and a white, yellow, or red bulb. For the best-tasting onions, visit the \"Onion Capital of the World\" Pine Island, New York."
Quotation marks that appear in a definition or a term must be escaped. The quotation mark must be identified as part of the definition or the mark is read as the end of the definition. Escape quotation marks with a backslash (\") or another set of quotation marks ("").
Batch files
Batch files are TXT files that hold large quantities of information that you can upload to the system. Each batch utility contains specific instructions on creating the batch file. These batch file standards are universal:
- Each file must be one of the supported file types: CSV or TXT. Microsoft Excel versions 2003 and later automatically insert double quotes in each field if the worksheet is saved as a CSV file.
- Each file must be in DOS format. Files in MAC or UNIX format must be converted to DOS.
- Each field must be enclosed in double quotation marks. For example: "ENG_201"
- If quotation marks appear in a field, use an escape character to indicate that the next character doesn't mark the end of the field. The escape character is a backslash (\). For example: "\"ENG_201\""
- Each field must be separated with one of these delimiters: comma, colon, or tab. When selecting AUTO, only one type of delimiter can be used in each batch file. For example: "ENG_201","English Literature" or "ENG_201":"English Literature"
- Each record must be on a separate line. For example:
"ENG_201","English Literature"
"ENG_201","English Literature" - Don't include blank lines between records. The blank line will be processed and return an error.
- Blackboard recommends that each batch file not exceed 500 records because of timeout restrictions associated with most browsers.
Upload or download a glossary file
Control Panel > Course Tools > Glossary
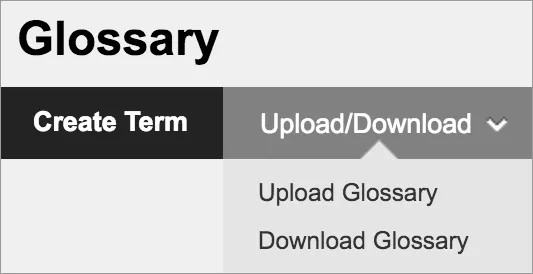
- On the Glossary page, select Upload/Download to access the menu and select Upload Glossary.
- On the Upload Glossary page, browse to locate the file on your computer or in the course's file repository: Course Files or the Content Collection.
- Select one of the Save Current Terms options:
- Add the Terms in this File to the Glossary: Use to supplement the existing glossary with a list of new terms. If a term appears in both the existing glossary and the file, the definition in the file will replace the definition in the existing glossary. If the same term appears two or more times in the file, the last definition for the term will appear in the glossary.
- Delete all Glossary Terms and Replace with the Terms in this File: Use to delete the existing glossary and replace it with the terms in file.
- Select Submit.
In Edit Mode, you can check the terms before you make the glossary available to students.
Download a glossary
You might download a glossary to add terms to another course. You can edit the glossary offline and then upload it to the other course.
When you download a glossary, a comma-separated values data file (CSV) of the glossary is created. Each entry is separated by a hard return and within each entry, the term and the definition are separated by a comma.
You can edit the glossary in a spreadsheet program or in a text editor. Make sure to keep the formatting of the file intact to ensure a smooth upload.
- On the Glossary page, select Upload/Download to access the menu and select Download Glossary.
- On the Download Glossary page, select Download.
- In the pop-up window, select Save As and select OK to save the glossary file to your computer.
Create a glossary term
- On the Glossary page, select Create Term.
- On the Create Term page, type the term and definition. Optionally, use the spell checker in the editor.
- Select Submit.
Add a glossary link to the course menu
You can add a link to the course menu for instant access to the glossary tool. You can also customize the name of the link.
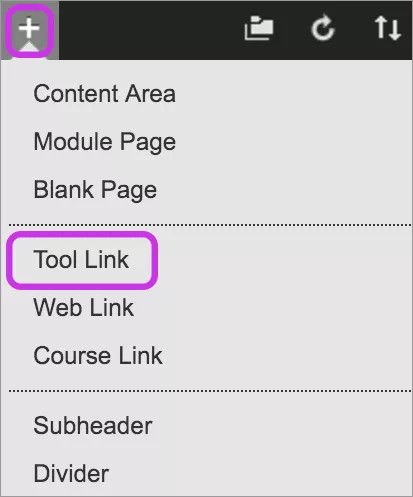
- In Edit Mode, select the Add Menu Item icon above the course menu.
- In the menu, select Tool Link and type a name for the link.
- From the Type menu, select Glossary.
- Select the Available to Users check box.
- Select Submit.
The new tool link appears last in the course menu list. Optionally, press and drag the link to a new position. Access the link's menu to rename, delete, or hide the link from students.