Reusable objects enable you to reuse and share course elements stored in the Content Collection. You can create reusable objects quickly and find them according to categories. You can add reusable objects to several areas of your course.
Your institution controls if you can create and discover reusable objects.
Create reusable objects
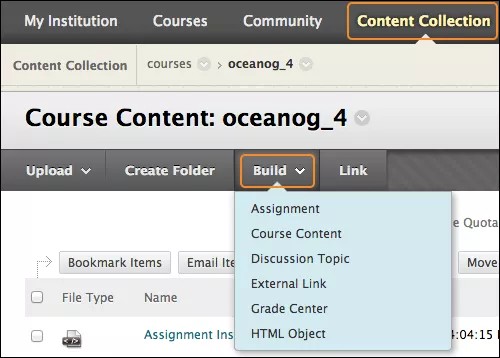
- Select the Content Collection tab and go to the course content folder where you want to create the reusable object. If you access the Content Collection through your course's Control Panel, you don't have access to the Build list and the six categories of reusable objects.
- Point to Build and select a reusable object type.
- On the Create Reusable Object page, type a name, which becomes the file name in the Content Collection.
- Type information in the Content box. Optionally, use the editor options to format the text and include files, images, web links, multimedia, and mashups. The files you upload from your computer are saved in the Content Collection in the same folder.
The editor isn't available for the External Link reusable object.
- Select Submit.
The reusable object appears in the selected folder in the Content Collection. The system adds the .html extension to the file name, except for External Links. In the Content Collection folder list, note that all reusable objects have the same icon, except for External Links.
View a list of reusable objects

In the learning objects catalog, you can view the entire collection of reusable objects that you created and those shared with you by other users at your institution.
- Go to the Content Collection.
- In the left navigation pane, select the arrow to expand the Jump To... menu.
- Select the arrow to expand the Learning Objects section.
- Select View Catalog.
- In the Browse Reusable Objects section, you can view the categories of reusable objects. Expand a category to see a list of reusable objects. You won't be able to view External Links. In the Content Collection, External Links appear only in the folder you created them in.
You can't add reusable objects to your course from this area.
Allow others to discover your reusable objects
To share reusable objects in the Content Collection, set permissions for an individual reusable object or its folder. When setting permissions, select which users or groups have access to the item or folder and determine their level of access—read, write, remove, or manage.
For example, you can start by allowing only read permission. Next, you can create a folder specifically for collaboration and give the appropriate users read and write permissions to the folder. Then, those users with read and write permissions can customize the reusable object by uploading new files and folders, and editing the information.
Edit and delete reusable objects
You're allowed to edit most reusable objects in the Content Collection using the Edit in Blackboard option. For External Links, select Overwrite URL and change the address. The changes you make in the Content Collection to External Links and Assignment reusable objects are reflected wherever they're linked in your courses. Edits you make to Grade Center, Discussion Topic, HTML Object, and Course Content reusable objects won't appear where the links already appear in your courses. The edits you make will be in effect when you add them to your courses in the future.
If you attached a file to a reusable object, you can update the file in the Content Collection with the file's Overwrite function. The new file will appear in the reusable object in your course as long as the file format is the same. For example, if you originally attached a PNG file, you need to overwrite with a new PNG file.

If you delete a reusable object from your course where it's linked, it isn't deleted from the Content Collection. The link to the reusable object in your course is deleted.
If you want to delete a reusable object from the Content Collection and it is linked in your course, a warning message appears alerting you that the deletion will break existing links. You can use the 360° View report to see where the file is linked before you delete it.