This topic provides instructions for setting up SAML authentication on a Blackboard Learn instance with Active Directory Federation Services (ADFS) as the Identity Provider (IdP). Your Blackboard Learn environment acts as the Service Provider (SP). While these steps use ADFS version 3.0 with Windows Server 2012 R2, the steps can also be applied to ADFS 2.0.
Learn Service Provider
- Login to Blackboard Learn as an administrator and navigate to System Admin > Authentication.
- Select Create Provider > SAML.
- Enter the following settings:
- Name > Type ADFS SAML or anything you want.
- Authentication Provider > set as Inactive.
- User Lookup Method > Username
- Restrict by Hostname > Use this provider for any hostnames.
- Link Text > Type ADFS Login or anything you want.
- Select Save and Configure.
- In the Entity ID field, ensure the value is the same as the ACS URL.
- Under Service Provider Metadata, select Generate and save the file to your desktop.
- It is recommended to create a new Data Source for this provider named SAML, otherwise use SYSTEM or whatever you choose.
- Select the Enable JIT Provisioning checkbox to allow the system to automatically create an account when an unknown user attempts to login via this SAML authentication provider. If it is not selected, the user account will first need to be manually created in Blackboard Learn.
- In the Compatible Data Sources list, be sure to select the data sources that this authentication provider should be compatible with.
- Select Point Identity Provider for the Identity Provider Type.
- For the Identity Provider Metadata, the metadata XML file for ADFS includes elements that are incompatible with SAML 2.0. Before the metadata is uploaded, you need to edit it to remove incompatible elements.
- The default metadata location for an ADFS federation is https://[ADFS server hostname]/FederationMetadata/2007-06/FederationMetadata.xml
- Download the file and open it in a text editor. Carefully delete the section starting <ds:Signature xmlns:ds="http://www.w3.org/2000/09/xmldsig#"> ... </X509Data></KeyInfo> and ending </ds:Signature>.
<ds:Signature xmlns:ds="http://www.w3.org/2000/09/xmldsig#">
<ds:SignedInfo>
<ds:CanonicalizationMethod Algorithm="http://www.w3.org/2001/10/xml-exc-c14n#"/>
<ds:SignatureMethod Algorithm="http://www.w3.org/2001/04/xmldsig-more#rsa-sha256"/>
<ds:Reference URI="#_43879f32-9a91-4862-bc87-e98b85b51158">
<ds:Transforms>
<ds:Transform Algorithm="http://www.w3.org/2000/09/xmldsig#enveloped-signature"/>
<ds:Transform Algorithm="http://www.w3.org/2001/10/xml-exc-c14n#"/>
</ds:Transforms>
<ds:DigestMethod Algorithm="http://www.w3.org/2001/04/xmlenc#sha256"/>
<ds:DigestValue>z1H1[SNIP]jaYM=</ds:DigestValue>
</ds:Reference>
</ds:SignedInfo>
<ds:SignatureValue> FVj[SNIP]edrfNKWvsvk5A==
</ds:SignatureValue>
<KeyInfo xmlns="http://www.w3.org/2000/09/xmldsig#">
<X509Data>
<X509Certificate>
FDdd[SNIP]qTNKdk5F/vf1AocDaX
</X509Certificate>
</X509Data>
</KeyInfo>
</ds:Signature> - Upload the updated metadata XML file in Blackboard Learn.
- For the Map SAML Attributes section, use SamAccountName for the Remote User ID.
- Select Submit.
ADFS Identity Provider
- On the ADFS Server, access the ADFS Management Console.
- Navigate to Trust Relationships > Relying Party Trusts > Add Relying Party Trust.
- Select Start on the Add Relying Party Trust Wizard page.
- Select Import Data about the relying party from a file.
- Select Browse and upload the file that was created in Step 6 of the Learn SP section. Select Next.
- Enter a Display name such as yourlearnserver.blackboard.com and select Next.
- Select I do not want to configure multi-factor authentication settings... and select Next.
- Select Permit All Users to Access this Relying Party and select Next.
- Select Next on the Ready to Add Trust step and then select Close on the Finish step.
- After the Relying Party Trust has been created, it should open the Edit Claims Rules if the last checkbox was left checked. Otherwise right-click the Relying Party Trust and select Edit Claims.
Add claim rules for relying party trust
Send attributes as claims
Adding claim rules for the Relying Party Trust sends LDAP attributes as claims from the ADFS server to Blackboard Learn. In the ADFS management console, right-click the Relying Party Trust.
Send username
- On the Issuance Transform Rules tab, select Add Rule.
- On the Select Rule Template page, select Send LDAP Attributes as Claims as the Claim rule template and select Next.
- On the Configure Rule page, in the Claim rule name box, type Transform Username to NameID.
- In the Attribute Store dropdown, select Active Directory.
- In the Mapping box on the left side select SAM-Account-Name or Company.
- In the Mapping box on the right side type SamAccountName and select Finish.
Send first and last name (optional)
If the JIT Provisioning option is selected on the Blackboard Learn SAML Authentication Settings page, meaning user accounts will be created in Blackboard Learn if they don't exist, then the First and Last Name LDAP attributes can also be sent from ADFS to Blackboard Learn by mapping the attributes accordingly.
- On the Issuance Transform Rules tab, select Add Rule.
- On the Select Rule Template page, select Send LDAP Attributes as Claims as the Claim rule template and select Next.
- On the Configure Rule page, in the Claim rule name box, type Send First Name.
- In the Attribute Store dropdown, select Active Directory.
- In the Mapping box on the left side select Given-Name.
- In the Mapping box on the right side type urn:oid:2.5.4.42 and select Finish.
- On the Issuance Transform Rules tab, select Add Rule.
- On the Select Rule Template page, select Send LDAP Attributes as Claims as the Claim rule template and select Next.
- On the Configure Rule page, in the Claim rule name box, type Send Last Name.
- In the Attribute Store dropdown, select Active Directory.
- In the Mapping box on the left side select Surname.
- In the Mapping box on the right side type urn:oid:2.5.4.4 and select Finish.
Transform an incoming claim
- Select Add Rule.
- On the Select Rule Template page, select Transform an Incoming Claim for the Claim rule template and select Next.
- On the Configure Rule page, in the Claim rule name box, type Transform Email to Name ID.
- Incoming claim type should be SamAccountName. It must match the Outgoing Claim Type created in the earlier rule.
- The Outgoing claim type is Name ID.
- The Outgoing name ID format is Email.
- Confirm Pass through all claim values is selected and select Finish.
- Select OK to save the rule and OK again to complete the attribute mappings.
Example attribute statement
After adding all of the previously mentioned claim rules for the Relying Party Trust, the rules appear in the Issuance Transform Rules tab.
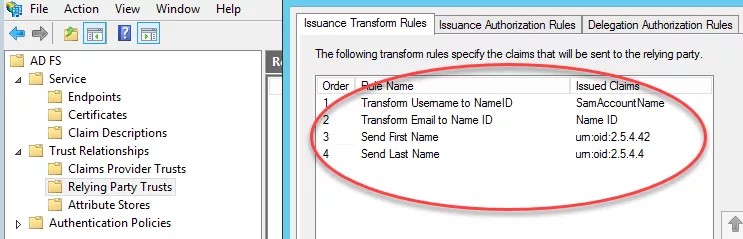
Subject and AttributeStatement elements similar to the following will be sent in the SAML POST from ADFS to Blackboard Learn after the user has been authenticated:
<Subject>
<NameID Format="urn:oasis:names:tc:SAML:1.1:nameid-format:emailAddress">luke.skywalker</NameID>
[SNIP]
</Subject>
<AttributeStatement>
<Attribute Name="SamAccountName">
<AttributeValue>luke.skywalker</AttributeValue>
</Attribute>
<Attribute Name="urn:oid:2.5.4.42">
<AttributeValue>Luke</AttributeValue>
</Attribute>
<Attribute Name="urn:oid:2.5.4.4">
<AttributeValue>Skywalker</AttributeValue>
</Attribute>
</AttributeStatement>
If the attributes from the IdP are not encrypted in the SAML response, the Firefox browser SAML tracer Add-on or Chrome SAML Message Decoder can be used to view the attributes that are being released from the IdP and sent to Blackboard Learn during the authentication process.
Configure ADFS to use SHA-1
In Blackboard Learn 9.1 Q2 2017 and later, this option can be configured in the user interface.
- Navigate to the Admin Panel.
- Under Building Blocks, select Building Blocks.
- Select Installed Tools.
- Locate Authentication Provider - SAML in the list. Open the menu and select Settings.
- Under Signature Algorithm Settings, choose SHA-1 in the list. After you select the Signature Algorithm Type, restart the SAML building block to apply the new settings.
- Select Submit to save your changes.
For Blackboard Learn 9.1 Q4 2016 and earlier, you can adjust the SHA option as follows.
The authentication requests are encrypted between Blackboard Learn and ADFS using the SHA-256 algorithm, which is used by default for MS ADFS as its base encryption.
- In the ADFS management console, right-click the Relying Party Trust.
- Select Properties.
- Select the Advanced Tab.
- Change from SHA-256 (ADFS Default) to SHA-1.
- Select OK.
Important additional ADFS configuration
By default, ADFS encrypts the attributes it sends using AES-256. The Java runtime used by Blackboard Learn doesn't support AES-256 out of the box. A user will not be able to login via SAML authentication and the following SAML related error messages will occur in the logs.
In /usr/local/blackboard/logs/bb-services-log.txt:
2016-10-26 13:16:51 -0400 - unsuccessfulAuthentication - org.springframework.security.authentication.AuthenticationServiceException: Error validating SAML message
at org.springframework.security.saml.SAMLAuthenticationProvider.authenticate(SAMLAuthenticationProvider.java:100)
at org.springframework.security.authentication.ProviderManager.authenticate(ProviderManager.java:167)
at org.springframework.security.saml.SAMLProcessingFilter.attemptAuthentication(SAMLProcessingFilter.java:87)
at org.springframework.security.web.authentication.AbstractAuthenticationProcessingFilter.doFilter(AbstractAuthenticationProcessingFilter.java:217)
at org.springframework.security.web.FilterChainProxy$VirtualFilterChain.doFilter(FilterChainProxy.java:330)
at org.springframework.security.web.FilterChainProxy.doFilterInternal(FilterChainProxy.java:213)
at org.springframework.security.web.FilterChainProxy.doFilter(FilterChainProxy.java:184)
at org.springframework.security.web.FilterChainProxy$VirtualFilterChain.doFilter(FilterChainProxy.java:330)
[SNIP]
at java.util.concurrent.ThreadPoolExecutor$Worker.run(ThreadPoolExecutor.java:617)
at org.apache.tomcat.util.threads.TaskThread$WrappingRunnable.run(TaskThread.java:61)
at java.lang.Thread.run(Thread.java:745)
Caused by: org.opensaml.common.SAMLException: Response doesn't have any valid assertion which would pass subject validation
at org.springframework.security.saml.websso.WebSSOProfileConsumerImpl.processAuthenticationResponse(WebSSOProfileConsumerImpl.java:229)
at org.springframework.security.saml.SAMLAuthenticationProvider.authenticate(SAMLAuthenticationProvider.java:87)
... 229 more
In /usr/local/blackboard/logs/tomcat/catalina-log.txt:
ERROR 2016-10-26 13:16:51,519 connector-38: userId={unset id}, sessionId=85DC3851365512EE96AABFBB8E5A519C org.opensaml.xml.encryption.Decrypter - Error decrypting the encrypted data element
org.apache.xml.security.encryption.XMLEncryptionException: Illegal key size
Original Exception was java.security.InvalidKeyException: Illegal key size
at org.apache.xml.security.encryption.XMLCipher.decryptToByteArray(XMLCipher.java:1822)
at org.opensaml.xml.encryption.Decrypter.decryptDataToDOM(Decrypter.java:596)
at org.opensaml.xml.encryption.Decrypter.decryptUsingResolvedEncryptedKey(Decrypter.java:795)
at org.opensaml.xml.encryption.Decrypter.decryptDataToDOM(Decrypter.java:535)
at org.opensaml.xml.encryption.Decrypter.decryptDataToList(Decrypter.java:453)
at org.opensaml.xml.encryption.Decrypter.decryptData(Decrypter.java:414)
at org.opensaml.saml2.encryption.Decrypter.decryptData(Decrypter.java:141)
at org.opensaml.saml2.encryption.Decrypter.decrypt(Decrypter.java:69)
at org.springframework.security.saml.websso.WebSSOProfileConsumerImpl.processAuthenticationResponse(WebSSOProfileConsumerImpl.java:199)
at org.springframework.security.saml.SAMLAuthenticationProvider.authenticate(SAMLAuthenticationProvider.java:87)
[SNIP]
at java.util.concurrent.ThreadPoolExecutor$Worker.run(ThreadPoolExecutor.java:617)
at org.apache.tomcat.util.threads.TaskThread$WrappingRunnable.run(TaskThread.java:61)
at java.lang.Thread.run(Thread.java:745)
Caused by: java.security.InvalidKeyException: Illegal key size
at javax.crypto.Cipher.checkCryptoPerm(Cipher.java:1039)
at javax.crypto.Cipher.init(Cipher.java:1393)
at javax.crypto.Cipher.init(Cipher.java:1327)
at org.apache.xml.security.encryption.XMLCipher.decryptToByteArray(XMLCipher.java:1820)
... 238 more
Since the Blackboard Learn backend configuration is typically not supported, a universal resolution option is to open a PowerShell on the ADFS server and set the relying party created for Blackboard Learn to send the attributes as unencrypted. As the whole communication is over SSL this will not reduce the security of the authentication. It also makes debugging of any issues easier as the attributes can be seen using debugging tools and a restart of the Blackboard Learn system is not required.
To set the relying party created for Blackboard Learn to send the attributes as unencrypted, open a PowerShell and execute the following command, replacing TargetName with the name given to the relying party created earlier:
set-ADFSRelyingPartyTrust –TargetName "yourlearnsever.blackboard.com" –EncryptClaims $False
After this change the ADFS service will need to be restarted with the command: Restart-Service ADFSSRV
Set SAML authentication provider active
- In Blackboard Learn, navigate to System Admin > Authentication.
- Open the menu next to the SAML authentication provider's name and set it to Active.
The ADFS IdP is then successfully configured as a SAML authentication provider and can be used to login to Blackboard Learn.
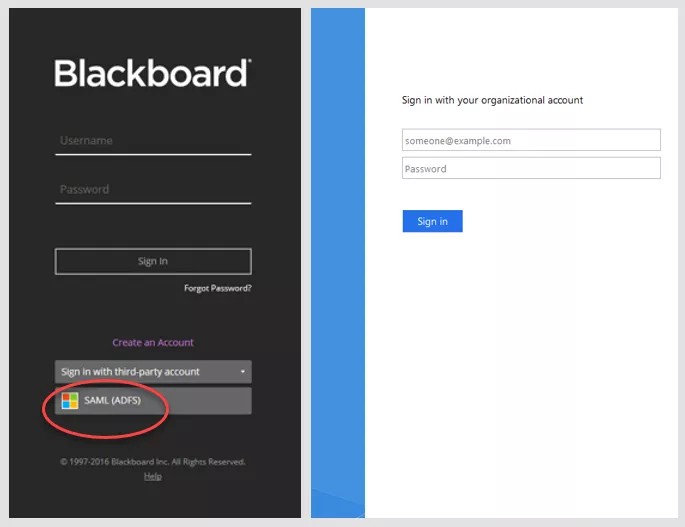
- On the Blackboard Learn login page, select Sign in with third-party account.
- Select the SAML authentication provider.
- Enter the login credentials on the ADFS login page.
Automatic redirect to IdP login page
Since the standard Blackboard Learn login page presents username/password fields for the default Blackboard Learn internal authentication provider and a small Sign in using... link for SAML, when an institution enables SAML authentication, they may request to have users redirected automatically to their IdP's authentication server when they first go to the Blackboard Learn site.
One option to accomplish this in the Blackboard Learn GUI is to navigate to System Admin > Authentication and set the default Blackboard Learn internal authentication to Inactive, which means a login page is no longer displayed, and immediately the user is redirected to the SAML login. The problem with that option is that it over-rides the default login URL and prevents any non-SAML user to login.
A solution to avoid that issue and provide almost the same result is by using a Custom Login Page, so that users are redirected to the SAML authentication provider's IdP login page, but the default login link is also usable.
Use the steps below to create a Custom Login Page so that users are redirected to the SAML authentication provider's IdP login page. The default login link will still be usable if needed.
- Ensure the default Blackboard Learn internal authentication is active.
- Go to the default login page, and copy the location of the provider redirect e.g. Sign in using... SAML (don't open the link, use Copy Link Location).
- In the Blackboard Learn GUI, navigate to System Admin > Communities: Brands and Themes > Customize Login Page.
- Select Download next to the Default Login Page text to download the default login JSP file.
- Open the login JSP file that was downloaded with a text editor.
- Add the following sample HTML to the login JSP file while also replacing the URL text with the URL that was copied in step 2 (in the two places where it shows https://URL_Goes_Here)
<!DOCTYPE HTML PUBLIC "-//W3C//DTD HTML 4.0 Transitional//EN">
<html>
<head>
<title>Blackboard Learn - Redirect</title>
<meta http-equiv="REFRESH" content="0;url=https://URL_Goes_Here"></HEAD>
<BODY style="font-family: arial,sans-serif;font-size: small; color: grey; padding: 1em; ">
Redirecting... <a style="color:grey" href="https://URL_Goes_Here">Go to login page</a> if you are not automatically redirected.
</BODY>
</HTML> - Back on the Customize Login Page in the Blackboard Learn GUI, select Use Custom Login page and then upload the updated login JSP file.
- After making the changes, select Preview on the Customize Login Page to confirm the redirect is working properly.
Users going to the main URL will now be redirected to the login page for the SAML authentication provider. Also, administrators can still login using the Blackboard Learn internal authentication via the default login page: /webapps/login/?action=default_login (aka /webapps/login/login.jsp).