Automatically generate messages based on your data imports!
Since your districts and schools import data from your Student Information System (SIS), attendance system, cafeteria balance systems you can use that information to trigger system messages concerning attendance, bus schedule changes, and low balances.
There are several pre-configured automated messages you can use within your district or school, plus you can create an override message, which is a message edited to your needs.
Set automated messages
You can select which types of automated messages to use at your district or school. These messages will automatically been sent based on the data imported.
- From the Blackboard Communications HQ interface menu, select Messages > Automated Messages.
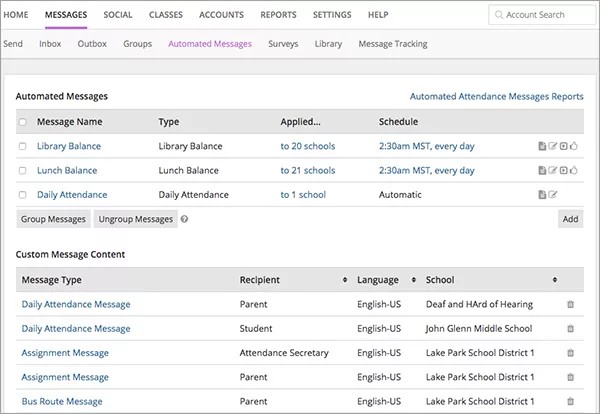
You can also use the Automated Messages page to remove or preview any automated messages.
- Select Add to set an automated message.
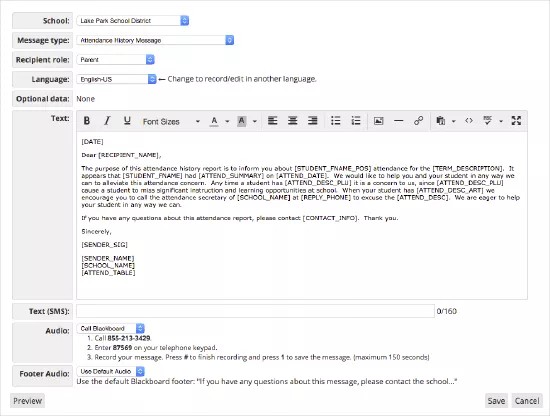
- Select the School sending the message.
- Select one of the Message types to send:
- Assignment Message - Contains the name of the student, the name of the class for the assignment, and the name of the specific assignment.
- Attendance History Message - Contains the attendance history for a student during a particular term. The summary contains the dates of the student's absences and contact information to have any of the absences excused.
- Basic Attendance Message - Contains the attendance for a student that was missing from school and includes the date, student name, and the contact information to set the absence as excused.
- Bus Route Message - Contains any changes to a student's bus route. Includes new pickup and drop-off times.
- Cafeteria Balance Message - Contains the details of a low cafeteria balance and how to make a payment.
- Consecutive Days Attendance Threshold Message - With this message, you can set a specific attendance code and number of days to monitor for when a message is sent. The message contains the details of the specific classes a student missed for the set days in a row.
- Daily Attendance Message - With this message, you can set a specific attendance code and the number of events the student missed for a message to be sent.
- Grades Summary Message - Contains the student's grade and GPA ranking for a specific term.
- Library Balance Message - Contains the student's list of items borrowed from the library and any balance due.
- Missing Assignments Message - Contains the name of the student, the name of the class for the missing assignment, and the name of the specific assignment.
- New Password Message - Contains the login information for the specific person.
- Progress Report Message - Contains the student's progress report for a specific time period.
- Reminder Message - Contains any reminders being sent out to the community.
- Since Date Attendance Threshold Message - With this message, you can set a specific attendance code and the number of events the student missed since a specific date for a message to be sent.
- X Days Attendance Threshold Message - With this message, you can set a specific attendance code and number of days to monitor for when a message is sent. The message contains the details of the specific classes a student missed for all the missed dates.
- Select the Recipient role of the message receiver. The message may change for the specific role.
- Update the Language for the message.
- Type any Optional data needed for the automated message, such as the number of consecutive days absent.
- To override the content of a message, update the Text.
- Update the Text (SMS) message as required. Text messages have a maximum of 160 characters.
- Select the message Audio options:
You can include merge tags for recorded messages.
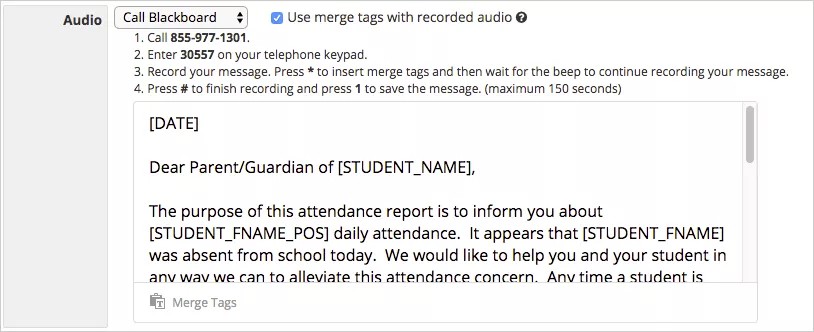
- Call Blackboard - Follow the instructions on the page to call and record your message.
- Upload Audio File - Select Choose File and select the audio file of your message.
- Use Default Audio - Choose to use the default recording by Blackboard.
- Select the Footer Audio options for the end of the message.
- Select Save when finished.
Merge tags with recorded automated messages
You can use merge tags for recorded automated messages. The tag will record the information available in the database for the specific information.
For example, for automatic attendance automated messages, if you want parents to confirm that their specific child is absent, you can record the message, insert a merge tag for the name of the student, and the student's name will be inserted into the generalized recording. Then the message will be sent to all parents of absentee students with the information for their own child.
Merge tags help you to send personalized messages with only one recording.
- From the Audio area, select Call Blackboard.
- Select Use merge tags with recorded audio.
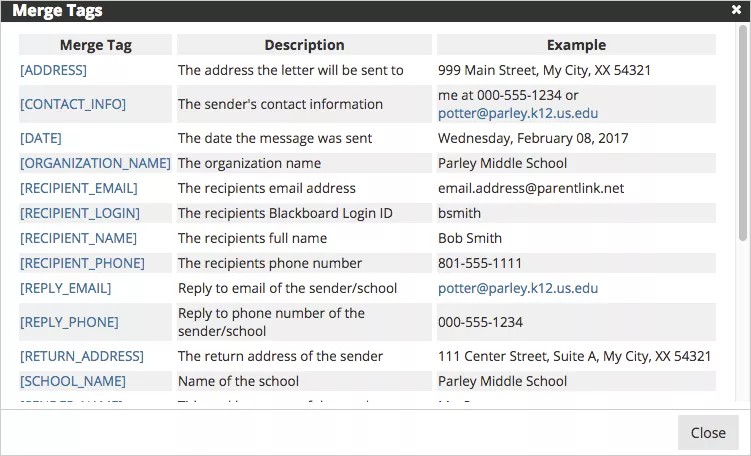
- When typing your script, select your merge tags through the Merge Tags feature. To avoid errors, do NOT copy and paste merge tags into the text.
- Read the script and when you see a merge tag, press the Star (*) button on your phone. Wait for the beep to continue reading your script.
- Press Pound (#) when finished recording, and press 1 to save the message.
Automated attendance messages
For automated attendance messages, you can access more detailed information about message creation and delivery.
- From the Blackboard Communications HQ interface menu, select Messages > Automated Messages.
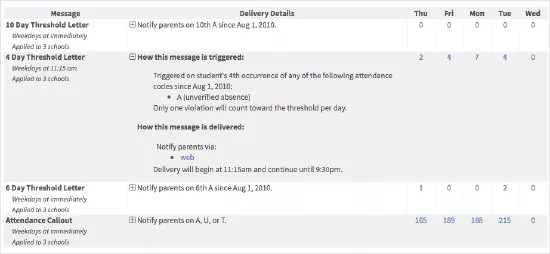
- Select the Automated Attendance Messages link.
- Select Delivery Details for the full information about the attendance messages, including the import file name and time; the name of the message that was sent; how the message was delivered (via phone, email, or text); and a link to view a report that displays which school sent the message.