Copy course function
The other procedures in this topic instruct you to search for the course you want to copy and then open the course's menu to begin.
If you know the exact course IDs of the source and destination courses, you might find it faster to use the copy course function.
- On the Administrator Panel in the Courses section, select Courses.
- On the Courses page, select Copy Course.
- Select the type of copy to perform.
Type the course ID in Source Course ID box.
If you don't know the course ID, select Browse to launch the search window. Select the course and select Submit to use it as the source course.
- Type the course ID in the Destination Course ID box. If this course doesn't already exist, Blackboard Learn creates a new course with the course ID you provide here.
- Select Submit.
Add course materials to an existing course
You can add course materials to an existing course by copying them from another course. This maintains the course materials, user enrollments, and records of the existing course while adding the new course materials.
We don't recommend using the workflow described in this section to copy course materials from Original to Ultra or from Ultra to Ultra. Use the Copy Items option from within the Ultra course. Visit the "Copy Content from Other Courses" topic to learn how to copy with Ultra workflows.
- On the Administrator Panel in the Courses section, select Courses.
- Search for a course.
- Open the course's menu and select Copy.
- In the Select Copy Type drop-down list, select Copy Course Materials into an Existing Course.
- In the Destination Course ID box, provide the course ID of the course you are adding the materials to. If you do not know the course ID, select Browse to launch the search window. Select the course and select Submit to use it as the destination course.
- Select Submit.
- In the Select Course Materials section, select the check box of each type of course materials you want to copy to the destination course. To learn more, see About Course Materials.
In the File Attachments section, select the option to copy links to:
Users can choose to take the entire folder of files or only those files that are actually linked to course content. Your institution determines what options are available when linking to course files for copying courses.
- Copy Links to Course Files: No copies of linked files are included in the copy. The copied course will have the same set of links and those links will point back to the original location of the link defined in the origin course.
- Copy links and copies of the content: This will make copies of linked files, but ONLY those files that are linked. Files within the course's home folder that are not linked to any content within the course are not included in the copy.
Copy links and copies of the content (include entire course home folder): This will make copies of ALL files in the course's home folder whether those files are linked to course content or not.
You need manage permission on an item to include copies of those files. If you do not have this permission, you may be missing some files after the copy.
- If you are including copies of the course files, select Calculate Size to ensure the course package does not exceed the maximum allowed size for copying. To reduce the package size, select Manage Package Contents and select the check box of each file to remove. The package size value updates as you exclude files so you know when the course package meets the size requirements. Select Submit to include the modified package in the copy.
- To add the users of the source course along with the new materials, select Include Enrollments in the Copy. This copies only the users and their course roles. It does not copy user records such as grades or discussion board posts. To copy complete user records, including grades, see Copy a Complete Course, Including Users (Make an Exact Copy).
- Select Submit.
File attachment troubleshooting:
When copying a course, if the value in Course Size Disk Quota is greater than the Maximum Package Size, and not marked as Unlimited, the message: "Course package is over the limit. Allowed package size: x" appears. The x represents the custom value set as the maximum package capacity.
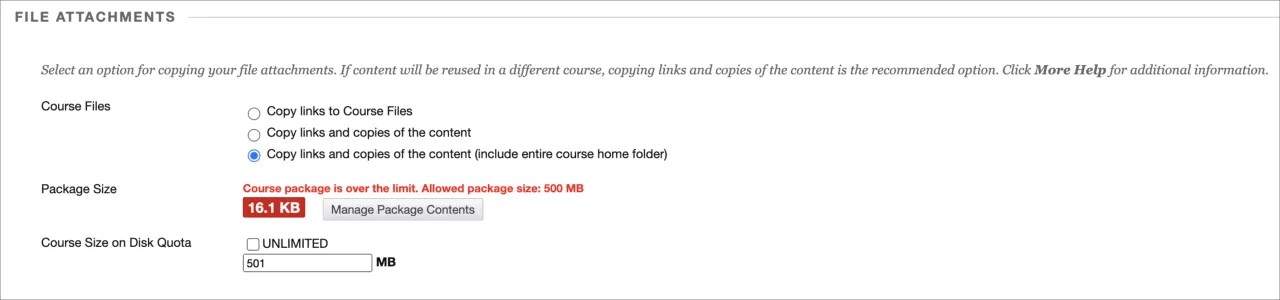
Although, the value highlighted corresponds to the size of the Course Files from the origin course, the system in this case is actually comparing the Course Size Disk Quota to the Maximum Package Size.
To fix this you can:
- Set the Course Size Disk Quota value equal or less than the Maximum Course Package Size value, or
- Increase the Maximum Course Package Size to a value greater or equal than the Course Size Disk Quota you need to set.
Learn more on Individual Course Quotas, and Course Files Package Size.
Move users to another course
You can copy enrollments from one course to another even if you do not copy any course materials.
- On the Administrator Panel in the Courses section, select Courses.
- Search for a course.
- Open the course's menu and select Copy.
- In the Select Copy Type list, select Copy Course Materials into an Existing Course if the destination course already exists or Copy Course Materials into a New Course if you are creating a new course.
- In the Destination Course ID box, provide the course ID of the course you are adding the materials to. If you do not know the course ID for an existing course, select Browse to launch the search dialog. Select the course and select Submit.
- Select Submit.
- In the Select Course Materials section, select the check box of each type of course materials you want to copy to the destination course. If you just want to move enrollments and no materials, leave these check boxes clear. To learn more, see About Course Materials.
- Select Include Enrollments in the Copy. This copies the users and their course roles into the destination course. It does not copy user records such as grades or discussion board posts. To copy complete user records, including grades, see Copy a Complete Course, Including Users (Make an Exact Copy)
- Select Submit.
Create a new course
Copying course materials into a new course creates a course in Blackboard Learn and populates it with content from an existing course. The Original Course View course menu specified in the source course replaces the default course menu in the new course in the Original Course View.
We don't recommend using the workflow described in this section to copy course materials from Original to Ultra or from Ultra to Ultra. Use the Copy Items option from within the Ultra course. Visit the "Copy Content from Other Courses" topic to learn how to copy with Ultra workflows.
To learn about how instructors can copy Original Course View materials into the Ultra Course View, see Copy a course you teach.
- On the Administrator Panel in the Courses section, select Courses.
- Search for a course.
- Open the course's menu and select Copy.
- From the Select Copy Type drop-down list, select Copy Course Materials into a New Course.
- Type the course ID for the new course in the Destination Course ID box. Follow the naming convention for your institution.
- Select Submit.
In the Select Course Materials section, select the check box of each type of course materials you want to copy to the destination course.
Select at least one of the following areas: Content, Contacts, or Settings. If you do not select one of these options, the destination course may not copy correctly.
In the File Attachments section, select the option to copy links to:
Users can choose to take the entire folder of files or only those files that are actually linked to course content. Your institution determines what options are available when linking to course files for copying courses.
- Copy Links to Course Files: No copies of linked files are included in the copy. The copied course will have the same set of links and those links will point back to the original location of the link defined in the origin course.
- Copy links and copies of the content: This will make copies of linked files, but ONLY those files that are linked. Files within the course's home folder that are not linked to any content within the course are not included in the copy.
Copy links and copies of the content (include entire course home folder): This will make copies of ALL files in the course's home folder whether those files are linked to course content or not.
You need manage permission on an item to include copies of those files. If you do not have this permission, you may be missing some files after the copy.
- To copy enrollments for all users in the course, select the Include Enrollments in the Copy check box. This copies only the users and their course roles. It does not copy user records such as grades or discussion board posts. To copy complete user records, including grades, see Copy a Complete Course, Including Users (Make an Exact Copy).
- Select Submit.
Copy a complete course, including users (make an exact copy)
An exact copy creates a new course and includes course materials, user enrollments, and staff assignments. For example, if a course is split into multiple sections to accommodate a large number of students, you can make an exact copy and then adjust the enrollment to create two sections of the same course. Unlike the other copy methods, the exact copy preserves user records such as grades and discussion board posts.
- On the Administrator Panel in the Courses section, select Courses.
- Search for a course.
- Open the course's menu and select Copy.
- From the Select Copy Type drop-down list, select Copy Course with Users (Exact Copy).
- Type the course ID for the new course in the Destination Course ID box. Follow the naming convention for your institution.
In the File Attachments section, select the option to copy links to:
Users can choose to take the entire folder of files or only those files that are actually linked to course content. Your institution determines what options are available when linking to course files for copying courses.
- Copy Links to Course Files: No copies of linked files are included in the copy. The copied course will have the same set of links and those links will point back to the original location of the link defined in the origin course.
- Copy links and copies of the content: This will make copies of linked files, but ONLY those files that are linked. Files within the course's home folder that are not linked to any content within the course are not included in the copy.
Copy links and copies of the content (include entire course home folder): This will make copies of ALL files in the course's home folder whether those files are linked to course content or not.
You need manage permission on an item to include copies of those files. If you do not have this permission, you may be missing some files after the copy.
- If you are including copies of the course files, select Calculate Size to ensure the course package does not exceed the maximum allowed size for copying. To reduce the package size, select Manage Package Contents and select the check box of each file to remove. The package size value updates as you exclude files so you know when the course package meets the size requirements. Select Submit to include the modified package in the copy.
If your institution has access to content management features, you can include Content Collection files in the copy. Select Select Folder and browse to a folder. Blackboard Learn places the files in a sub-folder of the folder you select here.
-OR-
To ignore Content Collection files, select Course Files Default Directory. When you select this option, Blackboard Learn does not process any Content Collection files.
- Select Submit.