This information applies only to the Original Course View. Your institution controls which tools are available.
What are Self and Peer Assessments?
You can use Self and Peer Assessments to facilitate the objective, analytical, and learning comprehension skills of students. Students can review the work of fellow students through criteria-based reference evaluation. They can give and receive constructive feedback that enhances their comprehension of the subject material.
Self and Peer Assessments can help distribute the workload and ensure that students receive feedback from several individuals. Students also benefit from the analytical experience of evaluating submissions against defined criteria.
Assessments are precisely scheduled to allow the proper time for the submission and evaluation process to be completed. You also schedule the time to access any content items associated with an assessment.
You have the option of to use both self and anonymous evaluations. These options may provide a comfort level that can result in more candid tests and evaluations. However, they can also impact the integrity of the assessment process.
You can export these tests, along with their questions and criteria, and then import them for later use.
Question and criteria example
Questions provide structure and content to the assessment. They are simple ("What is 2 plus 2?") or complex ("Describe the main reason for the fall of the Roman Empire.").
The criteria that accompany each question provide the means to evaluate the responses to the questions. The number or criteria can also range from one ("Did the answer = 4?") to many:
- Does the response place the issue within the broader context of the subject?
- Is the response well-organized and clearly laid out?
- Was the response proofread carefully? Was it free of significant grammatical, spelling, or typographical errors?
The assessment timeline
Create and deploy: Before any participant has submitted work, even after the submission start date
Submit: After the submission start date and work has been submitted, and before the submission end date
Complete: After the submission end date, but before the evaluation start date
Evaluate: After the evaluation start date and before the evaluation end date
Results: After the evaluation end date
Specify assessment date ranges
Three date ranges are necessary to the successful creation and deployment of an assessment:
- Display After/Until: The date range when the assessment is available to students
- Submission Start/End: The date range when students can submit answers to an assessment
- Evaluation Start/End: The date range when students can submit evaluations of their peers' work on the assessment as well as their own, if self evaluations are enabled
Create a Self and Peer Assessment
You can create Self and Peer Assessments in content areas, learning modules, lesson plans, and folders.
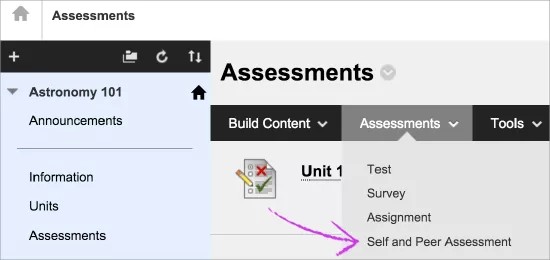
- From the Assessments menu, select Self and Peer Assessment.
- On the Create Self and Peer Assessment page, type a name and instructions.
- Optionally, use Insert File in the editor to add files.
- Set the Submission Start Date and Submission End Date.
- Set the Start Date and End Date for the peer evaluations.
- To Allow Anonymous Evaluations, select Yes.
- To Allow Self Evaluations, select Yes.
- Select Yes for Show Evaluation Results to Submitter to allow submitters to view their own evaluation results.
- For Number of Submissions to Evaluate, define how many tests each student is expected to evaluate. The number doesn't include the creator of the assessment. If self evaluations are the only kind you want, type (0).
- Make the assessment available and optionally, track number of views.
- Select the Display After and Display Until check boxes to enable the date and time selections. Display restrictions don't affect availability, only when it appears.
- Select Submit.
Assessment editing rules
After you create an assessment, you can edit it in a number of ways. However, you can't edit specific items in specific time periods.
These rules are presented to help prevent problems such as setting the dates incorrectly and rendering the assessment unusable. An assessment is unusable when you save it with the Submission End Date in the past or the Submission Start and Submission End dates matching each other. In this case, the only remedy is to export the assessment, import it, fix the dates, and then delete the original assessment. All submissions for the original are lost in this process.
This table defines the rules that govern the modification of assessment elements. These changes are made without system warnings.
| Timeline Period | Can't Edit |
|---|---|
| Create and deploy | You can change any element with no restrictions or warnings. |
|
Submit |
|
|
Complete |
|
|
Evaluate |
|
|
Results |
|
Edit an assessment
- Access an assessment's menu and select Edit.
- On the Edit page, select Assessment Canvas.
- To reorder questions, use the drag-and-drop function or the keyboard accessible reordering tool.
- To reorder a question's criteria, access the question's menu and select Criteria. Reorder the same as in step 3.
Edit assessment properties
- Access an assessment's menu and select Edit.
- On the Edit page, select Properties and make your changes.
- Select Submit.
Self and Peer Assessment questions
Questions are the basic component of any assessment. You must add at least one criterion to each question for students to use when they evaluate responses. Questions provide both the structure and content of the assessment. Questions are simple or complex:
- What year did Queen Elizabeth I die?
- What is the square root of 144?
- Explain why Napoleon's armies were defeated at the battle of Waterloo.
When you create questions, you must add the permanent URLs for Content Collection items. You can add a model response—an example of a correct response to a question. The model response allows evaluators to compare submitted answers to the example. Students who take the assessment don't see the model.
Add a question to an assessment
- Access an assessment's menu and select Edit.
- On the Edit page, select Assessment Canvas.
- On the Assessment Canvas page, select Create Question.
- On the Add Question page, provide the question information and a model response.
- Make the question available.
- Select Submit.
Add a default or previously used question
You can add a default question for a quick way to construct an effective assessment. A default set of questions exists that you can use to build your assessments. You can also find questions you've created in other assessments.
- Access an assessment's menu and select Edit.
- On the Assessment Canvas page, select Search for Question.
- Type search text and select Go. Or, select Go to display a list of all default questions.
- On the Search Results page, some questions may include details. Select a question's Expand icon to view those details.
- Select the check boxes next to the questions to add.
- Select Submit.
Use criteria to evaluate the responses to questions. The number of criteria can also range from one to many:
- Does the response place the issue within the broader context of the subject?
- Is the response well-organized and clearly laid out?
- Was the response proofread carefully? Was it free of significant grammatical, spelling, or typographical errors?
In general, essay questions may require many criteria per question. Shorter questions may require only one or two criteria.
Add criteria to a question
You must add at least one criterion to each question for students to use when they evaluate responses. You must assign a point value for each criterion.
- Access an assessment's menu and select Edit.
- On the Edit page, select Assessment Canvas.
- On the Assessment Canvas page, access a question's menu and select Criteria.
- On the Add/Edit Criteria page, select Create Criteria.
- On the Add Criteria page, type criteria and points possible.
- Select All or Nothing or Partial Credit and optionally, allow feedback.
- Select Submit.
Add word count criteria
If you want to evaluate the length of an answer, you can add a word count criterion to a question. You may specify that an answer should be around 200 words. The word count criterion enables points to be awarded based on the length of an answer. For example, award points if the answer is within 20 words of the 200-word maximum.
- Access an assessment's menu and select Edit.
- On the Edit page, select Assessment Canvas.
- On the Assessment Canvas page, access a question's menu and select Criteria.
- On the Add/Edit Criteria page, select Word Count Criteria.
- On the Add Criteria page, type the Points Possible, the Recommended Word Count, and the Allowed Variation.
- Select Submit.
Add default criteria
You can add default criteria for a quick way to construct an effective assessment. A default set of criteria exists that you can use to build your assessments.
- Access an assessment's menu and select Edit.
- On the Edit page, select Assessment Canvas.
- On the Assessment Canvas page, access a question's menu and select Criteria.
- On the Add/Edit Criteria page, select Search for Criteria.
- Type a keyword and select Go.
- On the Search Results page, some criteria may include details. Select a criterion's Expand icon to view those details.
- Select the check box next to the criteria to add.
- Select Submit.