During a session, you can participate in conversations using VoIP-Voice over Internet Protocol-with a headset or microphone and speakers. If your institution offers teleconferencing services with Blackboard Collaborate, you can use the telephony feature for your in-session communications. To learn more, see Use Your Phone.
Mobile users cannot use a teleconference for audio communications.
While using VoIP, a moderator can allow up to six simultaneous talkers in a session. If a session is connected to a teleconference, teleconference participants are not counted as simultaneous talkers.
Audio & Video Panel
In the interface, audio and video share a panel.
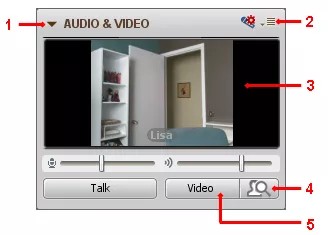
- Expand/Collapse
- Microphone level slider
- Talk function
- Audio Setup Wizard
- Options menu
- Primary video display, with the name of the user speaking
- Speaker level slider
Enable Your Microphone

To enable your microphone, click Talk. A microphone icon appears, and participants can hear you. Click Talk again to disable your microphone.
You may not be able to use the Talk function. It may appear grayed out for the following reasons:
- A moderator can remove your audio permission.
- The maximum number of simultaneous talkers has been reached.
- You are using the teleconferencing feature for audio communications.
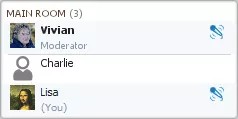
When you enable the microphone, the audio activity indicator appears next to your name in the participants list.
In the example, Vivian and Lisa enabled their microphones.
In the primary video display, you may see the video transmission or the profile picture of the speaker. The speaker's name also appears. To learn more about video settings, see Video.
Microphone and Speaker Levels
In the Audio & Video panel, the microphone level slider shows the volume level when you speak. The speaker level slider shows the volume level when another user speaks.
If all talkers set their microphones properly, listeners do not need to adjust their speakers for changes in volume. Before a session, run the Audio Setup Wizard to set proper microphone and speaker levels. To learn more, see Configure Your Session.
To increase or decrease the microphone or speaker volume during a session, press the slider and drag it right or left.

Activity, Permissions, and Status Indicators
In the participants list, you can monitor the state of audio activity, permissions, and status through indicators described in the following table.
| Activity Indicator | Description |
|---|---|
|
|
User enabled the microphone. |
|
|
User is experiencing a delay in receiving audio. |
| All users have the audio permission. However, the moderator revoked this user's audio permission. | |
|
|
User has the audio permission, but the moderator did not grant it to all users. |
|
|
User is running the Audio Setup Wizard. |
|
|
User is connected to the telephone conference. |
|
|
User is connected to the telephone conference, but has no audio permission. Therefore, the teleconference is muted. |
|
|
User is using telephony mode for audio communications and using the phone for audio. |
|
|
User is using telephony mode for audio communications and using the phone for audio, but the teleconference is muted. |
Microphone Settings
When you configure preferences, Blackboard Collaborate remembers your settings for all sessions you join on the same computer.
How to Set Microphone Preferences
Use the steps for your operating system.
Windows and Mac OS X 10.6 and Later
- Open the Preferences window:
- From the Edit menu, click Preferences (Windows).
- From the Blackboard Collaborate menu, click Preferences (Mac OS X).
- In the left panel of the Preferences window, click Microphone Settings in the Audio/Video section. In the main frame, the available audio input line options vary depending on your sound card.

- Choose your microphone device from the input devices listed in the box.
- Select the options: <<updates to these options should be made in following section as well>>
- Use System Default Device: (Mac only) Select if you want to use your system's default input device. Each time you change the system default, the microphone used by Blackboard Collaborate changes.
- Cancel echo between microphone and speakers: Select when others report an echo from your audio transmission. Echoes occur when the sound from your speakers is picked up by your microphone. By default, this option is enabled.
- Adjust microphone volume automatically (up and down): Select to allow the automatic increase or decrease of the microphone level when the volume is too low or too high. By default, this option is enabled.
- Transmit all sound, even when it appears to be silence: By default, this option is disabled.
- Microphone Sample Rate: Select a sample rate from the drop-down list. This may be necessary if your microphone is shared with other applications.
Mac OS X 10.5 and Earlier
- Open the Preferences window:
- From the Blackboard Collaborate menu, click Preferences (Mac OS X).
- In the left panel of the Preferences window, click Microphone Settings in the Audio/Video section. In the main frame, the available audio input line options vary depending on your sound card.

- Choose your microphone device from the input devices listed in the box.
- Select the options:
- Use System Default Device: (Mac only) Select if you want to use your system's default input device. Each time you change the system default, the microphone used by Blackboard Collaborate changes.
- Amplify quiet sounds from microphone dynamically: Select to allow the automatic increase of the microphone level when the volume is too low. By default, this option is enabled.
- Adjust volume automatically to limit distortion: Select to allow the automatic decrease of the microphone level when the volume is too high. By default, this option is enabled.
- To optimize the Adjust volume automatically to limit distortion control, select the type of microphone you are using.
The first time you access the microphone settings, it may appear that Microphone used by a single person is the default. This is true if you selected Single Talker in the Audio Setup Wizard, as the setting is inherited.
- Microphone used by a single person: Select if you are using a headset or a microphone just for yourself.
- Microphone used by multiple people: Select if you are using a single microphone for multiple talkers. This is the default.
- Transmit all sounds, even when it appears to be silence: By default, this option is disabled.
- Microphone Sample Rate: Select a sample rate from the drop-down list. This may be necessary if your microphone is shared with other applications.
Speaker Settings
When you configure preferences, Blackboard Collaborate remembers your settings for all sessions you join on the same computer.
How to Set Speaker Preferences
The speaker settings vary depending on your operating system.
- Open the Preferences window:
- From the Edit menu, click Preferences (Windows).
- From the Blackboard Collaborate menu, click Preferences (Mac OS X).
- In the left panel of the Preferences window, click Speaker Settings in the Audio/Video section.
- Windows only: Choose your speaker device from the output devices listed in the box. The available audio output device options vary depending on your sound card.

- Mac only: Blackboard Collaborate uses your system's default output device. To change it, click the speaker button to open your System Preferences Sound Output window and choose your new device.

- Select the options:
- Mute speakers when "Talk" pressed to prevent feedback: Select to mute the speakers when you press Talk. By default, this option is disabled.
- Speaker Sample Rate: Select a sample rate from the drop-down list. This may be necessary if your speakers are shared with other applications.
For optimal performance, Mac users should set the speaker sample rate to 8000 Hz.