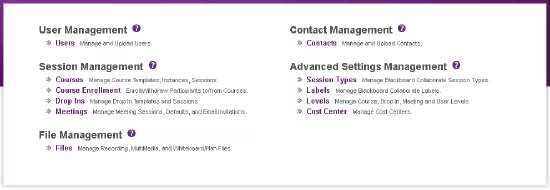
This page is the cornerstone of the SAS. It gives you access to the primary utilities where you will be doing most of your work in the SAS. On this page, the utilities are organized into functional groups. Each utility is comprised of a series of windows that enable you to accomplish specific tasks within the utility - these windows are called panels.
The items available on this screen depend on your role.
The utilities to which you have access (and how they are grouped on this page) will depend on your user role. Your user role also determines which default functions you are able to perform within utilities.
Within each utility is a set of default functions each user role can perform. A Manager or Administrator can override the defaults and change a user's access to functions.
User Management utility (M A S)
Anyone who wants to use the SAS requires a user account. Elluminate Inc. creates the first user account for you - the Manager account. Using the User Management Utility, the Manager must create at least one Administrator account for your organization. Administrators can create all further accounts (Supervisors, Moderators and Participants).
| Task | Manager | Administrator | Supervisor |
|---|---|---|---|
|
Create and manage Administrator accounts |

|
||
|
Create and manage Supervisor accounts |
|
|
|
|
Create and manage Moderator accounts |
|
|
|
|
Create and manage Participant accounts |
|
|
|
You can perform the following tasks in the User Management Utility:
- Sort/filter list of existing users
- Add new users (one at a time or by uploading several at a time from a file)
- Edit user profile information
- Grant or restrict user privileges
- Delete users
Course Management utility (M A)
The Course Management Utility enables the Manager and Administrators to create and manage Courses, enroll Participants in Courses and assign Course chairs.
You can perform the following tasks in the Course Management Utility:
- Sort/filter list of Course Administrators (M only)
- View list of all Courses (templates) associated with a particular Administrator
- Set default options for all Courses associated with an Administrator
- Create, manage and delete Courses (templates, instances and sessions)
- Upload data from files to create Courses (templates, instances and sessions)
- Customize notification email templates
- Set Course instance options
- Enroll registered Participants in Course instances and notify them by email
- Assign chair(s) (e.g., instructor) to Course instances
- Set Course session options, including options for recording Course sessions
- Preload multimedia, session plan or whiteboard files into Course sessions
- Review details about past Course sessions
- Join a Course session in progress
Course Enrollment utility (A S)
The Course Enrollment Utility enables Administrators and Supervisors to enroll Participants in Courses and withdraw them from Courses.
To perform user enrollment functions, the Manager must use the Course Management Utility.
You can perform the following tasks in the Course Enrollment Utility:
- Sort/filter list of Courses
- Enroll registered Participants in Courses instances and notify them by email
- Withdraw registered Participants from Courses instances and notify them by email
- See a log of notification emails that have been sent to a Course Participant
To assign chairs to Courses, Administrators must use the Course Management Utility.
Drop-In Management utility (M A)
The Drop-In Management Utility enables the Manager and Administrators to create and manage Drop-Ins and assign Drop-In chairs.
You can perform the following tasks in the Drop-In Management Utility:
- Sort/filter list of Drop-In Administrators (M only)
- Create list of passwords available for Drop-Ins (M only)
- View list of all Drop-Ins (templates) associated with a particular Administrator
- Set default options for all Drop-Ins associated with an Administrator
- Create, manage and delete Drop-Ins (templates and sessions)
- Upload data from files to create Drop-Ins (templates and sessions)
- Customize notification email templates
- Add or remove Drop-In passwords
- Assign chair(s) to Drop-In instances and notify them by email
- Set Drop-In session options, including options for recording Drop-In sessions
- Specify multimedia, session plan or whiteboard preloads for Drop-In sessions
- Review details about past Drop-Ins
- Join a Drop-In in progress
Meeting Management utility (M A S)
The Meeting Management Utility enables the Manager, Administrators and Supervisors to create and manage Meetings and invite users as chairs or non-chairs.
You can perform the following tasks in the Meeting Management Utility:
- Sort/filter list of Meeting Administrators or Supervisors (€M only)
- View list of all Meetings associated with a particular Administrator or Supervisors
- Set default options for all Meetings associated with an Administrator or Supervisor
- Create, manage and delete Meetings
- Customize invitation email templates
- Invite registered Participants to Meeting (as either Attendee or chair) via email invitation
- Invite Contacts to Meeting via email invitation
- Set Meeting session options, including options for recording Meeting sessions
- Preload multimedia, session plan or whiteboard files into Meeting sessions
- Review details about past Meetings
- Join a Meeting in progress
File Management utility (M A S)
The File Management Utility enables Manager, Administrators and Supervisors to manage the storage of recording, multimedia, session plan and whiteboard files.
On a large system like the SAS, where the number of active users is substantial, disk space must be managed carefully to ensure that all users have equitable access to disk storage. This is done by assigning a disk quota to each customer. The File Management Utility helps you manage your disk usage and remain within your assigned disk quota. Whiteboard, session plan, multimedia and recording files that are stored in the SAS probably take up most of your used disk quota. You may want to periodically delete some of these files to manage your disk quota.
You can perform the following tasks in the File Management Utility:
- View disk usage information (quotas and actual usage) for entire organization or by Administrator (M only) and Supervisor (M A only)
- Upload whiteboard, session plan and multimedia files
- Add whiteboard, session plan and multimedia files to sessions
- Remove whiteboard, session plan and multimedia preloads from sessions
- See how many times a recording, whiteboard file, session plan or multimedia file has been accessed by users
- Delete recording, whiteboard, session plan and multimedia files to free up disk space
Contact Management utility (M A S)
The Contact Management Utility allows the Manager, Administrators and Supervisors to manage Contact Lists. Contact Lists are used to send email invitations to users, informing them of new sessions.
You can perform the following tasks in the Contact Management Utility:
- Sort/filter list of Administrators and Supervisors who "own" contacts (M only)
- Sort/filter list of contacts
- Create new and edit exiting contacts
- Upload external contact lists
- Delete contacts
Session Types utility (M A S)
The Session Types Utility allows the Manager to create Session Types and Administrators and Supervisors to assign them to sessions.
Beyond Courses, Meetings and Drop-Ins, the SAS does not distinguish between types of sessions. (The default Session Type in the SAS is "None".) If you would like to make further distinctions between your sessions, you can create Session Types. For instance, for Courses you might want to distinguish between lectures, labs and tutorials. You can create these customized types using the Session Types utility. Then, when you create a new Course, Drop-In or Meeting, you can select one of your customized Session Types from a drop-down list.
Session Types can be assigned to Course instances, Drop-In templates and Meeting sessions.
The Session Type field appears in the schedule as well as in the invitation and notification emails sent to those you have invited to or enrolled in your session.
You can perform the following tasks in the Session Types Utility:
- Sort/filter list of Session Types
- Assign Session Types to Courses, Drop-Ins, Meetings and session Rooms
- Create new and edit exiting new Session Types (M only)
- Delete Session Types (M only)
Labels utility (M A S)
The Labels Utility allows the Manager to create Labels, and Administrators and Supervisors to assign them to sessions. (Use of Labels is optional.)
Labels are the names used for certain elements within the Blackboard Collaborate client interface. The default set of Labels uses the terms Session, Moderator, Participant and Breakout Room.
In the example below, note the words "Moderator", "Participant" and "Breakout Room" in the drop-down menu.
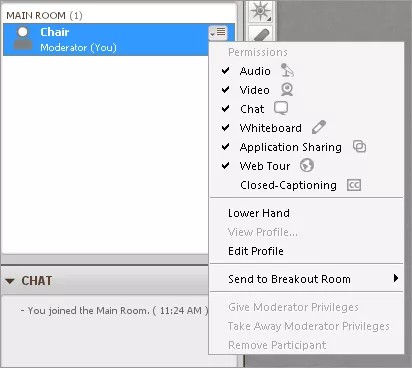
The term "Moderator" is used differently in Blackboard Collaborate sessions than it is in the SAS. In a Blackboard Collaborate session, a Moderator is someone with chair privileges. In the SAS, the Moderator is a distinct user role with certain inherent privileges, which may or may not include the chair privilege.
Your Manager may customize the Blackboard Collaborate Labels in the SAS - either by making changes to the default set of Labels or by creating new Label sets. Then, when you create a new Course, Drop-In or Meeting, you can select the customized Label set from a drop-down list. The customized Labels will appear in various menus and dialog boxes of the Blackboard Collaborate interface when a session is launched.
For example, you may want to create a customized set of Labels specifically for a college or university Course:
- instead of "Moderator" use the term "Professor";
- instead of "Participant" use the term "Student";
- instead of "Session" use the term "Lecture"; and
- instead of "Breakout Room" use the term "Tutorial Room".
You can perform the following tasks in the Labels Utility:
- Sort/filter list of Label sets
- Assign Label sets to Courses, Drop-Ins, Meetings and session Rooms
- Create new and edit exiting Label sets (M only)
- Delete Label sets (M only)
Levels utility (M A S)
The Levels Utility allows the Manager to create user Levels, and Administrators and Supervisors to assign them to sessions. (Use of Levels is optional.)
You can limit access to a Course, Drop-In or Meeting by creating user Levels in the SAS (e.g., Staff, Management and Senior Executive; Junior, Sophomore and Senior; etc.). You then assign Levels to your users and, when creating the session(s), specify what range of user Levels is eligible to attend.
A Level consists of a
- Level Type, which is a textual representation (name) of the Level; and a
- Level Weight, which is a numeric representation of the Level.
Level Weights must be whole numbers between 1 and 1000, where the highest number corresponds to the highest level, such as in the following example:
|
Level Type |
Level Weight |
|---|---|
|
Beginner |
1 |
|
Intermediate |
2 |
|
Advanced |
3 |
For a Course, Drop-In or Meeting, the Level Range consists of a minimum level and a maximum level. Keeping with the example above, you may decide that only Intermediate or Advanced users can attend your training Course. Therefore, when creating the Course, you must select a minimum level of Intermediate and a maximum level of Advanced. Or, if you want only Intermediate users to attend, you would set both the minimum level and maximum level to Intermediate. When you proceed to enroll or invite users to your new Course, Drop-In or Meeting, only those users who fall within the specified Level Range will appear in the list of eligible users.
You can perform the following tasks in the Level Utility:
- Sort/filter list of Levels Types
- Assign Levels Types to users
- Set a range of Level Types (minimum and maximum) for Courses, Drop-Ins, Meetings and session Rooms
- Create new Level Types (M only)
- Delete Level Types (M only)
The default level
A Default Level in the SAS is "None" with a Level Weight of 0. If the default is specified for a session (minimum Level 0 and maximum Level 0), access it granted to all users, regardless of their assigned Levels.
The Default Level Weight cannot be deleted, nor can you change its Level Weight. You can, however, change the Level Type (name) from "None" to something appropriate to your institutions' needs.
Cost Center utility (M A S)
The Cost Center Utility allows the Manager to create and manage Cost Centers, and Administrators and Supervisors to assign them to sessions. (Use of Cost Centers is optional.)
Cost Centers are like accounts against which you can track attendance at Blackboard Collaborate sessions in your organization. For example, if you want to track Blackboard Collaborate usage by department or faculty, you should set up a Cost Center for each department or faculty. Similarly, if you want to track the use of Blackboard Collaborate associated with a particular client project, you should set up a Cost Center for that client. When scheduling your new sessions, you simply select the appropriate Cost Center from a drop-down list.
Cost Center information is displayed in various reports. You can track the number of sessions, attendees and minutes associated with each Cost Center.
The default Cost Center in the SAS is called "None".
You can perform the following tasks in the Cost Center Utility:
- Sort/filter list of Cost Centers
- Create new Cost Center (M only)
- Assign Cost Center to Courses, Drop-Ins, Meetings and session Rooms
- Delete Cost Center (M only)
Recordings utility (Mod. & P)
The Recordings Utility is used by Moderators and Participants to list and play recordings of past sessions. They can list and play only those recordings to which they have access.
From the list of recorded sessions, they can click on a link to view details about the recording or click on a link to play a recording.
Moderators and Participants can perform the following tasks in the Recordings Utility:
- Set criteria for which recordings they want to view
- View their list of available recordings
- Play recorded sessions