This information applies only to the Ultra Course View.
Building a curriculum? No need to start from scratch.
Creating content for your courses takes time and thoughtful planning. If you teach multiple courses that use similar content, you may want to copy content items and folders between courses to save time. In the Ultra Course View, you can copy content from other courses you teach so you don't have to start with a blank slate.
You can copy entire courses and/or select individual items from other courses you’re currently teaching or have taught in the past. You can also combine items from multiple courses with a full course copy or individual item copies by selecting the checkboxes.
This information also applies to organizations.
Read more about:
- Copying an entire course
- Copying individual course items
- Copying content from an Original course to an Ultra course (video)
- Copying content from Original courses to Ultra courses
Looking for how to migrate courses from Canvas, Brightspace, or Moodle instead?
Copying an entire course
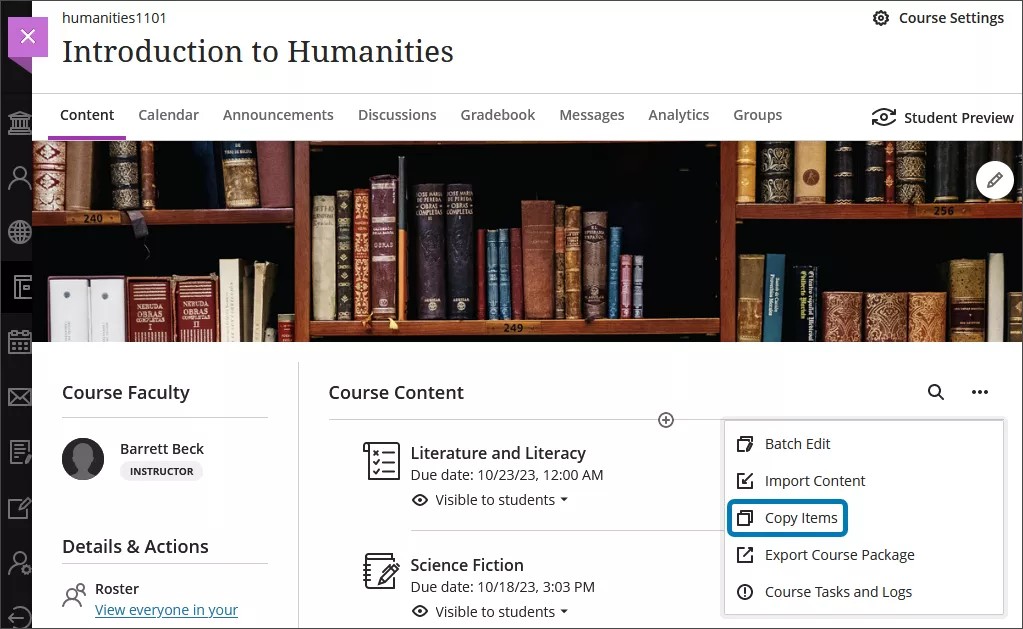
On the Course Content page, select the three dot menu next to the search option on the Course Content page. Select Copy Items from the dropdown menu.
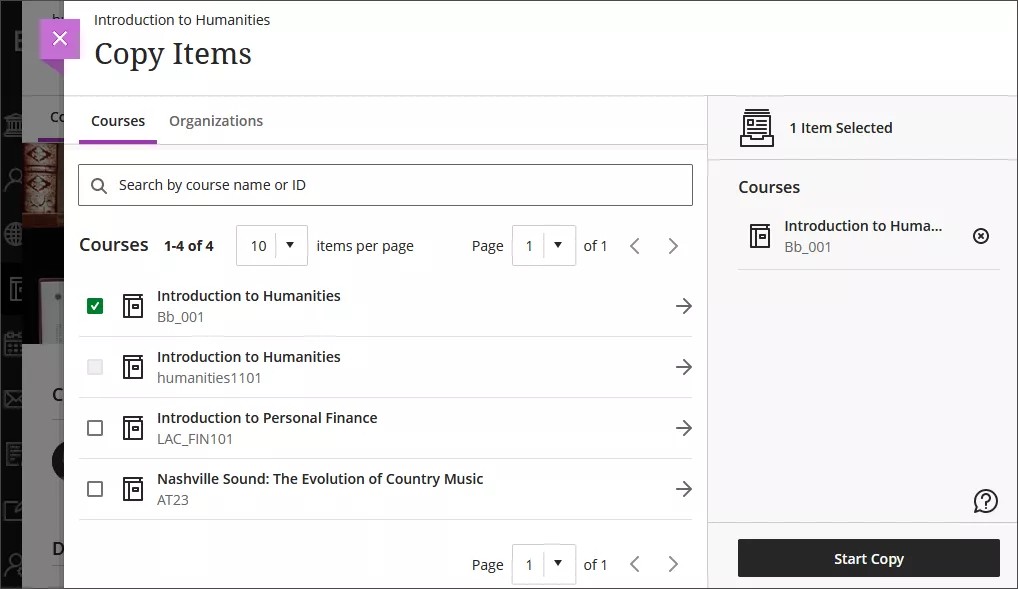
A list of your courses appears. If the course you’re looking for isn’t on the first page, use the arrows to navigate or use the search bar. You can also search for Organizations by selecting the Organizations tab.
Select a checkbox next to the name of the course to do a full course copy.
You can’t do a full course copy from the course you’re currently working in. Make sure you have navigated out of the course you wish to do a full course copy for before copying.
When you perform a full course copy, all settings are preserved (including due dates, visibility states, and release conditions). However, course links inside of learning modules with forced sequencing can’t be copied. This prevents users from navigating outside of the forced sequencing option. When a course link is copied, all associated content is also copied.
Select Start Copy.
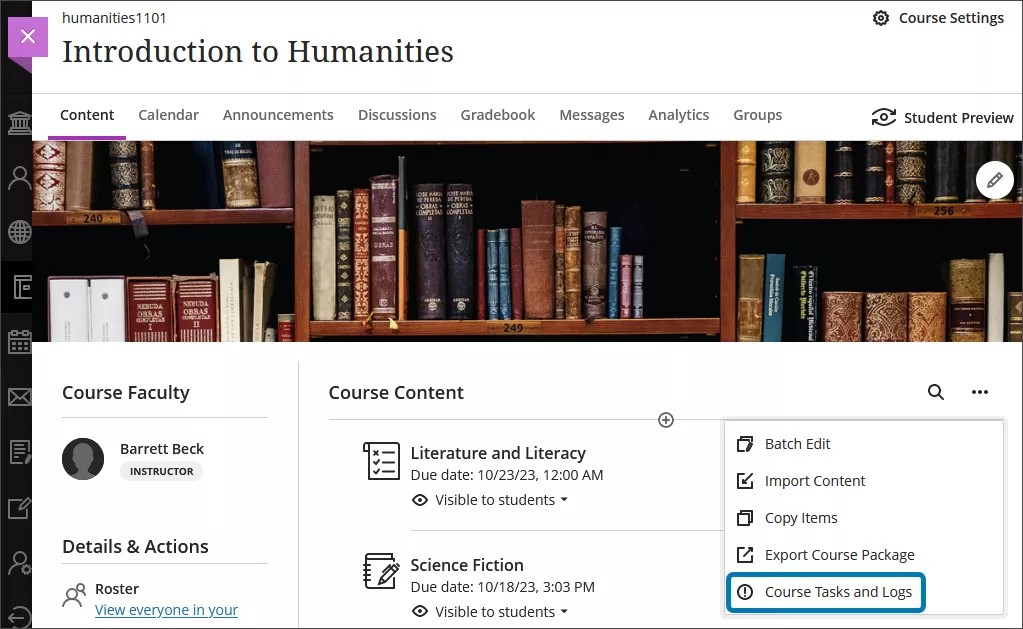
Copies are a queued process. The spinner that displays at the bottom of the Course Content page is a validation check. You don’t need to stay on the Course Content page for the copy to be processed. If you want to check if a copy has been completed, go to the More options menu from the Course Content page and select Course Tasks and Logs.
Watch a video about Copy content in Blackboard Learn
The following narrated video provides a visual and auditory representation of some of the information included on this page. For a detailed description of what is portrayed in the video, open the video on YouTube, navigate to More actions, and select Open transcript.
Video: Copy content in Blackboard Learn
Copying individual course items
On the Course Content page, select the three dot menu next to the search option on the Course Content page. Select Copy Items from the dropdown menu.
A list of your courses appears. If the course you’re looking for isn’t on the first page, use the arrows to navigate or use the search bar. You can also search for Organizations by selecting the Organizations tab.
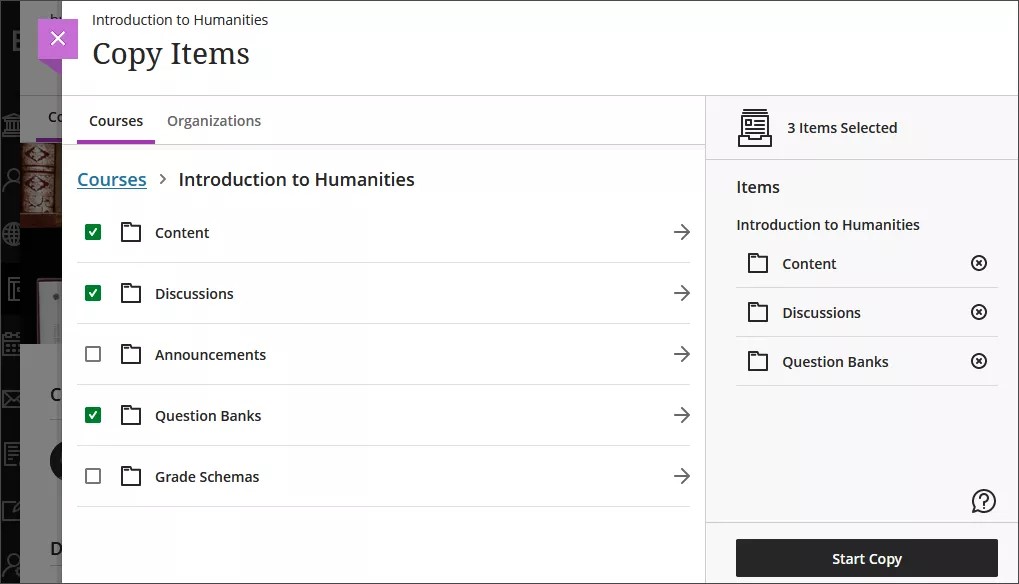
Select the arrow beside the name of a course to see its available items to copy. The following categories are available:
- Content: Items that are listed on the Content tab for that course.
- Discussions: Items that are listed on the Discussions tab for that Course.
- Question Banks: All available Question Banks for that course.
- Rubrics: All available Rubrics for that course.
- Grade Schemes: All available Grade Schemes for that course.
Even if you select all checkboxes, this is still an individual item copy. Copying individual items doesn’t preserve release conditions and visibility states. If you want to preserve those settings, go back to the list of courses and select the checkbox beside the name of the course, and then Start Copy to do a full course copy.
Select a category to view available items for copy. Then, select the checkboxes for items you would like to copy. Content is automatically set to Hidden from students if you copy individual items into your course.
Review all copied items to be sure students can see only the content that you want to show and that due dates are correct. You can use the Batch Edit feature to update visibility and due dates all at once. Visit the "Batch Edit" for more information about this feature.
Course links inside of learning modules with forced sequencing can’t be copied. This prevents users from navigating outside of the forced sequencing option. When a course link is copied, all associated content is also copied. LTI items also can’t be copied through individual course item copy. If you want to copy an LTI item, use full course copy instead.
Select Start Copy.
Copies are a queued process. The spinner that displays at the bottom of the Course Content page is a validation check. You do not need to stay on the Course Content page for the copy to be processed. If you want to check if a copy has been completed, go to the More options menu from the Course Content page and select Course Tasks and Logs.
Copying from the Original Course View
A list of your courses appears. If the course you’re looking for isn’t on the first page, use the arrows to navigate or use the search bar. You can also search for Organizations by selecting the Organizations tab. See “Copying an entire course” or “Copying individual course items” above for more information about how to do a full course copy or individual course item copy.
The Copy Content option isn't available for courses in Ultra preview mode. You can only copy content from other courses in the Ultra Course View. If you want to copy a course in Ultra preview mode, roll the conversion back to Original View or finalize the conversion to Ultra View.
Participation data isn't included when you copy a course into a new or existing course.
The table below outlines how content types are converted from Original Course View into Ultra Course View. Items labeled N/A, for Not Available, are not converted. These items can’t be selected for copying or will be flagged as exceptions.
| ORIGINAL COURSE VIEW CONTENT TYPE | CONVERTS INTO | FULL COURSE COPY | INDIVIDUAL ITEM COPY |
|---|---|---|---|
| Course Banner | Course Image | YES | NO |
| Course Menu Content Area | Folder | YES | YES |
| Course Menu Blank Page | Document | YES | YES |
| Course Menu Module Page | N/A | N/A | N/A |
| Course Menu Tool Link | N/A | N/A | N/A |
| Course Menu Course Link | N/A | N/A | N/A |
| Course Menu Subhead | N/A | N/A | N/A |
| Course Menu Divider | N/A | N/A | N/A |
| Item | Document | YES | YES |
| File | File | YES | YES |
| Audio | File | YES | YES |
| Image | File | YES | YES |
| Video | File | YES | YES |
| Web Link | Web Link | YES | YES |
| Learning Module | Learning Module | YES | YES |
| Lesson Plan | Folder | YES | YES |
| Syllabus | N/A | N/A | N/A |
| Content Package (SCORM) | SCORM package | YES | YES |
| Content Folder | Folder | YES | YES |
| Blank Page | Document | YES | YES |
| Flickr Mashup | Web Link | YES | YES |
| Test | Test | YES | YES |
| Question Pool | Question Bank | YES | YES |
| Survey | Form | YES | YES |
| Assignment | Assignment | YES | YES |
| Self and Peer Review | N/A | N/A | N/A |
| Blog | N/A | N/A | N/A |
| Journal | Journal | YES | YES |
| Wikis | N/A | N/A | N/A |
| Discussion Forum with "allow members to create new threads" selected. | Discussion | YES | NO |
| Discussion Forum with "allow members to create new threads" not selected. | Folder | YES | NO |
| Discussion Threads within a Forum with "allow members to create new threads" not selected. | Discussion | YES | NO |
| Announcements | Announcements | YES | YES |
| Goals | Goals | YES | NO |
| Rubrics | Rubrics | YES | YES |
| Categories | Categories | YES | NO |
| Grading Schemas | Grading Schemas | YES | YES |
Issues and exceptions copying content
If the system encounters problems with a content copy, an error report appears at the top of the Course Content page. Select View Exceptions to learn more about why the content failed to copy. Most exceptions are not significant and won't require any adjustment from you. On the Exceptions Report panel, view exceptions by category. Select a category to see a list of items that weren’t copied and a brief explanation. For some exceptions, you may need to manually create this item in your new course. For example, Surveys and Wikis aren't converted from Original to Ultra. For Surveys, you may want to replace them with Google or Microsoft Forms. For Wikis, you may want to use a Microsoft or Google Integration for Collaboration use cases.
Content nesting and flattening logic in Ultra
Content nesting refers to how content items can be contained within other content items on the Course Content page. By default, courses in Ultra Course View support up to three levels of hierarchy on the Course Content page. For example, a folder within a folder is two levels. A folder within a folder within a learning module is an example of three levels. This is different from the Original Course View, which had no restrictions on the number of levels that could be used. This change simplifies course structures to enhance student experience. Your institution can choose to add an additional level of content nesting. Ask your Ultra administrator whether your institution uses this option. View the "Convert Courses to Ultra - Bulk Conversion" topic to learn more about the conversion process.
The flattening process refers to how items can move when copied, imported, or converted into Ultra courses. The process moves items with a depth greater than two to the lowest supported level in Ultra courses.

For institutions that have opted in to a third level of depth, items with a depth greater than three move to the lowest supported level.
This can cause challenges when converting a course from the Original Course View to the Ultra Course View. Content at deeper levels gets moved to the lowest level supported in Ultra Course View. Folders are brought to the highest level necessary to ensure that child items don't move.